1. Важные инструкции по технике безопасности
Please read all instructions before using this sewing machine. This machine is intended for household use only.
DANGER - To reduce the risk of electric shock:
- Никогда не оставляйте включенный в сеть прибор без присмотра.
- Всегда отключайте прибор от электрической розетки сразу после использования и перед чисткой.
- Всегда отключайте перед повторным включениемampинж. Замените лампу на лампочку того же типа мощностью 15 Вт (для региона 110–120 В) или 15 Вт (для региона 220–240 В).
ВНИМАНИЕ! Для снижения риска ожогов, возгорания, поражения электрическим током или травм:
- Не позволяйте использовать в качестве игрушки. Особое внимание необходимо, когда этот прибор используется детьми или рядом с ними.
- Используйте этот прибор только по назначению, как описано в данном руководстве. Используйте только насадки, рекомендованные производителем и содержащиеся в данном руководстве.
- Никогда не используйте этот прибор, если у него поврежден шнур или вилка, если он не работает должным образом, если его уронили, повредили или уронили в воду. Верните прибор ближайшему авторизованному дилеру или в сервисный центр для осмотра, ремонта, электрической или механической регулировки.
- Никогда не используйте прибор с заблокированными вентиляционными отверстиями. Следите за тем, чтобы в вентиляционных отверстиях швейной машины и педали не скапливались ворсинки, пыль и рыхлая ткань.
- Держите пальцы подальше от всех движущихся частей. Особый уход требует иглы швейной машины.
- Всегда используйте правильную игольную пластину. Неправильная пластина может привести к поломке иглы.
- Не используйте гнутые иглы.
- Не тяните и не толкайте ткань во время шитья. Это может отклонить иглу и привести к ее поломке.
- Always unplug sewing machine off ("O") when making any adjustments in the needle area, such as threading needle, changing needle, threading bobbin, or changing presser foot, and the like.
- Всегда отключайте швейную машину от электрической розетки при снятии крышек, смазке или при выполнении любых других настроек обслуживания пользователем, упомянутых в руководстве по эксплуатации.
- Никогда не роняйте и не вставляйте никакие предметы в отверстия.
- Не использовать на открытом воздухе.
- Не работайте там, где используются аэрозольные распылители или где вводится кислород.
- Для отключения поверните все регуляторы в положение «выкл» («O»), затем выньте вилку из розетки.
- Не вынимайте вилку из розетки, дергая за шнур. Чтобы вынуть вилку из розетки, держитесь за вилку, а не за шнур.
- Уровень звукового давления при нормальных условиях эксплуатации составляет 75 дБ(А).
- Always turn off the machine or unplug when the machine is not operating properly.
- Никогда ничего не кладите на педаль.
- If the supply cord to the foot controller is damaged, it must be replaced by the manufacturer or its service agent or a similar qualified person in order to avoid a hazard.
- Данный прибор не предназначен для использования лицами (включая детей) с ограниченными физическими, сенсорными или умственными способностями или с недостатком опыта и знаний, если они не находятся под присмотром или не получили инструкции по использованию прибора от лица, ответственного за их безопасность.
- Необходимо следить за детьми, чтобы они не играли с прибором.
СОХРАНИТЕ ЭТИ ИНСТРУКЦИИ
Image: Important Safety Instructions page from the Singer 2250 manual, detailing electrical and general safety warnings.
2. Настройка
2.1 Аксессуары
The Singer 2250 sewing machine comes with a set of standard accessories and supports various optional accessories for different sewing tasks.
- Стандартные аксессуары: All purpose foot, Button sewing foot, Zipper foot, Screwdriver, Seam ripper/brush, Pack of needles, Bobbin (3), Darning plate, Spool holder.
- Optional Accessories (not supplied with machine, available from SINGER® retailers): Edge/quilting guide, Zipper foot, Straight stitch foot, Overcasting foot, Hemmer foot, Blind hem foot, Satin stitch foot, Cording/embroidery foot, Second spool pin, Spool pin felt.
2.2 Намотка бобины
- Place thread and corresponding spool holder onto the spool pin.
- Snap the thread into the thread guide.
- Wind the thread counterclockwise around the bobbin winder tension disc.
- Thread the bobbin as illustrated and place it on the spindle.
- Push the bobbin spindle to the right.
- Hold the thread end.
- Step on the foot control pedal to begin winding.
- Cut the thread once the bobbin is full.
- Push the bobbin spindle to the left and remove the wound bobbin.
Пожалуйста, обрати внимание: When the bobbin winder spindle is in the "bobbin winding" position, the machine will not sew and the hand wheel will not turn. To start sewing, push the bobbin winder spindle to the left (sewing position).

Image: Manual page illustrating standard and optional accessories, and a step-by-step guide for winding the bobbin.
2.3 Подключение к источнику питания
Ensure the machine's power switch is in the "O" (off) position. Insert the machine plug into the electrical outlet. Always use a grounded outlet.
2.4 Raising the Presser Foot Lifter
The presser foot lifter is located at the back of the needle bar area. Lift it to raise the presser foot for placing fabric, and lower it to hold the fabric in place for sewing.
3. Операция
3.1 Choosing Your Pattern
The Singer 2250 features a Pattern Selector Dial to choose various stitch patterns.
- Stitches indicated in black on the diagram correspond to the Pattern Selector Dial.
- For patterns indicated with the "S" color, turn the Pattern Selector Dial to "S", then use the Stitch Length Dial to adjust the desired stitch length.
- The Pattern Selector Dial can be turned in either direction.
3.2 Stitch Length Dial
The Stitch Length Dial controls the length of straight stitches and the density of zig-zag stitches.
- For Straight Stitching: Turn the Pattern Selector Dial to the straight stitch symbol. The stitch length increases as the dial approaches "4". Use longer stitches for heavier fabrics and thicker needles, shorter stitches for lighter fabrics and finer needles.
- For Zig-Zag Stitching: Turn the Pattern Selector Dial to "~~~ ". The density of zig-zag stitches increases as the setting of the stitch length dial approaches "0". Dense zig-zag stitches are known as satin stitches.

Image: Manual page detailing how to choose stitch patterns and adjust stitch length for various sewing applications.
3.3 Заправка машины нитками
Proper threading is crucial for smooth sewing. Follow these general steps:
- Наденьте катушку с нитками на штифт для катушки.
- Пропустите нить через верхние нитеводители.
- Пропустите нить через натяжные диски.
- Протяните нить через рычаг натяжения.
- Guide the thread down through the needle bar thread guide.
- Проденьте нить в иглу спереди назад.
- Raise the bobbin thread by turning the handwheel towards you, catching the bobbin thread with the needle thread.
- Pull both threads under the presser foot and towards the back.
3.4 Sewing on Buttons
To sew buttons using your Singer 2250:
- Установите штопальную пластину.
- Change the all-purpose foot to the button sewing tool.
- Position the fabric and button under the foot.
- Lower the button to the desired position and lower the foot.
- Set the Pattern Selector Dial on "---" and sew a few securing stitches.
- Select one of the two narrow zig-zag patterns (between 0.5 and 1.5) and sew through both holes of the button. Turn the handwheel to check needle clearance.
- Slowly sew the button with about 10 stitches.
- Select pattern "---" again and sew a few securing stitches.
- If a shank is required, place a darning needle on top of the button and sew.
- For buttons with 4 holes, sew through the front two holes first, then sew backwards and then sew through the back two holes.
3.5 Installing the Removable Extension Table
The removable extension table provides a larger work surface and also serves as an accessory box.
- Для установки: Hold the removable extension table horizontally and push it in the direction of the arrow until it clicks into place.
- Чтобы удалить: Pull the extension table towards the left.
- The inside of the removable extension table can be used as an accessory box. To open, flip the cover down.
4. Техническое обслуживание
4.1 Darning Plate
The darning plate is used for specific tasks like darning or free-hand embroidery.
- Установка: Install the darning plate as illustrated in the manual.
- Удаление: Для обычного шитья снимите штопальную пластину.
- For free-motion sewing, a darning/embroidery foot (optional accessory) is recommended.
4.2 Inserting & Changing Needles
Regularly change your needle, especially if sewing problems occur. Use SINGER® Brand Needles for best results.
- Turn the power switch to off ("O").
- Ослабьте иглу cl.amp винт.
- Insert the new needle with the flat side of the shaft facing the back, pushing it up as far as it will go.
- Затяните иглу cl.amp винт.
Внимание: Needles must be in perfect condition. Problems can occur with bent needles, damaged points, or blunt needles.
4.3 Changing the Bulb
To change the light bulb, ensure the machine is unplugged. Replace the bulb with the same type rated 15 watts (110-120V area) or 15 watts (220-240V area).
4.4 Очистка
Regularly clean the lint and dust from the bobbin case area and feed dogs using the provided brush. Ensure the machine is unplugged before cleaning.
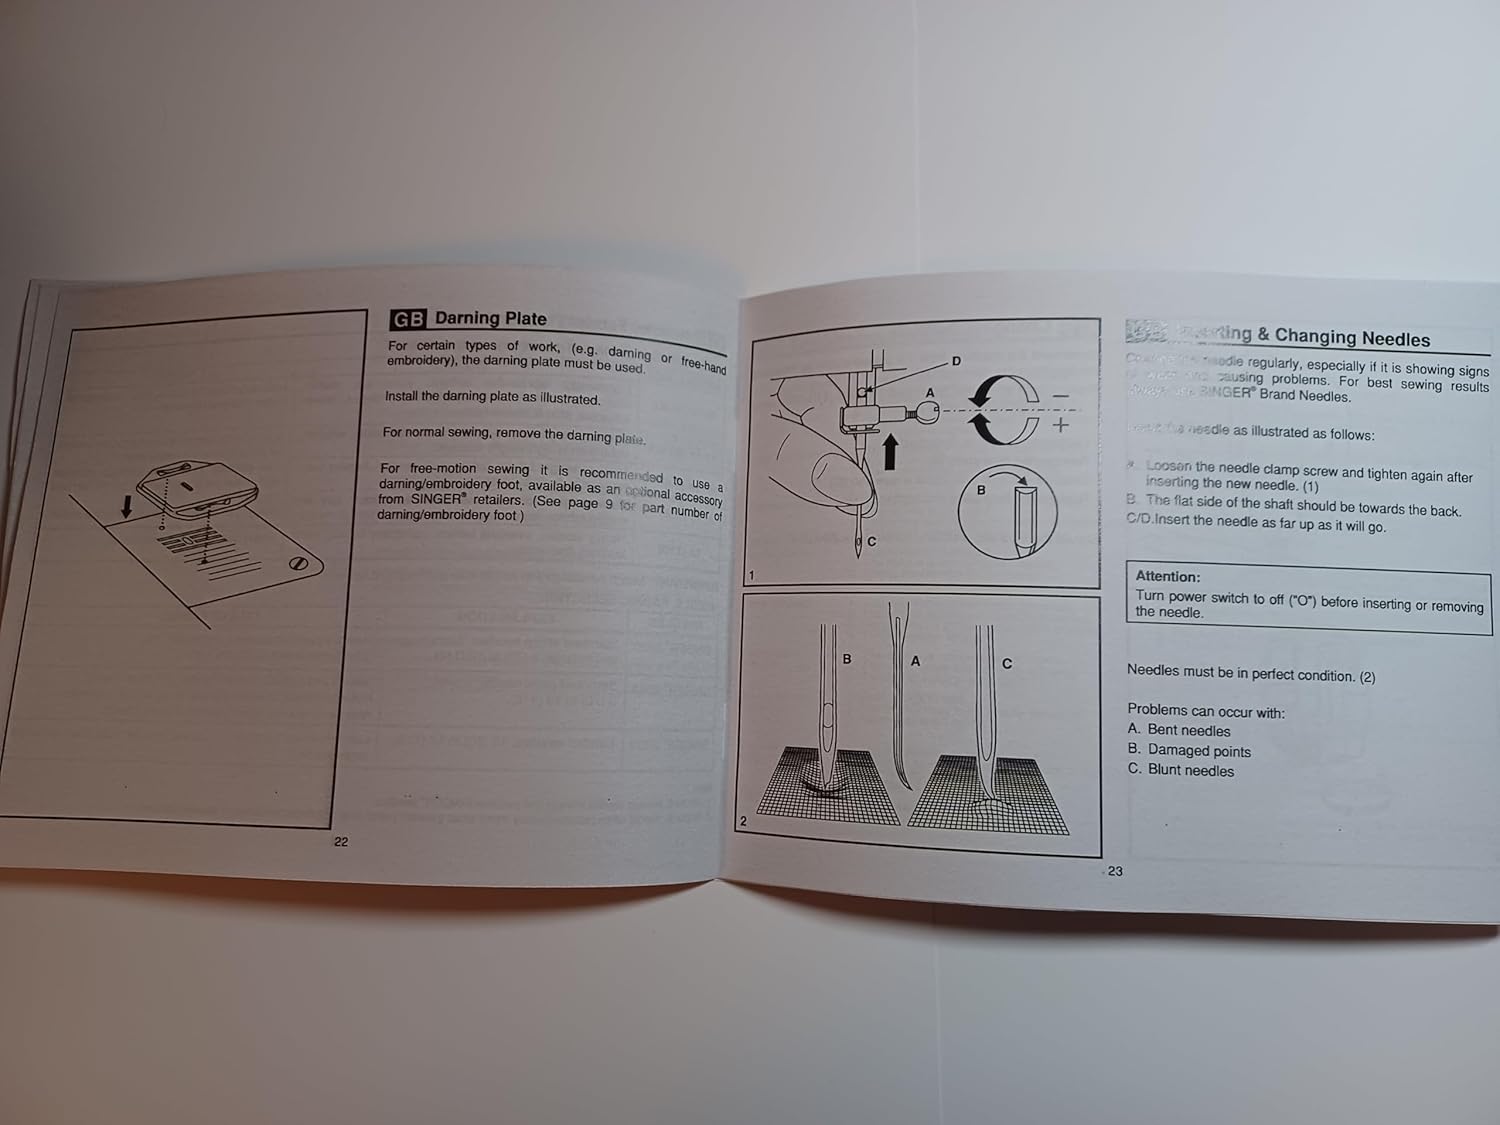
Image: Manual page illustrating procedures for sewing on buttons, installing the extension table, using the darning plate, and changing needles.
5. Поиск Неисправностей
If you encounter issues with your Singer 2250, refer to the following common problems and solutions:
- Пропущенные стежки: Ensure the needle is inserted correctly, not bent, and is the appropriate size for the fabric and thread. Re-thread the machine.
- Разрыв темы: Check for correct threading, proper tension, a bent or blunt needle, or burrs on the needle plate or bobbin case.
- Сминание ткани: Adjust tension settings, use the correct needle size, or ensure the presser foot pressure is appropriate for the fabric.
- Машина не подает ткань: Check if the feed dogs are raised. Ensure the presser foot is lowered.
- Шумная работа: Clean and lubricate the machine as per maintenance instructions. Check for loose parts or a bent needle.
For persistent problems, contact an authorized Singer service center.
6. Технические характеристики
| Размеры продукта | 8.5 x 5.5 x 0.1 дюйма |
| Вес товара | 3 унции |
| Номер модели | SINGER 2250 Manual |
| Производитель | TabSynth Design (for reproduction manual) |
| ASIN | B0G19M5M63 |
7. Гарантия и поддержка
This instruction manual is a reproduction for the Singer 2250 Sewing Machine. For warranty information regarding your Singer 2250 sewing machine, please refer to the original documentation provided with your machine or contact Singer customer support directly.
For support related to the operation or maintenance of your Singer 2250, please consult this manual. If further assistance is needed, contact an authorized Singer service center or your local Singer dealer.


