1. Важные инструкции по технике безопасности
При использовании электроприборов всегда следует соблюдать основные меры предосторожности, чтобы снизить риск возникновения пожара, поражения электрическим током и/или травмирования людей, включая следующее:
- Прочитайте все инструкции.
- Не прикасайтесь к горячим поверхностям. Используйте ручки или ручки.
- Во избежание пожара, поражения электрическим током и травм не погружайте шнур, вилки или прибор в воду или другую жидкость.
- Необходимо обеспечить строгий надзор, если какой-либо прибор используется детьми или рядом с ними.
- Отключайте от розетки, когда не пользуетесь и перед чисткой. Дайте остыть перед тем, как устанавливать или снимать детали, а также перед чисткой прибора.
- Не используйте прибор с поврежденным шнуром или вилкой, а также после того, как прибор вышел из строя или был поврежден каким-либо образом. Верните прибор в ближайший авторизованный сервисный центр для проверки, ремонта или регулировки.
- Использование дополнительных принадлежностей, не рекомендованных производителем прибора, может привести к пожару, поражению электрическим током или травмам.
- Не использовать на открытом воздухе.
- Не допускайте свисания шнура с края стола или стойки, а также его соприкосновения с горячими поверхностями.
- Не ставьте на горячую газовую или электрическую плиту или рядом с ней, а также в разогретую духовку.
- Всегда сначала вставляйте вилку в прибор, а затем вставляйте шнур в розетку. Чтобы отключить прибор, поверните любой переключатель в положение «выкл.», а затем выньте вилку из розетки.
- Не используйте прибор не по назначению.
- Если снять крышку во время заваривания, можно получить ожоги.
- Графин предназначен для использования только с этим прибором. Его никогда нельзя использовать на приставке.
- Не ставьте горячий графин на холодную или мокрую поверхность.
- Не используйте графин с трещинами или с ослабленной или разболтанной ручкой.
- Не очищайте графин моющими средствами, подушечками из стальной ваты или другим абразивным материалом.
2. Компоненты продукта
The Gevi 10-Cup Grind & Brew Coffee Maker includes the following components:
- 1 x Drip Coffee Maker (Main Unit)
- 1 x Glass Coffee Pot (Carafe)
- 1 мерная ложка
- 1 x Permanent Filter
- 1 x Filter Ring
- 1 x Removable Filter Holder
- 1 х Руководство пользователя

Figure 2.1: Included components of the Gevi 10-Cup Grind & Brew Coffee Maker.
3. Настройка
3.1 Первоначальная очистка
Before first use, wash all removable parts (glass carafe, scoop, permanent filter, filter ring, removable filter holder, and water tank) in warm, soapy water. Rinse thoroughly and dry. Wipe the exterior of the coffee maker with a soft, damp ткань.
3.2 Сборка
- Install the Filter Holder: Open the swing-out filter basket. Place the removable filter holder into its designated slot.
- Insert Permanent Filter: Place the permanent filter into the removable filter holder.
- Add Filter Ring: Place the filter ring on top of the permanent filter.
- Позиция Графин: Поставьте пустой стеклянный графин на подогреваемую подставку.
- Заполните резервуар для воды: Open the water tank lid. Fill the removable water tank with clean, room-temperature water up to the desired cup mark (e.g., MAX 10). Ensure the water level matches the amount of coffee you intend to brew.
- Close Water Tank: Плотно закройте крышку резервуара для воды.

Figure 3.1: Removable and visible water tank.

Figure 3.2: Adding water to the tank.
Video 3.1: Step-by-step guide on how to set up the Gevi 10-Cup Grind & Brew Coffee Maker.
4. Инструкция по эксплуатации
4.1 Приготовление кофе из цельных зерен
- Подготовьте машину: Ensure the filter holder, permanent filter, filter ring, and carafe are correctly in place, and the water tank is filled to the desired level.
- Добавить кофейные зерна: Open the bean hopper lid and add whole coffee beans using the provided scoop. Close the bean hopper lid.
- Adjust Grind Level: Rotate the grind regulator on the bean hopper to select your preferred grind size (finer or coarser).
- Включение питания: Plug in the coffee maker and press the ВКЛ/ВЫКЛ кнопку, чтобы включить его.
- Выберите размер чашки: Нажмите ГРИНД ЧАШКА button to select the desired number of cups (4-10).
- Choose Brewing Style: Нажмите РЕЦЕПТЫ button to cycle through the available brewing styles: CLASSIC, INTENSE, RICH, or ICE.
- Начать заваривать: Нажмите ВКЛ/ВЫКЛ button again to start the grinding and brewing process. The machine will automatically grind the beans and then brew the coffee.
- Функция поддержания тепла: After brewing, the warming plate will automatically keep the coffee hot for up to 4 hours (60-240 minutes, adjustable via touchscreen).

Figure 4.1: Adding whole beans or ground coffee.
Video 4.1: Instructions on how to make coffee using whole beans with the Gevi 10-Cup Grind & Brew Coffee Maker.
Video 4.2: Guide to setting the powder amount and strength for brewing.
4.2 Приготовление кофе из молотого кофе
- Подготовьте машину: Ensure the filter holder, permanent filter, filter ring, and carafe are correctly in place, and the water tank is filled to the desired level.
- Добавить молотый кофе: Add your desired amount of pre-ground coffee into the permanent filter.
- Disable Grinding: Нажмите ВЫКЛЮЧИТЬ button to ensure the grinder does not activate.
- Включение питания: Plug in the coffee maker and press the ВКЛ/ВЫКЛ кнопку, чтобы включить его.
- Выберите размер чашки: Нажмите ГРИНД ЧАШКА button to select the desired number of cups (4-10).
- Choose Brewing Style: Нажмите РЕЦЕПТЫ button to cycle through the available brewing styles: CLASSIC, INTENSE, RICH, or ICE.
- Начать заваривать: Нажмите ВКЛ/ВЫКЛ button again to start the brewing process.
- Функция поддержания тепла: After brewing, the warming plate will automatically keep the coffee hot for up to 4 hours (60-240 minutes, adjustable via touchscreen).
Video 4.3: Instructions on how to make coffee using pre-ground coffee with the Gevi 10-Cup Grind & Brew Coffee Maker.
4.3 Programmable Brewing (Delay Brew)
The coffee maker features a 24-hour programmable timer, allowing you to set a delay brew for fresh coffee at a specific time.
- Установить текущее время: With the machine plugged in and powered on, use the ЧАС и МИН кнопки для установки текущего времени.
- Подготовка к завариванию: Follow steps 1-6 from either "Making Coffee with Whole Beans" or "Making Coffee with Ground Coffee" sections.
- Установить время задержки: Нажмите ЗАДЕРЖКА ПРИГОТОВЛЕНИЯ button. The display will show "PM" or "AM" and the time will flash. Use the ЧАС и МИН кнопки для установки желаемого времени начала приготовления кофе.
- Activate Delay Brew: Нажмите ЗАДЕРЖКА ПРИГОТОВЛЕНИЯ button again to confirm. The delay brew indicator will light up, and the machine will start brewing at the set time.

Figure 4.2: Setting the 24-hour programmable timer for delay brew.
Video 4.4: Guide on how to set the delay brew function.
Video 4.5: Instructions for scheduling brewing time on the Gevi coffee maker.
5. Техническое обслуживание
5.1 Ежедневная уборка
- Отключить: Всегда отключайте кофеварку от сети перед чисткой.
- Очистка графина: Wash the glass carafe, permanent filter, filter ring, and removable filter holder in warm, soapy water. Rinse thoroughly and dry. These parts are not dishwasher safe.
- Протрите внешнюю поверхность: Wipe the exterior surfaces of the coffee maker, including the warming plate, with a soft, damp ткань. Не используйте абразивные чистящие средства или губки для мытья посуды.
5.2 Удаление накипи
Mineral deposits (limescale) can build up in your coffee maker over time, affecting performance and coffee taste. Descale your machine regularly (e.g., every 2-3 months, or more often if you have hard water).
- Приготовьте раствор для удаления накипи: Fill the water tank with a mixture of white vinegar and water (e.g., 1:2 ratio) or a commercial descaling solution according to product instructions.
- Начать цикл очистки: Выберите ЧИСТЫЙ mode on the touchscreen. Press the ВКЛ/ВЫКЛ button to start the cleaning process. The machine will run a cycle to flush the internal water lines.
- Циклы полоскания: After the descaling cycle is complete, empty the carafe. Fill the water tank with fresh, clean water and run 2-3 full brewing cycles (without coffee) to rinse out any remaining descaling solution.
Video 5.1: Detailed instructions on how to descale the Gevi 10-Cup Drip Coffee Maker.
5.3 Cleaning the Bean Hopper
The bean hopper is removable for easy cleaning. Regularly remove any residual coffee beans or grounds to prevent clogging and maintain optimal grinding performance.
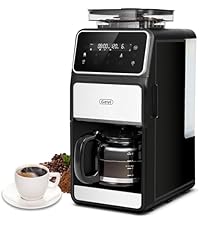
Figure 5.2: Removable bean hopper for easy cleaning.
6. Поиск Неисправностей
| Проблема | Возможная причина | Решение |
|---|---|---|
| Кофе не заваривается. | No water in tank; machine not plugged in; delay brew set. | Fill water tank; ensure power connection; check delay brew settings. |
| Слабый кофе. | Insufficient coffee grounds; coarse grind setting; incorrect brewing style. | Add more coffee; select finer grind; choose a stronger brewing style (e.g., Intense, Rich). |
| Измельчитель не работает. | Bean hopper empty; grind off selected; bean hopper not locked. | Fill bean hopper; ensure GRIND OFF is not selected; ensure bean hopper is locked in place. |
| Кофе переливается. | Too much water; filter basket clogged. | Do not overfill water tank; clean filter basket and ensure proper placement. |
| Сенсорный экран не отвечает. | Временный сбой программного обеспечения; проблема с питанием. | Unplug the machine for 30 seconds, then plug back in. If issue persists, contact customer support. |
7. Технические характеристики
- Бренд: Геви
- Название модели: Drip Coffee Machine (DCMF0-BK0A1)
- Цвет: Черный
- Размеры продукта: 10.7"Д x 7.9"Ш x 17.8"В
- Вес товара: 4.7 фунта
- Тип кофеварки: Капельная кофемашина
- Режим работы: Полностью автоматический
- Томtage: 120 Вольт
- Тип подачи кофе: Цельные бобы
- Можно ли мыть в посудомоечной машине: No (for most components)
- Особая особенность: Programmable, Built-in Burr Grinder, Touch Screen, 4-Hour Keep Warm

Figure 7.1: Product dimensions of the Gevi 10-Cup Grind & Brew Coffee Maker.
8. Гарантия и поддержка
Every Gevi product (purchased through official or authorized channels) includes a 12-month warranty and lifetime technical support.
If you encounter any problems when using your Gevi coffee machine, please feel free to contact us for assistance.
- Гарантийный срок: 12 месяцев
- Поддерживать: Пожизненная техническая поддержка


