1. Введение
The Montech AX120 PRO is a high-performance 120mm cooling fan designed for efficient thermal management in computer systems. This 3-pack includes fans with a glowing ARGB rim and illuminated fan blades, providing both cooling capability and visual effects. The fans feature a precision-engineered 9-blade design for optimal airflow and static pressure, along with integrated anti-vibration pads for reduced noise. A durable rifle bearing ensures smooth operation and an extended lifespan. This manual provides instructions for installation, operation, maintenance, and troubleshooting.

Изображение 1.1: оконченоview of MONTECH AX120 PRO ARGB Fans and their features.
2. Что в коробке
Перед началом установки убедитесь, что все компоненты присутствуют:
- 3 x MONTECH AX120 PRO ARGB PWM 120mm Fans
- 1 x ARGB Fan Hub
- Крепежные винты

Image 2.1: Packaging and contents of the AX120 PRO 3-pack.
3. Настройка и установка
Follow these steps to properly install your MONTECH AX120 PRO fans:
- Подготовьте свою систему: Убедитесь, что ваш компьютер выключен и отсоединен от розетки. Откройте корпус компьютера, чтобы получить доступ к местам крепления вентилятора.
- Установите вентиляторы: Position each AX120 PRO fan in your desired location (e.g., front intake, rear exhaust, top exhaust). Use the included mounting screws to secure the fans to the case. Ensure the fan's airflow direction is correct for your cooling strategy. The AX series fans typically blow air from the RGB end to the non-RGB end.
- Подключитесь к Fan Hub: Connect the 4-pin PWM cable from each fan to an available 4-pin fan header on the included ARGB Fan Hub.
- Подключение кабелей ARGB: Connect the 3-pin ARGB cable from each fan to an available 3-pin ARGB header on the fan hub. Ensure correct orientation to avoid damage.
- Connect Fan Hub to Motherboard:
- Connect the 4-pin PWM cable from the fan hub to a 4-pin PWM fan header on your motherboard (e.g., CPU_FAN, SYS_FAN). This allows for fan speed control.
- Connect the 3-pin ARGB cable from the fan hub to a 3-pin 5V ARGB header on your motherboard. This enables software control of the fan lighting. Не подключайте к 4-контактному 12-вольтовому RGB-разъему, так как это повредит светодиоды.
- Connect Fan Hub Power: Connect the SATA power connector from your power supply unit (PSU) to the ARGB Fan Hub. This provides power to both the fans and the ARGB lighting.
- Управление кабелями: Route all cables neatly to ensure proper airflow within the case and a clean aesthetic.
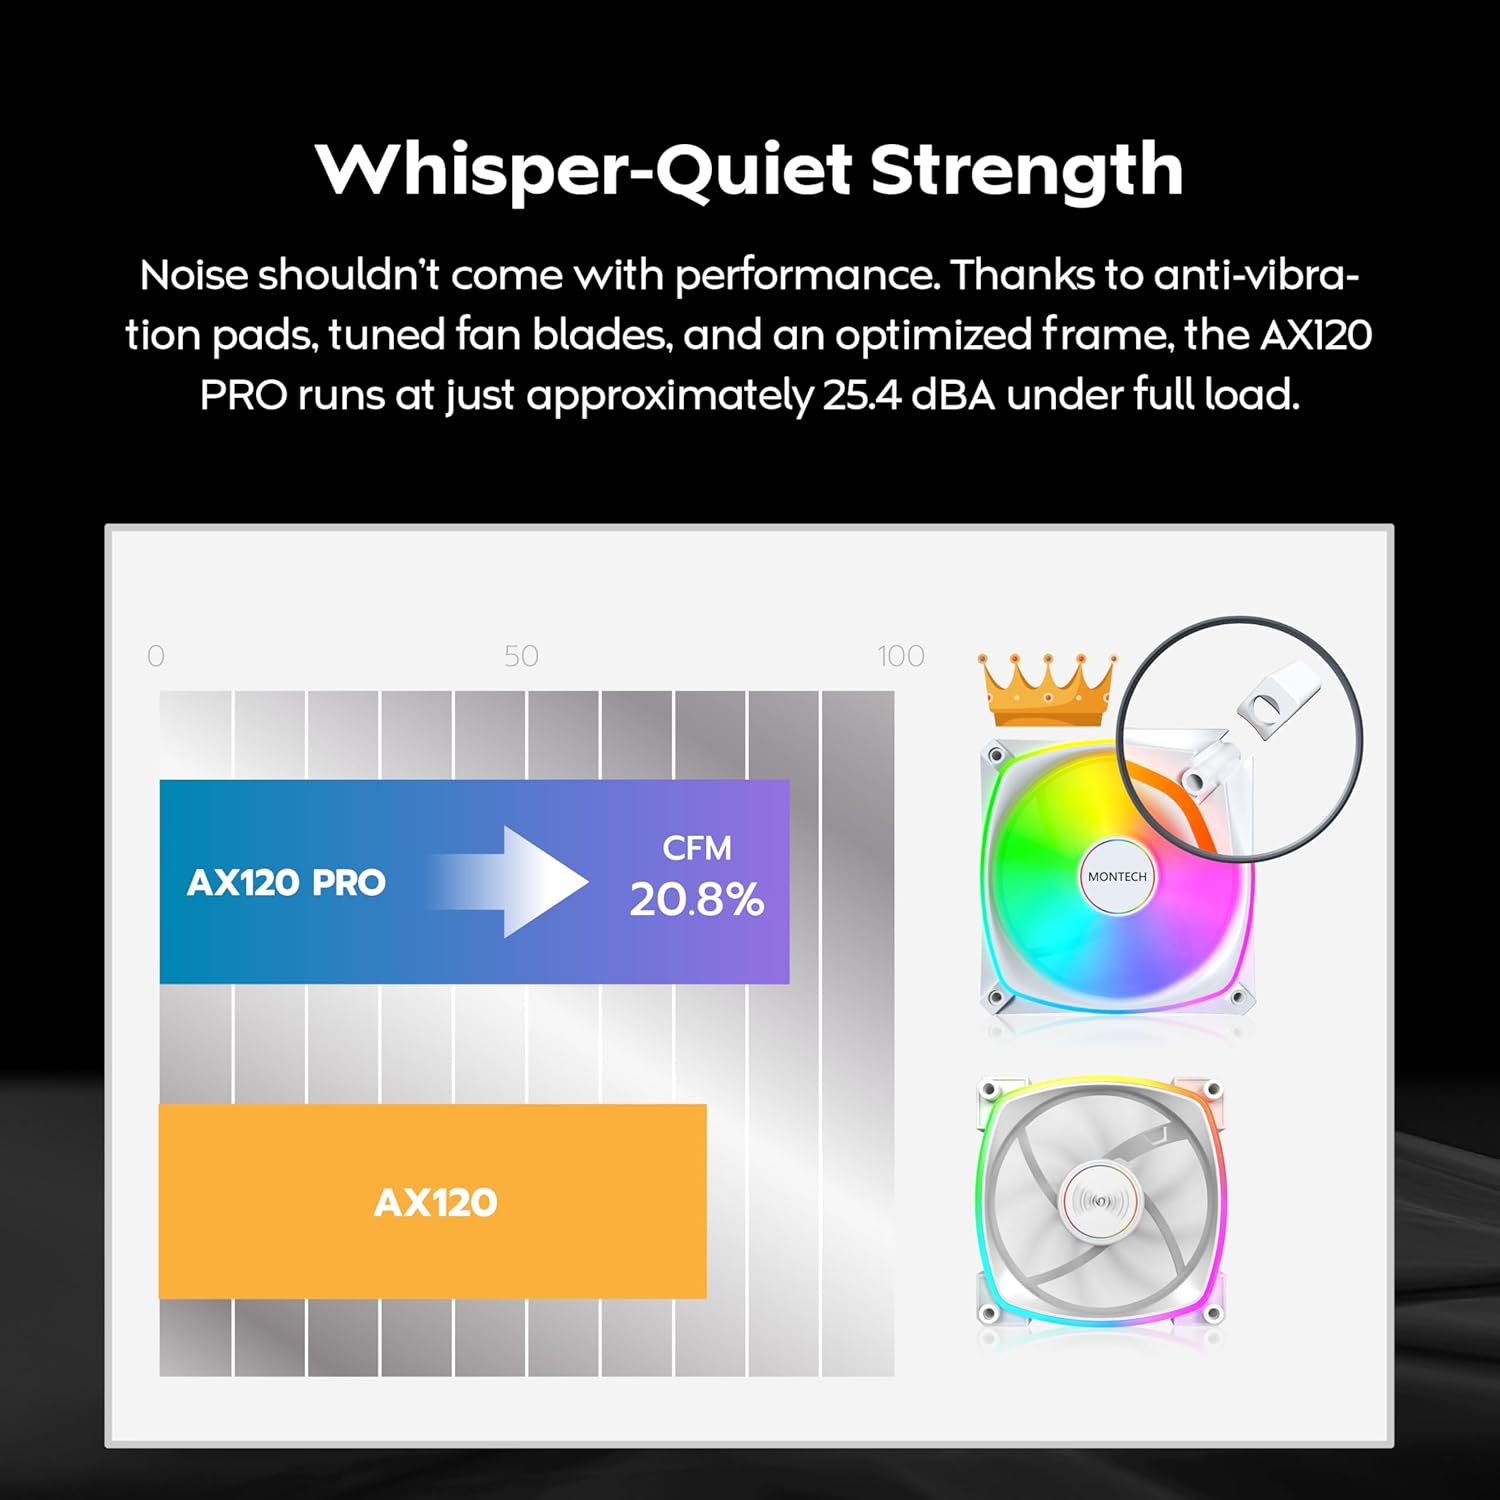
Image 3.1: The included ARGB Fan Hub for connecting multiple fans.

Image 3.2: Illustration of fan placement and airflow for optimal cooling.
4. Инструкция по эксплуатации
4.1. PWM Fan Speed Control
The AX120 PRO fans utilize Pulse Width Modulation (PWM) technology, allowing your motherboard to dynamically adjust fan speeds based on system temperature. This provides an optimal balance between cooling performance and noise levels. Fan speeds can range from 600 to 1600 RPM.
- Автоматическое управление: Once connected to a 4-pin PWM header on your motherboard, the fan speed will be automatically regulated by your motherboard's BIOS/UEFI settings or operating system software.
- Ручная настройка: Обычно можно настроить кривые скорости вращения вентиляторов и установить пользовательские параметры скорости.files through your motherboard's BIOS/UEFI or dedicated fan control software provided by your motherboard manufacturer.

Image 4.1: PWM control mechanism for intelligent cooling.
4.2. Управление ARGB-подсветкой
The AX120 PRO fans feature Addressable RGB (ARGB) lighting, allowing for customizable lighting effects. The lighting is controlled via your motherboard's ARGB software.
- Синхронизация программного обеспечения: Connect the fan hub's ARGB cable to a compatible 3-pin 5V ARGB header on your motherboard. Use your motherboard's RGB control software (e.g., ASUS Aura Sync, GIGABYTE RGB Fusion 2.0, MSI Mystic Light Sync, ASRock Polychrome Sync) to customize lighting patterns, colors, and effects.
- Независимый контроль: If your motherboard does not have an ARGB header, or if you prefer, a separate ARGB controller (not included) can be used to manage the lighting.

Image 4.2: ARGB lighting synchronization with major motherboard brands.
5. Техническое обслуживание
Регулярное техническое обслуживание помогает обеспечить оптимальную производительность и долговечность ваших вентиляторов.
- Уборка: Periodically clean the fan blades and frame to remove dust buildup. Use compressed air or a soft brush. Ensure the fan is powered off and unplugged before cleaning. Do not use liquid cleaners directly on the fan.
- Инспекция: Check fan cables for any signs of wear or damage. Ensure all connections to the fan hub and motherboard are secure.
- Уход за подшипниками: The rifle bearing is designed for long-term, maintenance-free operation. No lubrication is required.

Изображение 5.1: Внутренний вид view of the rifle bearing, designed for durability.
6. Поиск Неисправностей
If you encounter issues with your MONTECH AX120 PRO fans, refer to the following common problems and solutions:
- Вентиляторы не вращаются:
- Ensure the fan hub is correctly connected to the PSU via the SATA power cable.
- Verify that the 4-pin PWM cables from the fans are securely connected to the fan hub, and the fan hub's PWM cable is connected to a motherboard fan header.
- Проверьте настройки BIOS/UEFI вашей материнской платы, чтобы убедиться, что разъемы для вентиляторов включены и настроены правильно.
- Нет ARGB-подсветки:
- Confirm the 3-pin ARGB cables from the fans are connected to the fan hub, and the fan hub's ARGB cable is connected to a 3-pin 5V ARGB header on your motherboard.
- Важный: Do not connect to a 4-pin 12V RGB header.
- Ensure the fan hub is receiving power from the PSU via SATA.
- Check your motherboard's ARGB software for lighting control and ensure it is running and configured.
- Чрезмерный шум:
- Verify that the fans are securely mounted and not vibrating against the case. The fans include anti-vibration pads.
- Проверьте, нет ли каких-либо кабелей или препятствий, мешающих работе лопастей вентилятора.
- Adjust fan speed settings in your motherboard's BIOS/UEFI or software to a lower RPM if noise is a concern at idle.
- Очистите лопасти вентилятора от скопившейся пыли.
7. Технические характеристики
| Особенность | Спецификация |
|---|---|
| Номер модели | AX120PW3in1 |
| Размеры вентилятора | 120 мм x 120 мм x 25 мм (4.72 дюйма в длину x 0.98 дюйма в ширину x 4.72 дюйма в высоту) |
| Скорость вентилятора | 600–1600 об/мин (управление ШИМ) |
| Емкость воздушного потока | 72.3 кубических футов в минуту (кубические футы в минуту) |
| Уровень шума | 25.4 дБА (максимум) |
| Статическое давление | 1.85 ммH2O |
| Тип подшипника | Винтовочный подшипник |
| Разъем питания | 4-Pin PWM |
| Разъем АРГБ | 3-контактный 5В ARGB |
| Совместимые устройства | Настольные компьютеры |
| Количество предметов | 3 Fans + 1 Hub |
8. Гарантия и поддержка
8.1. Информация о гарантии
The MONTECH AX120 PRO ARGB PWM 120mm Fan 3-Pack comes with a Гарантия 3 год с даты покупки. Данная гарантия распространяется на производственные дефекты и гарантирует соответствие изделия заявленным эксплуатационным характеристикам при нормальном использовании. Сохраните чек о покупке для предъявления гарантийных претензий.
8.2. Техническая поддержка
For technical assistance, troubleshooting beyond this manual, or warranty inquiries, please contact MONTECH customer support through their official website or the retailer where the product was purchased. Provide your product model number (AX120PW3in1) and a detailed description of the issue to expedite support.