1. Введение
This manual provides comprehensive instructions for the installation, operation, and maintenance of your SCULPFUN iCube Ultra Air Assist Kit. This kit is designed to enhance the performance of your SCULPFUN iCube Ultra laser engraver by providing a focused air stream to the laser point, improving cut quality, and reducing material scorching.
2. Информация по технике безопасности
Please read all safety warnings and instructions carefully before using the Air Assist Kit. Failure to follow these instructions may result in injury or damage to the equipment.
- Always ensure the laser engraver is powered off and disconnected from the power source before installing or performing maintenance on the Air Assist Kit.
- Operate the Air Assist Kit in a well-ventilated area to dissipate smoke and debris effectively.
- Во время работы держите руки и свободную одежду подальше от движущихся частей.
- Do not obstruct the air outlet nozzle during operation.
- Use only the provided components and accessories with the kit.
3. Содержимое упаковки
Убедитесь, что в вашей посылке присутствуют все перечисленные ниже предметы:
- Воздушный насос ×1
- Air Nozzle ×1
- Air Hose ×1
- Honeycomb Panel ×1
- Шестигранный ключ ×1
- Sealing Ring ×3
- Air Hose Clip ×3
- Хомут-стяжка ×3

Visual representation of the SCULPFUN iCube Ultra Air Assist Kit packing list, including the air pump, air nozzle, air hose, honeycomb panel, hex key, sealing rings, air hose clips, and zip ties.
4. Технические характеристики
| Компонент | Спецификация |
|---|---|
| Название продукта | SCULPFUN iCube Ultra Air Assist Kit |
| Модель | ИПД |
| Максимальное давление воздуха | 21±1 kPa |
| Diameter of Air Outlet Nozzle | 2.6 мм |
| Air Pump Noise Level | <40 дБ |
| Вес упаковки | 0.85 кг |
| Размер упаковки | 285 × 220 × 88 мм |
| Размеры изделия (в комплекте) | 11.22 x 8.66 x 3.46 дюйма |
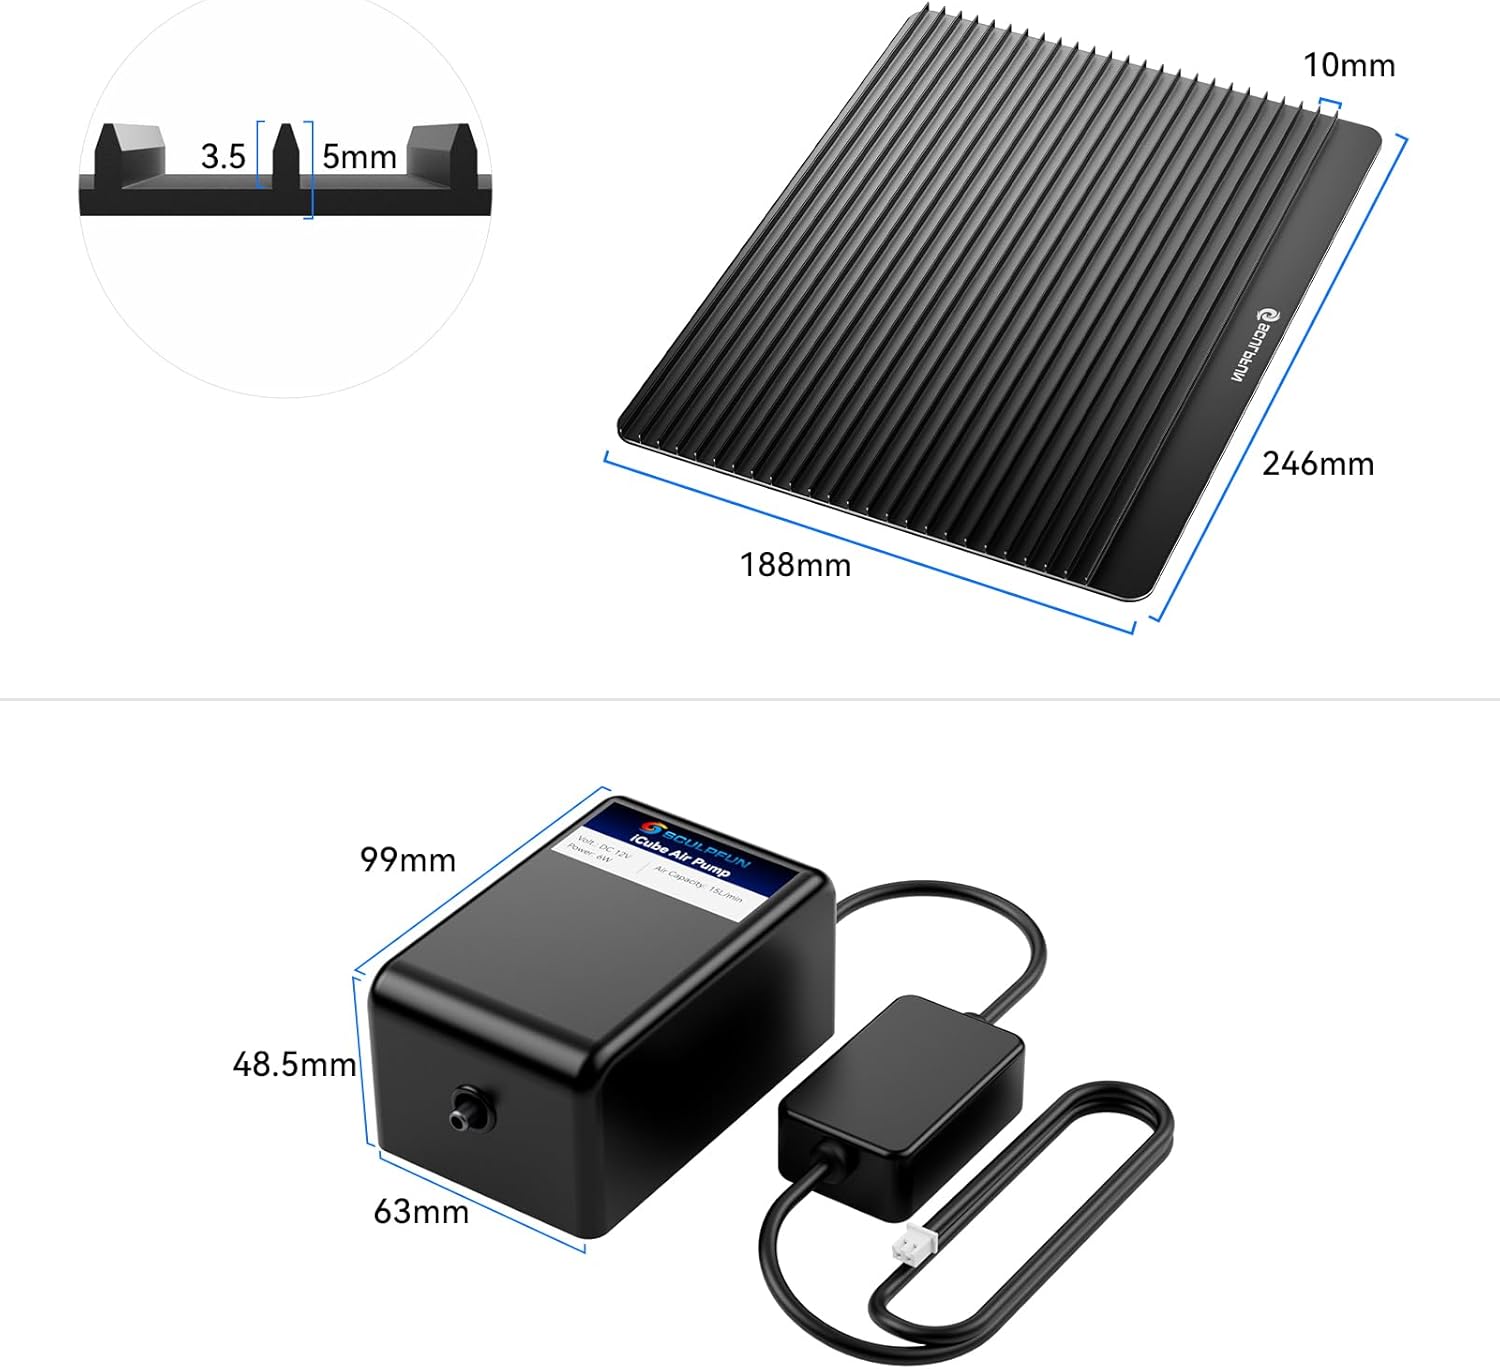
Diagram illustrating the dimensions of the honeycomb bed plate (188mm x 246mm) and the iAP air pump (63mm x 48.5mm x 99mm).
5. Настройка и установка
5.1 Компоненты вышеview
The Air Assist Kit integrates seamlessly with your SCULPFUN iCube Ultra laser engraver. It includes an air pump to generate airflow, an air nozzle to direct the air, tubing to connect them, and a honeycomb cutting bed to support materials and minimize backside reflections.
5.2 Этапы установки
Follow these steps to install the Air Assist Kit:
- Prepare the Laser Engraver: Ensure your SCULPFUN iCube Ultra laser engraver is powered off and unplugged.
- Place the Honeycomb Bed: Position the honeycomb cutting bed inside the engraver's working area. This provides a stable surface for your materials and helps reduce scorch marks on the underside.
- Attach the Air Nozzle: Securely attach the air nozzle to the laser head of your iCube Ultra. Refer to your iCube Ultra's manual for specific instructions on attaching accessories to the laser head.
- Подсоедините воздушный шланг: Connect one end of the air hose to the air nozzle and the other end to the air pump's outlet. Ensure a snug fit to prevent air leaks.
- Route the Tubing: Route the air hose through the designated cable guide on your iCube Ultra to keep it tidy and prevent interference with the laser head's movement. Use the provided air hose clips and zip ties if necessary to secure the hose.
- Подключите воздушный насос: Plug the air pump's power cable into the reserved port on your iCube Ultra laser engraver. This allows the engraver to control the air pump's operation.
- Окончательная проверка: Verify all connections are secure and the air hose is not kinked or obstructing any moving parts.

SCULPFUN iCube Ultra laser engraver with the air assist kit connected, showing the air pump and tubing.

Задний view of the SCULPFUN iCube Ultra laser engraver, illustrating the connection points for the air assist kit's pump and tubing.
6. Инструкция по эксплуатации
6.1 Using the Air Assist System
The air assist system delivers a focused stream of air directly to the laser's focal point. This action effectively blows away smoke, debris, and molten material during engraving and cutting processes.
- Cleaner Results: The removal of smoke and debris leads to significantly cleaner engravings with sharper details.
- Reduced Scorching: It dramatically reduces scorch marks and yellowing on materials, particularly noticeable on acrylic and wood.
- Постоянный поток воздуха: The iAP air pump features upgraded silent technology and shock-absorbing feet, ensuring consistent and stable airflow even during extended engraving sessions, with a noise level under 40dB.
- Laser Lens Protection: The stable high-pressure airflow also helps protect your laser lens from smoke and residue buildup, contributing to its longevity.

Comparison image showing laser engraving results: 'Before Use' (without air assist) with scorch marks and 'After Use' (with air assist) demonstrating cleaner cuts and reduced residue.
6.2 Using the Honeycomb Bed
The included honeycomb bed serves multiple purposes:
- Материальная поддержка: It provides a flat and stable surface for your materials during laser processing.
- Minimized Backside Reflections: The open honeycomb structure allows smoke and laser energy to pass through, minimizing reflections and burn marks on the underside of your material.
- Улучшенный поток воздуха: It facilitates better airflow around the material, aiding in the removal of smoke and heat.
7. Техническое обслуживание
Regular maintenance ensures optimal performance and extends the lifespan of your Air Assist Kit.
- Clean the Air Nozzle: Periodically inspect and clean the air nozzle to ensure it is free from debris or residue that could obstruct airflow. Use a soft brush or compressed air.
- Inspect Air Hose: Check the air hose for any kinks, cracks, or damage. Replace if necessary to maintain consistent airflow.
- Clean Honeycomb Bed: Over time, the honeycomb bed may accumulate residue. Clean it regularly using a brush or appropriate cleaning solution to maintain its effectiveness.
- Air Pump Care: The iAP air pump is designed for low maintenance. Ensure it is kept in a clean, dry environment. Avoid blocking its ventilation ports.
8. Поиск Неисправностей
If you encounter issues with your Air Assist Kit, refer to the following common problems and solutions:
- No Airflow from Nozzle:
- Check if the air pump is properly connected to the iCube Ultra's power port and the engraver is powered on.
- Ensure the air hose is securely connected to both the pump and the nozzle, with no kinks or blockages.
- Inspect the air nozzle for any debris obstructing the outlet.
- Слабый поток воздуха:
- Verify the air hose connections are tight.
- Проверьте воздушный шланг и соединения на наличие утечек.
- Ensure the air pump's intake is not obstructed.
- Excessive Noise from Air Pump:
- Ensure the air pump is placed on a stable, flat surface.
- Check if the shock-absorbing feet are properly installed and intact.
- If noise persists and is significantly above 40dB, contact customer support.
- Scorch Marks Still Present:
- Ensure the air nozzle is positioned correctly to direct air directly at the laser's focal point.
- Adjust laser power and speed settings for the specific material being used.
- Confirm the honeycomb bed is clean and properly positioned.
9. Гарантия и поддержка
SCULPFUN products are manufactured to high-quality standards. For warranty information, please refer to the documentation provided with your original SCULPFUN iCube Ultra laser engraver or visit the official SCULPFUN webсайт.
For technical support, troubleshooting assistance, or to inquire about replacement parts, please contact SCULPFUN customer service through their official channels. When contacting support, please have your product model number (iCube Ultra Kit) and purchase information readily available.
You can visit the official SCULPFUN store for more information: Магазин SCULPFUN


