Введение
This manual provides detailed instructions for the safe and efficient operation of your Xiaomi Portable Electric Air Compressor 2 Pro. Please read this manual thoroughly before using the product and retain it for future reference. This device is designed for inflating tires on cars, motorcycles, bicycles, and balls, offering a convenient and portable solution for maintaining optimal pressure.
Информация по безопасности
Предупреждение: Несоблюдение данных инструкций по технике безопасности может привести к поражению электрическим током, пожару или серьезным травмам.
- Держите устройство в недоступном для детей месте.
- Не используйте компрессор во влажных условиях, а также вблизи легковоспламеняющихся жидкостей или газов.
- Перед началом накачивания убедитесь, что воздушный шланг надежно подсоединен к клапану.
- Do not over-inflate items. Always refer to the recommended pressure for the item being inflated. The auto shut-off feature helps prevent over-inflation.
- Избегайте длительной непрерывной работы во избежание перегрева. Если устройство нагрелось, дайте ему остыть.
- Use only the provided charging cable and a compatible 5V/3A power adapter for charging.
- Do not disassemble or modify the device. Contact customer support for repairs.
Содержимое упаковки
Проверьте наличие всех предметов в упаковке:
- Xiaomi Portable Electric Air Compressor 2 Pro
- Fast-connecting air valve
- High-pressure air hose extension
- Needle valve (for balls)
- Presta valve adapter (for some bicycle tires)
- Кабель для зарядки Type-C
- Чехол для хранения

Figure 1: Included accessories with the air compressor.
Продукт болееview
The Xiaomi Portable Electric Air Compressor 2 Pro is a compact and powerful inflation device. It features a digital LED display, multiple preset modes, and a long-lasting rechargeable battery for convenient use.
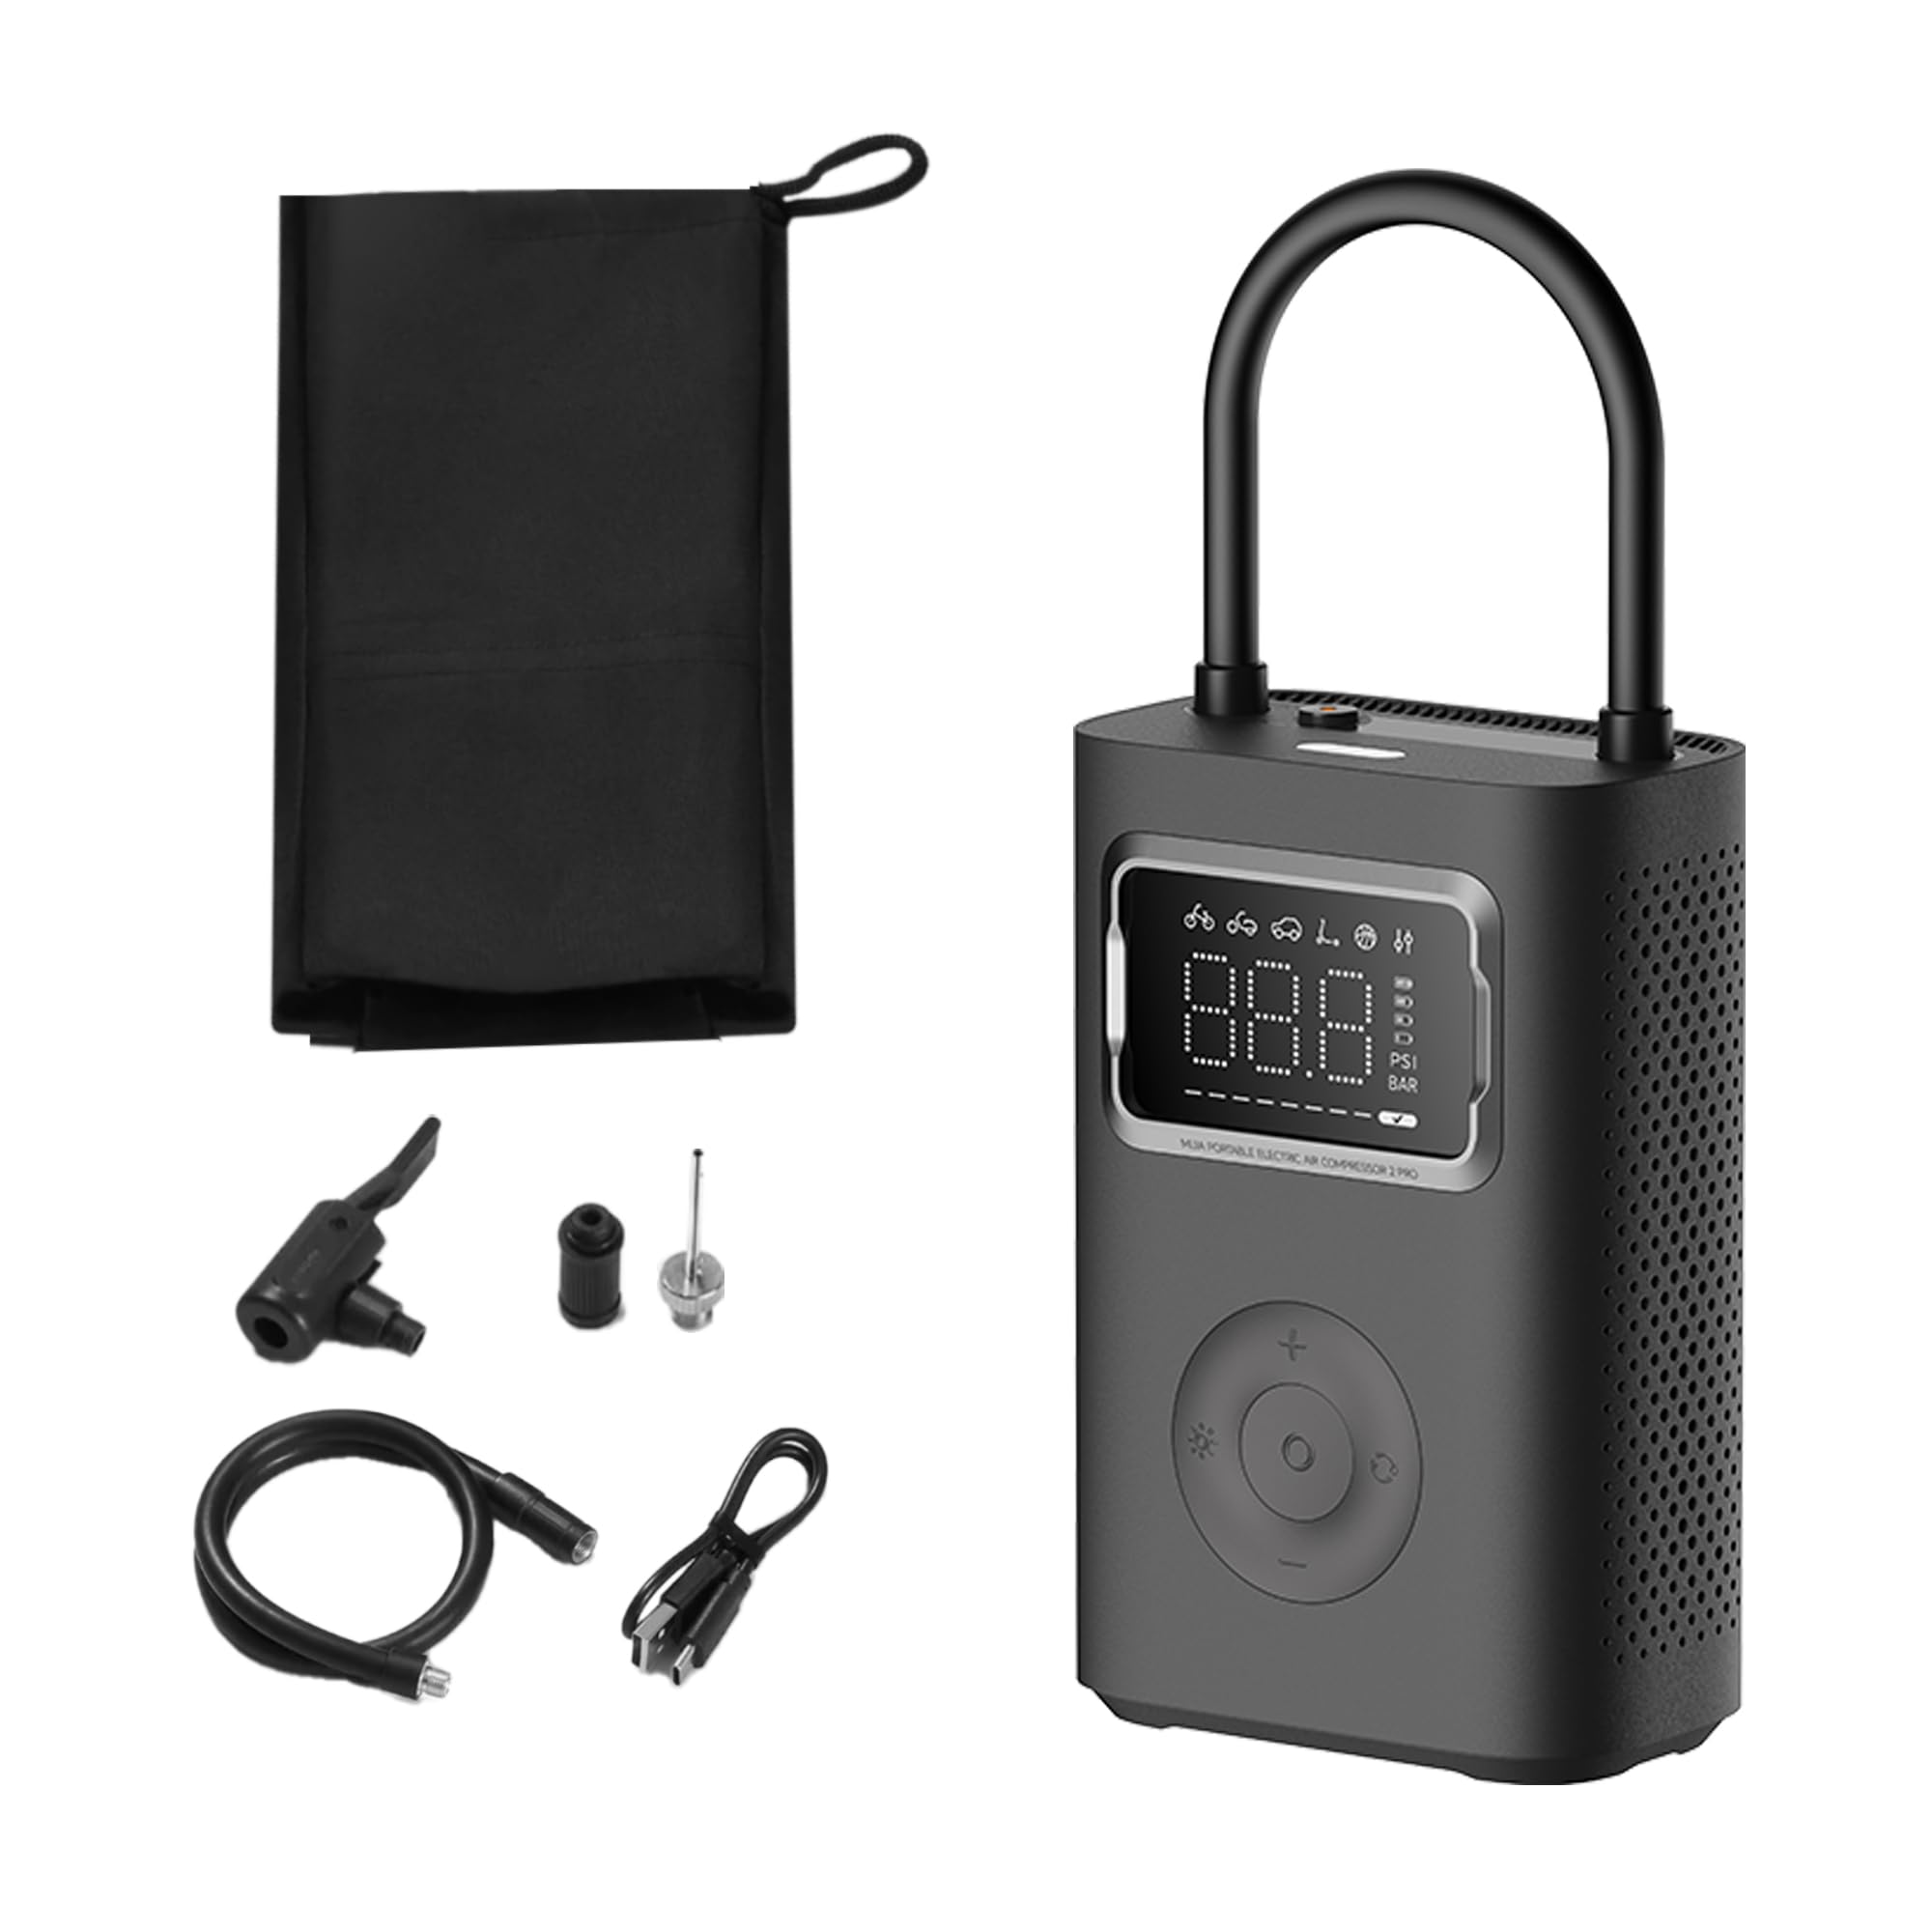
Figure 2: Xiaomi Portable Electric Air Compressor 2 Pro.
Основные характеристики:
- Максимальное давление: Давление до 150 PSI для различных потребностей в накачивании.
- Цифровой светодиодный дисплей: Provides real-time pressure readings and allows for precise pressure setting.
- Автоматическое отключение: Автоматически прекращает накачивание при достижении заданного давления, предотвращая перекачивание.
- Беспроводной и перезаряжаемый: Powered by a 27 Watt-hour battery, offering portability and convenience.
- Несколько предустановленных режимов: Includes modes for car, motorcycle, bicycle, electric scooter, and ball, along with a custom mode.
- Dual-Purpose LED Light: Features a white light for illumination and a red light for signaling.
- Компактный и легкий: Предназначен для удобного хранения и транспортировки.

Figure 3: Product details showing 150 PSI capability, battery indicator, and hose lock.
Настраивать
1. Первоначальная зарядка
Before first use, fully charge the air compressor. Connect the provided Type-C charging cable to the charging port on the device and the other end to a 5V/3A USB power adapter (not included). The battery indicator on the display will show charging progress. A full charge typically takes approximately 3.5 hours.
2. Присоединение воздушного шланга
The air hose is stored by being locked into the device. To use, pull the air hose out of its storage slot. This action will automatically power on the device. Connect the appropriate valve adapter (Schrader, Presta, or needle valve) to the end of the air hose, depending on the item you intend to inflate.

Figure 4: Pulling the air hose from its slot to power on the device.
Инструкция по эксплуатации
1. Включение и выключение
- Включение питания: Pull the air hose out of its storage slot. The device will automatically power on and display the current pressure.
- Выключение: Push the air hose back into its storage slot. The device will automatically power off.
2. Понимание дисплея
The large LED display shows the current pressure, selected mode, and battery level. You can switch between PSI and Bar units using the unit selection button.

Figure 5: Digital display showing mode icons and pressure.
3. Selecting Inflation Modes
Press the mode button to cycle through the 6 preset inflation modes:
- Пользовательский режим: Default 35 PSI (adjustable 3-150 PSI / 0.2-10.3 Bar)
- Режим велосипеда: Стандартное давление 45 PSI (регулируемое от 30 до 65 PSI)
- Motorbike Mode: Default 2.4 Bar (adjustable 1.8-3.0 Bar)
- Автомобильный режим: Default 2.5 Bar (adjustable 1.8-3.5 Bar)
- Режим электросамоката: Стандартное давление 50 PSI (регулируемое от 45 до 60 PSI)
- Режим мяча: Стандартное давление 8 PSI (регулируемое от 4 до 16 PSI)

Рисунок 6: Болееview of multiple preset inflation modes.
4. Adjusting Pressure Settings
After selecting a mode, use the '+' and '-' buttons to adjust the target pressure. The display will show the target pressure blinking. Once set, the value will stabilize.
5. Инфляционный процесс
- Connect the air hose with the appropriate adapter securely to the valve stem of the item to be inflated.
- На дисплее будет отображаться текущее давление в изделии.
- Select the desired inflation mode and set the target pressure.
- Press the start button (usually the center button) to begin inflation.
- The compressor will automatically stop once the target pressure is reached.
- Отсоедините воздушный шланг от штока клапана.

Figure 7: Auto pressure detection and inflation for a bicycle tire.
6. Использование светодиодной подсветки
Press the light button to activate the LED light. It has two modes: a white light for illumination in dark environments and a red flashing light for emergency signaling.
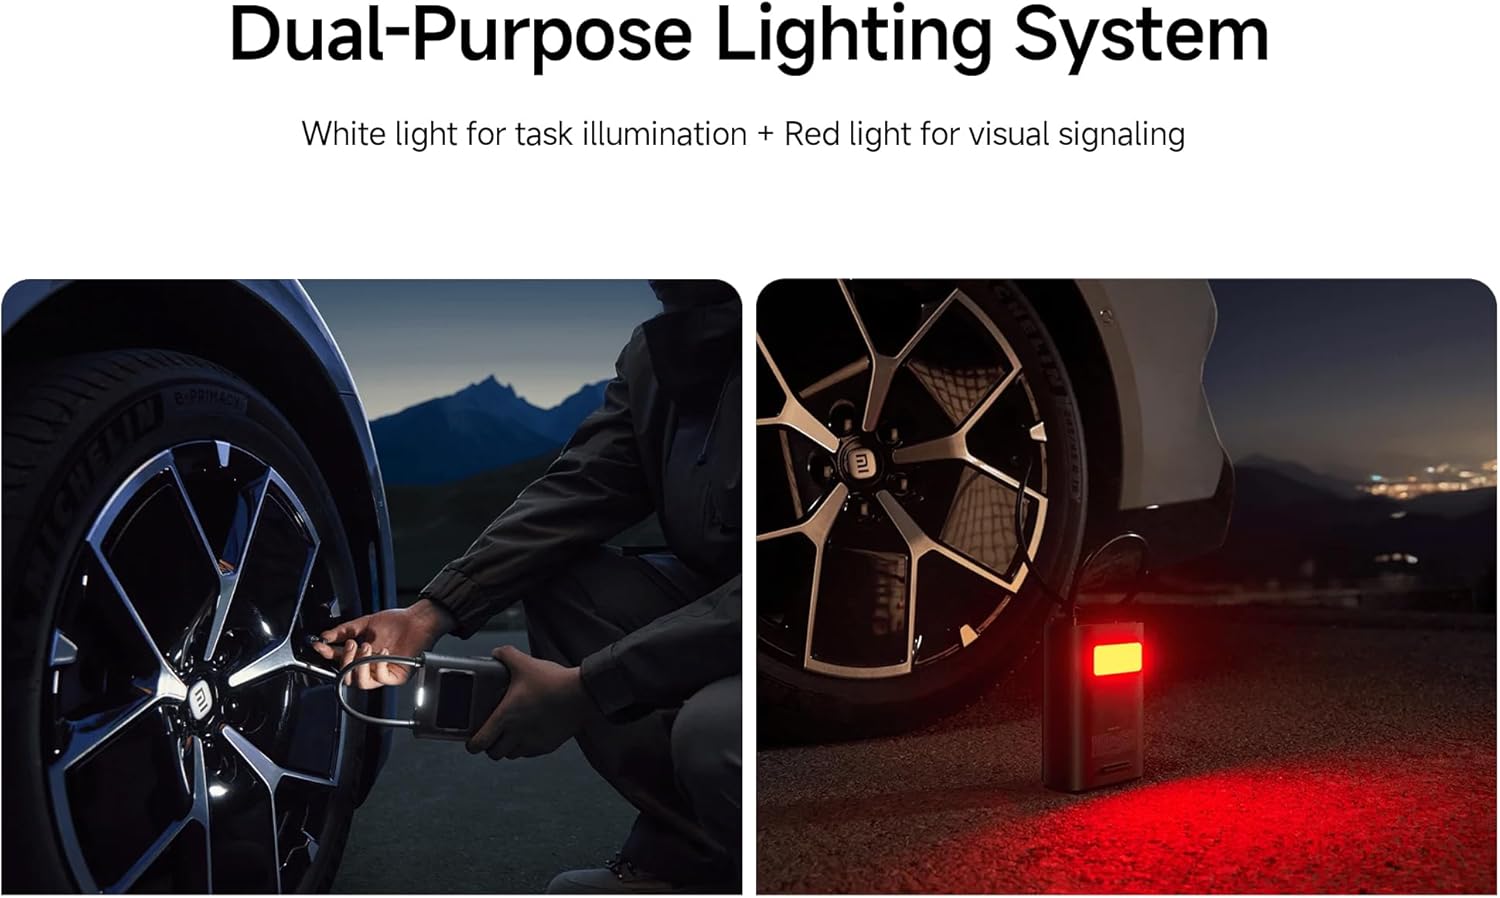
Figure 8: Dual-purpose lighting system in use (white for task, red for signaling).
Зарядка
The device is equipped with a 27 Watt-hour rechargeable battery. When the battery level is low, the battery indicator on the display will show a low charge. Connect the Type-C charging cable to recharge. The device can reinflate approximately 16 car tires (from 2.0 Bar to 2.5 Bar) on a full charge, or inflate up to 138 size 7 basketballs (from 0 PSI to 8 PSI).

Figure 9: Battery capacity and inflation performance exampлес.
Обслуживание
- Уборка: Протрите внешнюю поверхность компрессора мягкой тряпкой.amp ткань. Не используйте агрессивные химикаты или абразивные чистящие средства.
- Хранилище: Store the device in a cool, dry place, away from direct sunlight and extreme temperatures. Ensure the air hose is properly stowed to prevent damage.
- Уход батареи: Для оптимального срока службы батареи заряжайте устройство не реже одного раза в три месяца, если оно не используется регулярно.
Поиск неисправностей
| Проблема | Возможная причина | Решение |
|---|---|---|
| Устройство не включается. | Battery is depleted; Air hose not fully pulled out. | Charge the device; Ensure the air hose is fully extended from its slot. |
| Инфляция либо медленная, либо неэффективная. | Low battery; Air hose not securely connected; Incorrect pressure setting. | Recharge the device; Check all connections for leaks; Verify the target pressure. |
| Устройство неожиданно останавливается. | Target pressure reached (auto shut-off); Overheating; Low battery. | This is normal if target pressure is met; Allow device to cool down; Recharge the device. |
| Неточные показания давления. | Loose connection; Sensor error. | Ensure the air hose is tightly connected to the valve; If problem persists, contact support. |
Технические характеристики
| Особенность | Деталь |
|---|---|
| Номер модели | XM-MJCQB06QW-03 |
| Размеры | 10.5 х 8 х 25.5 см |
| Масса | 1.1 кг |
| Материал | Пластик |
| Источник питания | Питание от батареи |
| Томtage | 10.8 Вольт |
| Ватtage | 27 Ватт-часа |
| Ampсредняя емкость | 3 Amps |
| Максимальное давление | 150 фунтов на кв. дюйм |
| Длина шланга | 200 мм |
| Особые возможности | Automatic Shut-Off, Digital Display, LED Light, Lightweight |
| Рекомендуемое использование | Tire Inflation (Car, Bike, Motorcycle, Electric Scooter), Ball Inflation, Toy Inflation |
Официальные видеоролики о продуктах
Video 1: General product overview и демонстрация ключевых особенностей.
Video 2: Demonstration of the compressor's portability and ease of use.
Video 3: Detailed look at the inflation process and digital display functionality.
Гарантия и поддержка
For warranty information or technical support, please refer to the warranty card included with your product or contact the manufacturer directly through their official website. Ensure you have your product model number (XM-MJCQB06QW-03) and purchase details available when seeking support.