1. Введение
This manual provides detailed instructions for the setup, operation, and maintenance of your JOYALENS JL210 10.1'' Digital Microscope and JL115A Flex Boom Arm Stand. The JL210 microscope features a 10.1-inch IPS screen, 1080P HD video recording, and a 12MP camera sensor, making it suitable for various applications including coin observation, PCB soldering, watch repair, electronics, and DIY projects. The JL115A Flex Boom Arm Stand offers enhanced flexibility and working space for intricate tasks.
2. Содержимое упаковки
Пожалуйста, убедитесь, что в вашей посылке присутствуют все перечисленные ниже предметы:
- JOYALENS JL210 Digital Microscope with 10.1-inch IPS Screen
- JOYALENS JL115A Flex Boom Arm Stand
- Standard Metal Stand (for JL210)
- Bottom Light Stage and Slides Kit
- Кабель USB-C
- Адаптер питания
- Руководство пользователя (этот документ)
3. Инструкции по настройке
3.1. JL210 Digital Microscope with Standard Metal Stand
- Assemble the Standard Metal Stand: Ensure the base and vertical rod are securely connected.
- Attach the JL210 Microscope: Slide the microscope body into the holder on the stand. Tighten the securing screw to hold it in place.
- Подключите питание: Plug the USB-C cable into the microscope and connect the other end to the power adapter, then into a wall outlet.
- Adjust Height for Observation: Для viewing entire coins, position the lens at the very bottom of the stand's travel. The 12.6-inch high stand provides a maximum working distance of 10.2 inches.

Рисунок 3.1: The JL210 Digital Microscope mounted on its 12.6-inch standard metal stand, demonstrating its capability for full coin observation. The image highlights the working distance required for viewing larger objects like a silver dollar.

Рисунок 3.2: The JL210 Digital Microscope set up on its large metal base, providing a stable and spacious workbench for soldering and electronic repair tasks. The image shows the microscope positioned over a circuit board with a soldering iron in use.
3.2. JL115A Flex Boom Arm Stand
- Прикрепите Clamp: Securely fasten the C-clamp of the boom arm to a sturdy desk or workbench edge.
- Mount the Boom Arm: Вставьте стрелу в clamp and tighten the securing knob.
- Attach the JL115A Microscope: Connect the JL115A microscope to the end of the boom arm. Ensure it is firmly attached.
- Отрегулируйте положение рычага: Loosen the adjustment knobs on the boom arm to position the microscope over your desired working area. Tighten all knobs once the desired position is achieved.
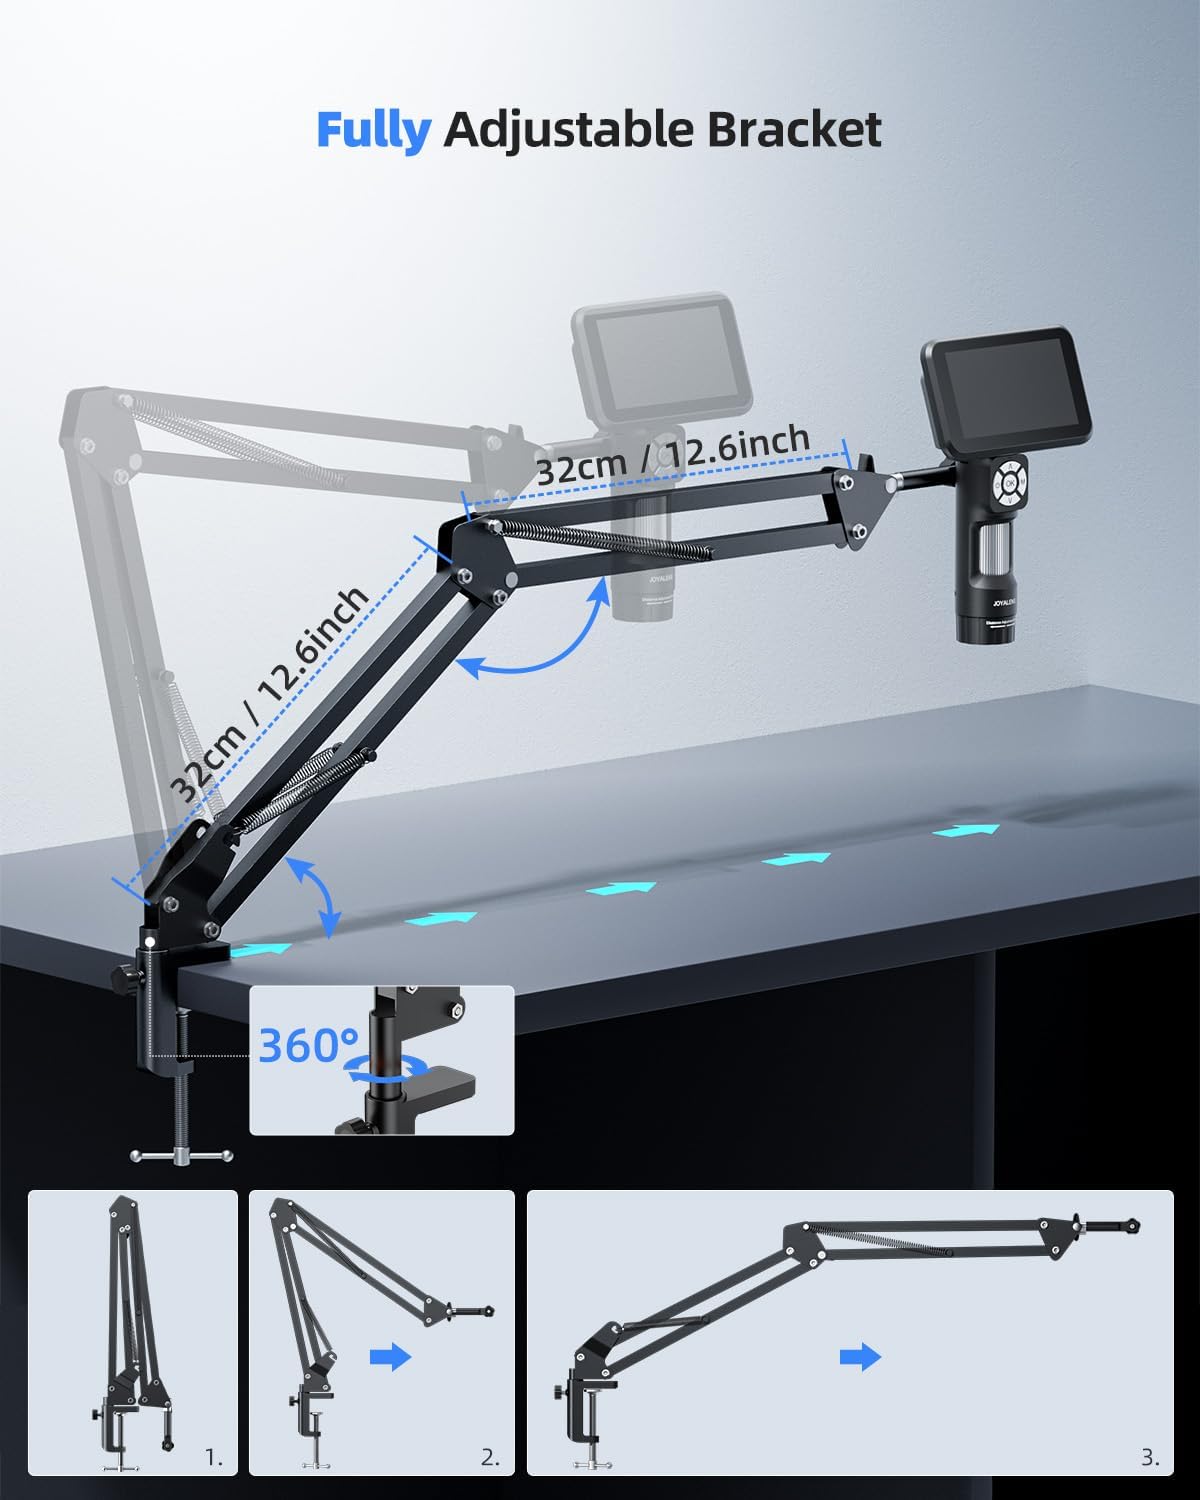
Рисунок 3.3: The JL115A Digital Microscope mounted on the flexible boom arm bracket, providing ample working space and flexibility for soldering and other detailed tasks. The setup allows for easy repositioning of the microscope.

Рисунок 3.4: An illustration of the fully adjustable JL115A flex arm bracket, demonstrating its range of motion and how it can be positioned for various applications. The image highlights the 360-degree rotation and extendable segments.
4. Инструкция по эксплуатации
4.1. Включение/выключение питания
Locate the power button on the microscope unit. Press and hold for a few seconds to power on or off the device. The 10.1-inch IPS screen will illuminate upon startup.
4.2. Регулировка фокуса
- For Stand-Mounted Use: Вращайте фокусировочное колесо на корпусе микроскопа до тех пор, пока изображение на экране не станет четким и резким.
- For JL115A Handheld Use: Utilize the built-in distance adjustment ring on the JL115A to reduce hand shake and achieve a clearer view. Rotating the ring increases the working distance and expands the field of view.
4.3. Увеличение
Magnification is primarily adjusted by changing the working distance between the microscope lens and the object. Moving the microscope closer to the object increases magnification, while moving it further away decreases it. Fine-tune focus after each adjustment.
4.4. Управление освещением
The microscope is equipped with multiple lighting options to ensure optimal illumination for various specimens:
- Встроенные светодиодные фонари: These are typically located around the lens. Use the dedicated buttons or controls on the microscope to adjust their brightness.
- Side LED Lights: The standard metal stand includes adjustable side LED lights. Position them to eliminate shadows and provide even illumination.
- Bottom Light Stage: For transparent or translucent specimens (e.g., biological slides), place them on the bottom light stage. Activate the bottom light for transmitted illumination.

Рисунок 4.1: An illustration detailing the LED light adjustment features of the JL210 Digital Microscope, showing controls for brightness and direction of illumination from various light sources.
4.5. Recording and Capturing Images
The JL210 features 1080P HD video recording and a 12MP camera sensor for high-quality image capture.
- Кнопка фото: Press the designated photo button to capture still images.
- Кнопка записи: Press the record button once to start video recording and again to stop.
- Хранилище: Captured photos and videos are saved to an inserted memory card (not included, typically microSD).
4.6. Подключение к ПК
Connect the microscope to a computer via the provided USB-C cable for real-time viewing on a larger screen and easy sharing of observations.
- Подключить кабель: Plug one end of the USB-C cable into the microscope and the other end into an available USB port on your computer.
- Выберите режим ПК: On the microscope screen, select 'PC Camera' or 'Mass Storage' mode as prompted. For real-time viewing, select 'PC Camera'.
- Программное обеспечение: Open a compatible camera application or microscope software on your computer to view прямая трансляция.

Рисунок 4.2: The JL115A Digital Microscope connected to a laptop via a USB-C cable, enabling real-time viewing on a larger screen and facilitating easy sharing of microscopic observations.
4.7. Handheld Use (JL115A)
The JL115A can be used as a handheld digital microscope. Its built-in distance adjustment ring helps stabilize the view and reduce hand shake. Rotate the ring to adjust the working distance and field of view for clearer observation.

Рисунок 4.3: The JL115A Digital Microscope being used in handheld mode, illustrating its portability and the convenience of its rechargeable battery. Battery charging and usage times are also displayed.
5. Техническое обслуживание
- Очистка объектива и экрана: Для аккуратной протирки линз и экрана используйте мягкую безворсовую ткань, специально предназначенную для оптических поверхностей. Избегайте использования абразивных материалов и едких химикатов.
- Хранилище: When not in use, store the microscope and its components in a clean, dry, and dust-free environment. Use protective covers if available.
- Уход батареи: The JL115A features a rechargeable battery. For optimal battery life, avoid fully discharging the battery frequently. Charge the battery using the provided USB-C cable and power adapter. Charging time is approximately 3.0 hours, providing about 2.5 hours of usage time.
6. Поиск Неисправностей
If you encounter issues with your JOYALENS microscope, please refer to the following common problems and solutions:
| Проблема | Возможная причина | Решение |
|---|---|---|
| Микроскоп не включается. | Низкий заряд батареи или проблема с подключением питания | Ensure the device is fully charged or connected to a power source. Check the power adapter and cable. |
| Изображение размыто или не в фокусе | Incorrect focus adjustment or working distance | Adjust the focus wheel or distance adjustment ring. Ensure the working distance is appropriate for the desired magnification. |
| Screen is too dark or too bright | Improper lighting settings | Adjust the brightness of the built-in LEDs, side lights, or bottom light as needed. |
| Невозможно подключиться к ПК | Incorrect USB mode or driver issue | Ensure 'PC Camera' mode is selected on the microscope. Try a different USB port or cable. Install necessary drivers if prompted by your operating system. |
| Нет изображения на экране | Lens cap still on or sensor obstruction | Remove the lens cap. Check for any obstructions blocking the lens or sensor. |
7. Технические характеристики
| Особенность | Описание |
|---|---|
| Модель | JL210, JL115A |
| Размер экрана | 10.1-дюймовый IPS-дисплей |
| Разрешение видео | 1080P HD |
| Датчик камеры | 12 мегапикселей |
| JL210 Standard Stand Height | 12.6 дюймов |
| JL210 Max Working Distance | 10.2 дюймов |
| JL210 Metal Bracket Size | 7.1 x 7.9 x 12.6 inches (Base x Depth x Height) |
| Тип батареи | Rechargeable (for JL115A handheld use) |
| Время использования батареи | Приблизительно 2.5 часов |
| Время зарядки аккумулятора | Приблизительно 3.0 часов |
| Связность | USB-C |
8. Гарантия и поддержка
For warranty information and customer support, please refer to the documentation included with your product or visit the official JOYALENS webсайт. Вы также можете посетить JOYALENS Store on Amazon Для получения дополнительной информации и контактных данных.
