1. Введение
This manual provides detailed instructions for the LinYuvo KS10 Wireless Controller. It covers setup, operation, and maintenance to ensure optimal performance and an enhanced gaming experience across various platforms, including Nintendo Switch, Windows, SteamOS, and iOS devices.
2. Продукт закончилсяview
The LinYuvo KS10 is a versatile wireless controller designed for a comfortable and responsive gaming experience. It features a transparent design showcasing internal components, enhanced joysticks, and customizable functions.

Рисунок 2.1: Передняя часть view of the LinYuvo KS10 Wireless Controller, showing its transparent casinРасположение кнопок и символов g.
Основные характеристики:
- Metal Mushroom Head & Honeycomb Design Joysticks: Provides improved operational feedback and anti-slip functionality for precise control.
- Three-Speed Continuous Firing (Turbo): Offers flexible operation for rapid input in games.
- Integrated Six-Axis Gyroscope: Enables immersive motion sensing for compatible games.
- Adjustable Vibration Level: Dual motors provide haptic feedback that can be customized.
- Красочные световые эффекты: Features RGB lighting with various patterns to enhance the gaming atmosphere.
- Back-Key Macro Programming: Allows for personalized macro programming and multi-step combined key output.
- Эргономичный дизайн: Shaped for comfortable grip during extended gaming sessions.
- Функция пробуждения: Ability to wake up the connected console.

Figure 2.2: Close-up of the metal rocker and honeycomb joystick design, highlighting enhanced detection and anti-slip features.
3. Настройка
3.1. Зарядка контроллера
Before initial use, fully charge the controller using the provided USB-C cable. Connect the cable to the controller's charging port and a compatible USB power source (e.g., a computer USB port or a USB wall adapter). The charging indicator will show the charging status and turn off when fully charged.
3.2. Сопряжение с Nintendo Switch
- На консоли Nintendo Switch перейдите в главное меню.
- Выбирать «Контроллеры», затем "Сменить хват/порядок".
- Нажмите и удерживайте Кнопка сопряжения on the top of the LinYuvo KS10 controller for a few seconds until the indicator lights start flashing rapidly.
- Once paired, the controller will appear on the Switch screen, and the indicator light(s) on the controller will remain solid.
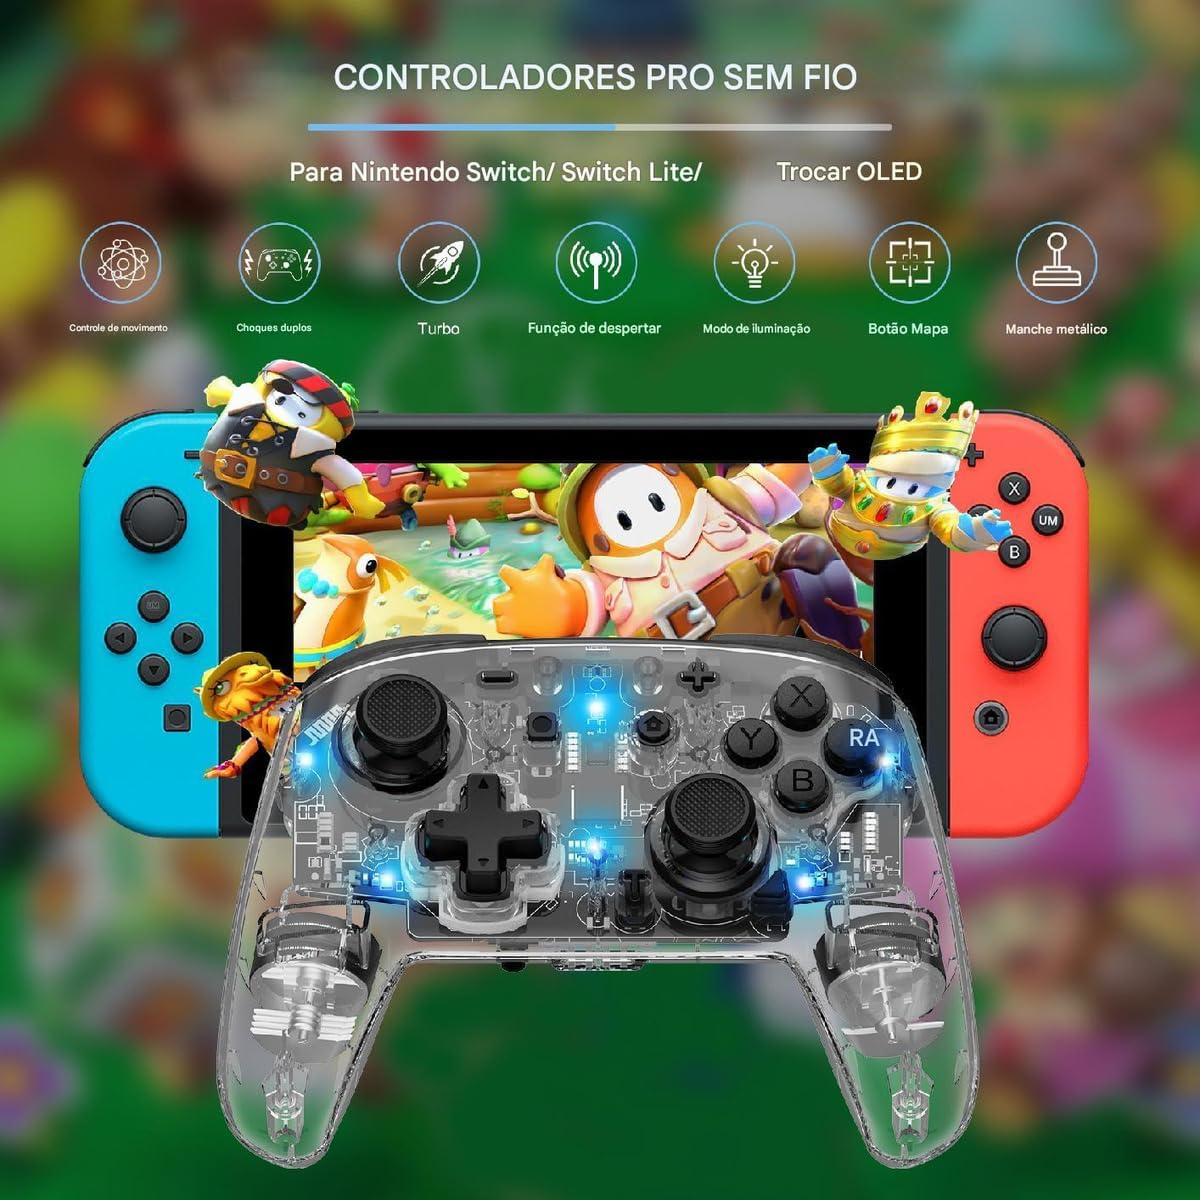
Figure 3.1: The LinYuvo KS10 controller shown alongside a Nintendo Switch console, illustrating its compatibility.
3.3. Pairing with Windows/SteamOS
- Ensure your Windows PC or SteamOS device has Bluetooth enabled.
- Перейдите в настройки Bluetooth на своем устройстве и выберите "Добавить Bluetooth или другое устройство".
- Нажмите и удерживайте Кнопка сопряжения on the LinYuvo KS10 controller until the indicator lights flash rapidly.
- Select the controller from the list of available devices to complete pairing.
3.4. Pairing with iOS Devices
- On your iOS device, go to Настройки > Bluetooth и убедитесь, что Bluetooth включен.
- Нажмите и удерживайте Кнопка сопряжения on the LinYuvo KS10 controller until the indicator lights flash rapidly.
- Look for the controller in the "Other Devices" list and tap to connect.
3.5. Функция пробуждения
To activate a connected Switch console from sleep mode, simply press and hold the "ДОМ" button on the controller for approximately 3 seconds.

Figure 3.2: The controller's ergonomic design and the instruction to hold the HOME button for 3 seconds to wake up the Switch console.
4. Инструкция по эксплуатации
4.1. Основные элементы управления
The LinYuvo KS10 controller features standard button layouts including A, B, X, Y buttons, D-pad, Left/Right joysticks, L/R and ZL/ZR shoulder buttons, HOME, SELECT, START, and screenshot buttons. Refer to in-game instructions for specific button functions.
4.2. Функция Турбо
The Turbo function allows for rapid, continuous input of a selected button. It has three adjustable speeds: 5 shots/second, 12 shots/second, and 20 shots/second.
- Чтобы активировать Turbo: Нажмите и удерживайте Кнопка Турбо (T), then press the desired action button (e.g., A, B, X, Y, L, R, ZL, ZR). The button will now continuously fire when held down.
- Чтобы отрегулировать скорость Турбо: Удерживая Кнопка Турбо (T), нажмите кнопку Минус (-) button to decrease speed or the Плюс (+) button to increase speed. The corresponding light will flash slowly, medium, or fast to indicate the speed level.
- Чтобы отключить Turbo: Нажмите и удерживайте Кнопка Турбо (T)Затем снова нажмите кнопку действия.

Figure 4.1: Visual representation of the adjustable Turbo function with three speed settings (5/s, 12/s, 20/s) and instructions for adjustment.
4.3. Gyroscope Motion Control
The integrated six-axis gyroscope provides motion control capabilities for games that support it. This allows for immersive gameplay where tilting and moving the controller translates into in-game actions.

Figure 4.2: A user demonstrating gyroscope motion control with the LinYuvo KS10 controller in a racing game scenario.
4.4. Adjustable Vibration Feedback
The controller features dual motors for haptic feedback. The vibration intensity can be adjusted to suit personal preference.
- Чтобы настроить вибрацию: Нажмите и удерживайте Vibration button (UM), затем используйте Вверх/Вниз directional buttons on the D-pad to increase or decrease intensity.
- Available levels typically include 0%, 30%, 50%, 75%, and 100%.

Figure 4.3: Illustration of the adjustable vibration feedback levels (0%, 30%, 50%, 75%, 100%) provided by the integrated dual motors.
4.5. Красочные световые эффекты
The controller includes customizable RGB lighting to enhance the gaming ambiance. There are various lighting modes and colors.
- To change lighting mode/color: Нажмите Lighting button (often represented by a lightbulb icon or a specific combination) to cycle through different colors (Blue, Red, Yellow, Green, Orange, Purple, Pink) or breathing patterns (e.g., rainbow breathing).
- Чтобы отрегулировать яркость: Нажмите и удерживайте Кнопка освещения и используйте Кнопка Y для регулировки уровней яркости.
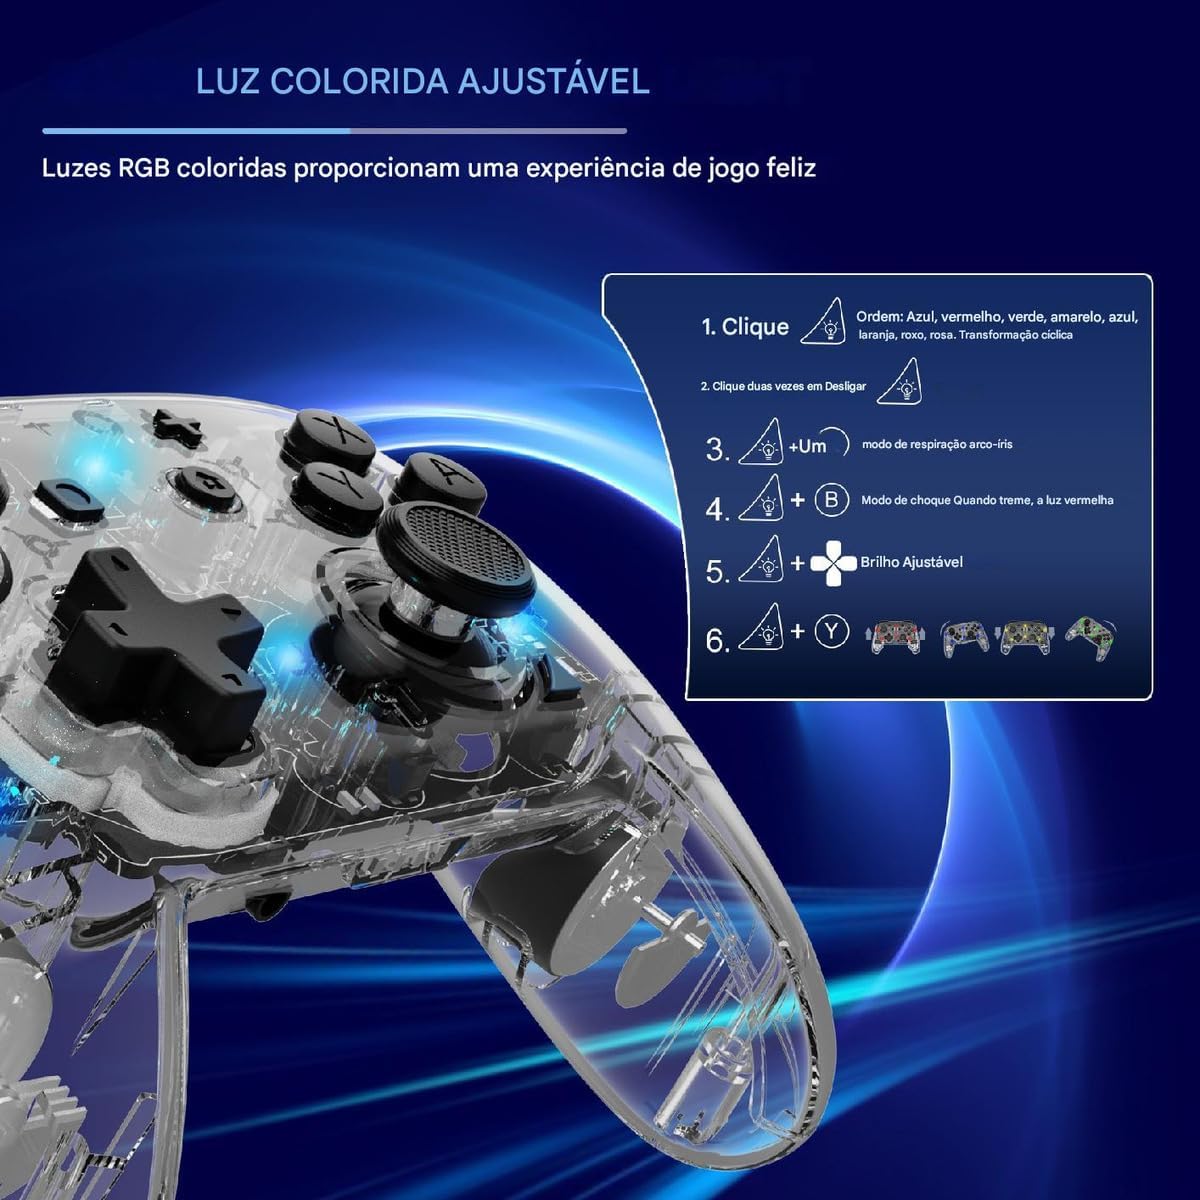
Figure 4.4: Diagram illustrating how to adjust the colorful RGB lighting, including color order and brightness settings.
4.6. Macro Programming (Back-Keys)
The back-keys on the controller can be programmed with custom macros, allowing for complex button sequences to be executed with a single press.
- To enter Macro Programming Mode: Refer to the specific instructions provided with your controller for the exact button combination (e.g., a dedicated Macro button + the back-key you wish to program).
- To record a Macro: While in programming mode, press the sequence of buttons you want to record.
- To save the Macro: Press the Macro button again to save the sequence to the selected back-key.
- To use a Macro: Press the programmed back-key to execute the recorded sequence.
Note: Detailed macro programming steps may vary. Consult the included quick start guide or manufacturer's website for precise instructions.
5. Техническое обслуживание
- Уборка: Для чистки контроллера используйте мягкую сухую ткань. Не используйте едкие химикаты или абразивные материалы.
- Хранилище: Храните контроллер в прохладном, сухом месте, вдали от прямых солнечных лучей и экстремальных температур.
- Уход батареи: Избегайте частой полной разрядки аккумулятора. Регулярно заряжайте контроллер, даже если он не используется в течение длительного времени, чтобы поддерживать его работоспособность.
- Избегайте капель: Оберегайте контроллер от падений и ударов, которые могут повредить внутренние компоненты.
6. Поиск Неисправностей
| Проблема | Возможная причина | Решение |
|---|---|---|
| Контроллер не включается. | Низкий заряд батареи. | Заряжайте контроллер не менее 30 минут. |
| Не удалось выполнить сопряжение с устройством. | Bluetooth not enabled; controller not in pairing mode; interference. | Ensure Bluetooth is on. Put controller in pairing mode (flashing lights). Move closer to the device. Restart both devices. |
| Задержка ввода или обрыв связи. | Низкий заряд батареи; слишком большое расстояние до устройства; беспроводные помехи. | Charge controller. Move closer to device. Reduce other wireless activity. |
| Кнопки или джойстики не реагируют. | Сбой программного обеспечения; физическое повреждение. | Restart the controller and the connected device. If problem persists, contact support. |
| Вибрация не работает. | Vibration level set to 0%; game does not support vibration. | Adjust vibration intensity (Section 4.4). Check game settings. |
7. Технические характеристики
- Модель: КС10
- Связь: Беспроводная связь (Bluetooth)
- Совместимость: Nintendo Switch, Windows, SteamOS, iOS
- Особые характеристики: Six-axis gyroscope, adjustable vibration, customizable RGB lighting, Turbo function, macro programming back-keys, metal joysticks.
- Источник питания: Перезаряжаемая внутренняя батарея
- Порт зарядки: USB-C
- Страна происхождения: Китай
- ASIN: B0F18PLLLF
8. Гарантия и поддержка
For warranty information and technical support, please refer to the documentation included with your purchase or contact the retailer. Keep your proof of purchase for any warranty claims.
This product is not an official Nintendo product but is compatible with the Nintendo Switch console.


