Введение
This manual provides detailed instructions for the setup, operation, and maintenance of your Geevon Wireless Digital Refrigerator Thermometer. This device is designed to monitor temperatures in your refrigerator, freezer, or other environments using two wireless sensors, ensuring optimal storage conditions for your items.
Перед использованием изделия внимательно ознакомьтесь с данным руководством, чтобы обеспечить его правильную работу и максимально продлить срок службы.
Содержимое упаковки
После распаковки убедитесь, что все компоненты присутствуют и находятся в хорошем состоянии:
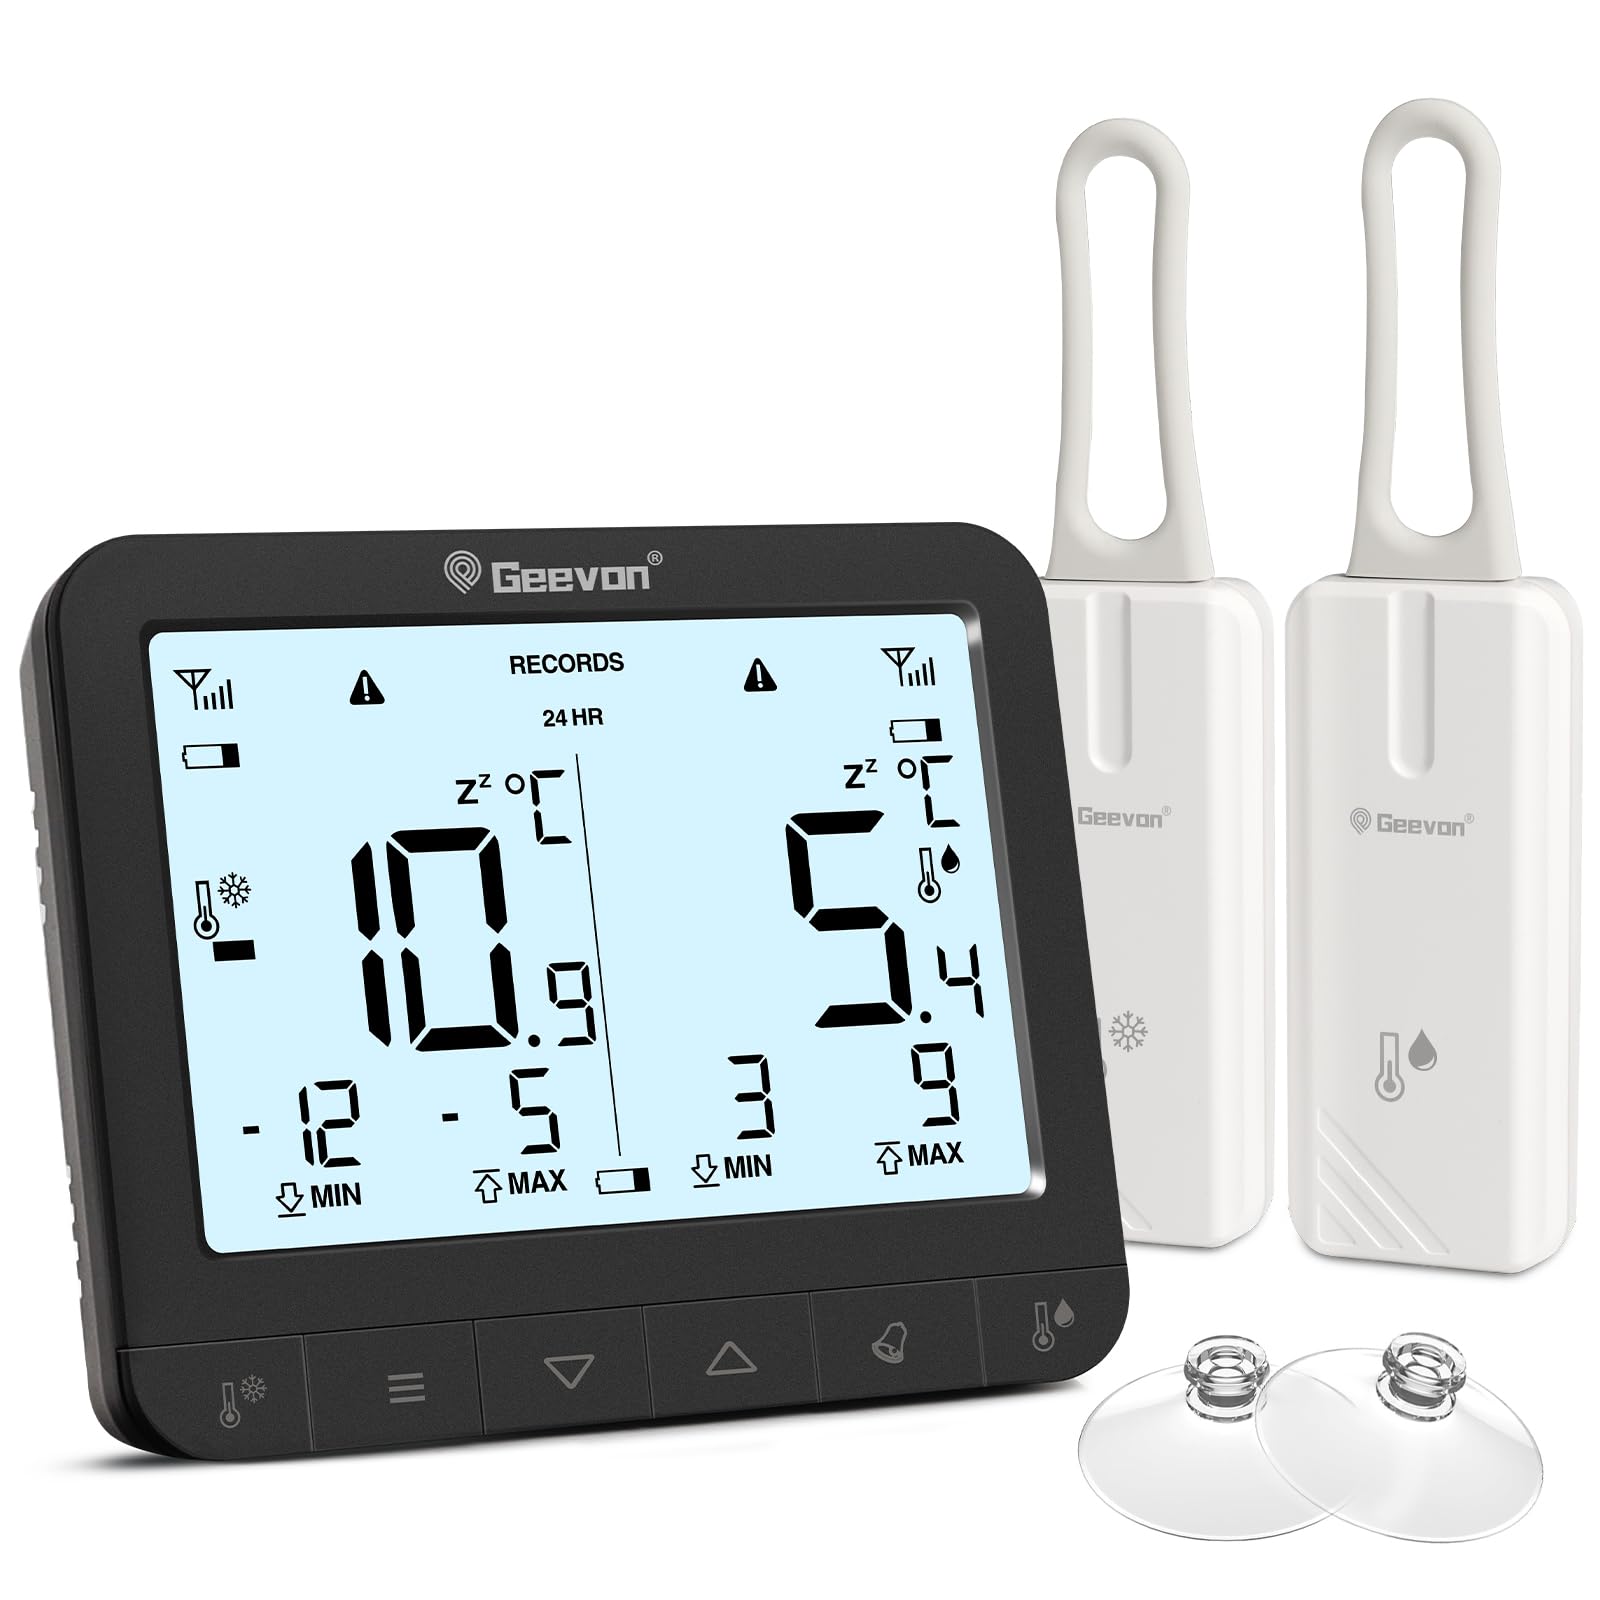
- 1 x Основной дисплейный блок
- 2 x Wireless Sensors
- 6 x AAA Batteries (for main unit)
- 2 x CR2032 Batteries (pre-installed in sensors or included separately)
- 1 x Руководство пользователя (этот документ)
- 2 x Suction Cups (for sensor mounting)

The image displays the main unit, two sensors, and accessories including suction cups for installation.
Инструкции по установке
1. Установка аккумулятора
Для основного дисплейного блока:
- Найдите батарейный отсек на задней стороне основного устройства.
- Откройте крышку батарейного отсека.
- Вставьте 6 батарейки типа ААА, соблюдая правильную полярность (+/-).
- Плотно закройте крышку батарейного отсека.
For the Wireless Sensors:
- Locate the battery compartment on the back of each sensor.
- Откройте крышку батарейного отсека.
- Insert 1 CR2032 battery into each sensor, observing the correct polarity (+/-).
- Плотно закройте крышку батарейного отсека.
The image illustrates the battery compartments for both the main unit and the wireless sensors.
2. Размещение датчика
The wireless sensors can be placed inside your refrigerator, freezer, or any other area where temperature monitoring is desired. Ensure the sensors are not submerged in liquid and are placed in a location where they can transmit signals to the main unit.
- Подвесной: Use the integrated loop to hang the sensor from a shelf or rack.
- Магнитное крепление: The sensors have built-in magnets for attachment to metallic surfaces.
- Присоски: Attach the provided suction cups to the sensor for mounting on smooth surfaces like glass or plastic.

This image demonstrates different ways to position the wireless sensors within a refrigerator or freezer.
The main display unit can be placed on a countertop using its integrated stand or mounted on a metallic surface using its rear magnets.
Инструкция по эксплуатации
Показать большеview

The main display unit shows current temperatures for two channels, along with max/min records and status icons.
The display shows temperatures for two channels (CH1 and CH2), along with their respective maximum (MAX) and minimum (MIN) recorded temperatures. Signal strength indicators for each sensor and battery level indicators are also present.
1. Temperature Unit Selection (℃/℉)
On the back of the main display unit, locate the small "C/F" button. Press this button to toggle between Celsius (℃) and Fahrenheit (℉) temperature units.

This image highlights the C/F switch on the back of the main unit and other key features.
2. Max/Min Temperature Records
The display shows the maximum and minimum temperatures recorded over a 24-hour period. To view historical max/min records (since the last reset or power cycle), briefly press the "UP" or "DOWN" buttons on the main unit. To reset the max/min records, press and hold the "CLEAR" button (usually indicated by a trash can icon or similar) for a few seconds.
3. 2-Channel Alarm Setting
The thermometer allows you to set high and low temperature alarms for each channel.
- Briefly press the channel button (e.g., "CH1" or "CH2" button, or a general "Channel" button) to enter alarm setting mode for that channel.
- Use the "UP" and "DOWN" buttons to adjust the desired high and low temperature thresholds.
- Press and hold the "Alarm" button (often indicated by a bell icon) to toggle the alarm function ON or OFF for the selected channel.
- An audible alarm will sound if the temperature exceeds the set high threshold or falls below the set low threshold.

This image illustrates the alarm function, showing how to set upper and lower temperature limits for alerts.
4 Функция подсветки
To illuminate the display for easier reading in low-light conditions, touch the light bulb icon on the top of the main unit. The backlight will activate for approximately 10 seconds.
Основные характеристики
- Dual Wireless Sensors: Monitor two separate locations simultaneously.
- Широкий диапазон температур: Measures temperatures from -40°C to 37°C (-40°F to 98.6°F).
- Макс./мин. запись: Tracks the highest and lowest temperatures recorded over 24 hours or historically.
- Звуковые сигналы: Alerts you when temperatures exceed or fall below preset thresholds.
- Индикатор низкого заряда батареи: Displays icons for low battery on both the main unit and sensors.
- Подсветка: Provides temporary illumination for clear reading in dim environments.
- Универсальное размещение: Main unit features a stand and magnets; sensors can be hung, magnetically attached, or secured with suction cups.
The thermometer is suitable for various applications, including refrigerators, freezers, and wine coolers.
Обслуживание
- Уборка: Протрите основной блок и датчики мягкой тряпкой.amp не используйте абразивные чистящие средства и не погружайте устройства в воду.
- Замена батареи: Replace batteries promptly when the low battery indicator appears on the display. Refer to the "Battery Installation" section for instructions.
- Хранилище: При длительном хранении устройства извлеките все батарейки, чтобы предотвратить протечку. Храните в прохладном, сухом месте.
Индикатор низкого заряда батареи
The display unit features separate low battery indicators for the main unit and each sensor. When a battery icon appears, it indicates that the corresponding battery needs replacement.

This image highlights the low battery indicators for the sensors and the main display unit.
Поиск неисправностей
| Проблема | Возможная причина | Решение |
|---|---|---|
| На основном блоке нет дисплея. | Батарейки разряжены или установлены неправильно. | Проверьте полярность батареек и замените их новыми батарейками типа ААА. |
| Sensor reading "---" or inaccurate. | Батарейки в датчике разряжены, датчик находится вне зоны действия или присутствуют помехи. | Replace sensor CR2032 batteries. Move sensor closer to the main unit. Avoid placing near large metal objects or electronics that may cause interference. |
| Будильник не звучит. | Alarm function is off or thresholds are set too wide. | Ensure the alarm is enabled for the desired channel. Adjust alarm thresholds to appropriate levels. |
| Подсветка не работает. | Батареи основного блока разряжены или находятся в низком состоянии. | Replace main unit AAA batteries. |
Технические характеристики
| Бренд | Дживон |
| Номер модели | 86218 |
| Размеры продукта (основной блок) | 16 x 4.8 x 17.5 см (6.3 x 1.9 x 6.9 дюймов) |
| Масса | 310 г (0.68 фунта) |
| Мощность основного блока | 6 батарейки ААА (в комплекте) |
| Мощность датчика | 1 x CR2032 Battery per sensor (included) |
| Диапазон температур | -40°C до 37°C (-40°F до 98.6°F) |
| Точность измерения | ± 0.1 ℉/℃ |
| Тип дисплея | Цифровой LCD |
| Особые возможности | Low Battery Indicator, Backlit Display, Max/Min Record, 2-Channel Alarm |
| Материал | Акрилонитрилбутадиенстирол (АБС) |
Гарантия и поддержка
Geevon is committed to providing high-quality products. For any questions, issues, or support needs regarding your Geevon Refrigerator Thermometer, please contact our customer service. We offer lifetime consultation service for our products.
Please refer to your purchase documentation or the official Geevon webсайт для получения подробной информации об условиях гарантии и контактной информации.
Онлайн поддержка: Contact Seller (GEEVON UK)


