1. Введение
This manual provides detailed instructions for the ACEMIC AT-5 Acoustic Guitar Wireless Microphone System. This system is designed to provide high-fidelity audio transmission for plucked string instruments, offering freedom of movement and clear sound reproduction. It utilizes UHF frequency for stable wireless connectivity and features a flexible gooseneck microphone for precise sound capture.
2. Содержимое упаковки
Пожалуйста, убедитесь, что все перечисленные ниже предметы включены в ваш пакет:
- 1 x ACEMIC AT-5 Wireless Microphone Transmitter (with gooseneck microphone)
- 1 x ACEMIC AT-5 Wireless Receiver (with 6.35mm jack and antenna)
- Зарядный кабель 1 x USB-C
- 1 x 3.5mm Audio Jack Adapter
- 5 x Velcro Adhesive Attachments
- 1 x Spare Microphone Foam Cover
- 1 х Руководство пользователя
- 1 х сумка для переноски
3. Продукт закончилсяview
The ACEMIC AT-5 system consists of two main components: the Transmitter and the Receiver.
3.1. Transmitter (Microphone Unit)
- Микрофон на гибкой стойке: Flexible arm for precise positioning.
- Microphone Foam Cover: Reduces plosives and wind noise.
- Кнопка питания: Для включения/выключения устройства.
- Порт зарядки (USB-C): Для подзарядки внутренней батареи.
- ИК-датчик: For automatic pairing with the receiver.
3.2. Приемник
- Аудиоразъем 6.35 мм: Подключается к amplifiers, mixers, or PA systems.
- Антенна: Для стабильного приема сигнала.
- Кнопка питания: Для включения/выключения устройства.
- Порт зарядки (USB-C): Для подзарядки внутренней батареи.
- Отображать: Показывает информацию о канале.
- Кнопка переключения каналов: For manual channel selection.
- ИК-датчик: For automatic pairing with the transmitter.

4. Инструкции по настройке
Follow these steps to set up your ACEMIC AT-5 wireless microphone system:
4.1. Зарядка устройств
- Connect the USB-C charging cable to the charging ports on both the transmitter and receiver units.
- Подключите другой конец кабеля к USB-адаптеру питания (не входит в комплект) или к USB-порту с питанием.
- The charging indicator will illuminate. A full charge typically takes 2.5 to 3 hours.
- Once fully charged, the indicator light will change or turn off, depending on the unit.

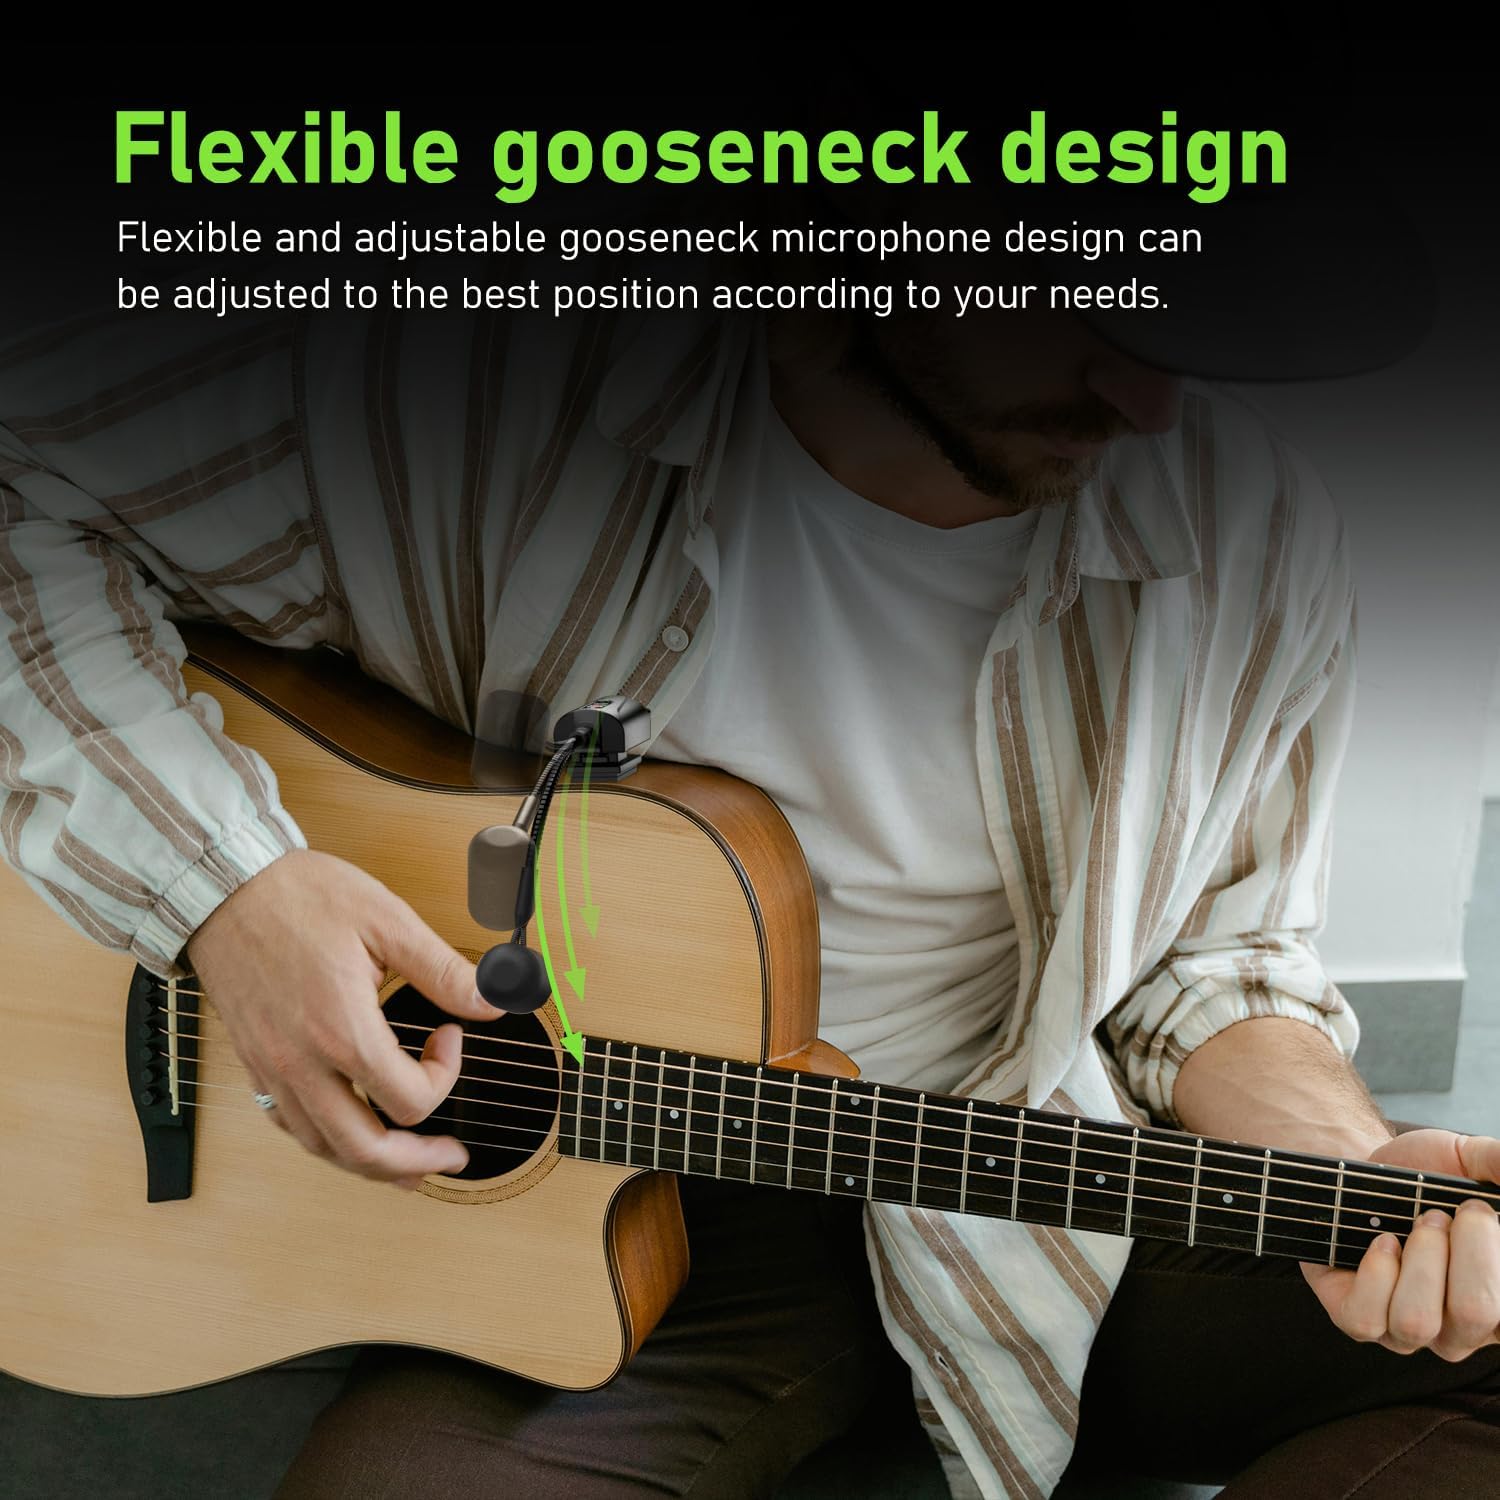
4.2. Attaching the Transmitter to Your Instrument
- Select a suitable location on your acoustic guitar, typically near the sound hole, where the transmitter can be securely attached without obstructing your playing.
- Peel the backing from one of the Velcro adhesive attachments.
- Apply the adhesive side firmly to the chosen spot on your guitar.
- Attach the transmitter unit to the Velcro. Ensure it is secure.
- Adjust the flexible gooseneck microphone to point towards the sound hole or strings for optimal sound capture.

4.3. Подключение ресивера
- Ensure the antenna on the receiver is correctly installed and extended.
- Plug the 6.35mm audio jack of the receiver directly into the input of your amplifier, PA system, or audio mixer.
- If your device requires a 3.5mm input, use the provided 3.5mm audio jack adapter.
4.4. Сопряжение единиц
The ACEMIC AT-5 system features automatic infrared pairing:
- Power on both the transmitter and the receiver units.
- Place the IR sensors of the transmitter and receiver close to each other (within a few inches).
- The units will automatically pair. A successful connection is usually indicated by a stable light on both units.

5. Операция
5.1. Включение и выключение
Press and hold the power button on each unit to turn it on or off.
5.2. Выбор канала
The system offers 16 preset groups of adjustable channels to mitigate potential interference. If you experience interference, you can manually switch channels on the receiver using the channel switch button. Ensure that the transmitter and receiver are on the same channel for proper operation.

5.3. Размещение микрофона
Adjust the flexible gooseneck microphone to achieve the desired sound. Experiment with different angles and distances from the sound hole or strings to find the optimal position for your instrument and playing style. The built-in high-sensitivity condenser microphone is designed to capture clear and realistic audio.

5.4. Беспроводная передача
The ACEMIC AT-5 system uses UHF frequency for stable transmission up to 130 feet (approximately 40 meters) in open areas. Performance may vary depending on environmental factors and obstacles.

6. Техническое обслуживание
6.1. Уборка
Wipe the units with a soft, dry cloth. Do not use liquid cleaners or solvents, as they may damage the finish or internal components.
6.2. Хранение
When not in use, store the ACEMIC AT-5 system in its carrying bag in a cool, dry place, away from direct sunlight and extreme temperatures. Ensure the units are turned off before storage.
6.3. Уход за аккумулятором
To prolong battery life, avoid completely discharging the units regularly. Recharge them periodically, even if not in frequent use.
7. Поиск Неисправностей
If you encounter issues with your ACEMIC AT-5 system, refer to the following common problems and solutions:
| Проблема | Возможная причина | Решение |
|---|---|---|
| Нет звука | Устройства не включены Единицы не парные Receiver not connected to audio input Receiver antenna not installed/extended Низкий заряд батареи | Убедитесь, что передатчик и приемник включены. Re-pair the units using the infrared sensors. Verify the receiver is securely plugged into your ampЛиффер/миксер. Ensure the receiver antenna is properly installed and extended. Полностью зарядите оба устройства. |
| Помехи или статический шум | Рядом электронные устройства Other wireless signals Препятствия между подразделениями | Отойдите подальше от потенциальных источников помех. Change the operating channel on the receiver. Обеспечьте прямую видимость между передатчиком и приемником. |
| Poor sound quality (e.g., muffled, weak) | Неправильное расположение микрофона Микрофон расположен слишком далеко от источника звука. Низкий заряд батареи | Adjust the gooseneck microphone closer to the sound hole or strings. Убедитесь, что устройства полностью заряжены. |
| Малый радиус действия передачи | Препятствия, блокирующие сигнал Факторы окружающей среды Низкий заряд батареи | Сведите к минимуму препятствия между передатчиком и приемником. Убедитесь, что устройства полностью заряжены. |
| Transmitter not attaching securely | Velcro adhesive worn out | Use a fresh Velcro adhesive attachment. (5 spare pieces are included). |
8. Технические характеристики
| Особенность | Деталь |
|---|---|
| Название модели | АТ-5 |
| Бренд | АЦЕМИК |
| Технология связи | УВЧ |
| Форм-фактор микрофона | Гусиная шея |
| Количество каналов | 16 |
| Источник питания | Питание от батареи (требуется 2 литий-полимерные батареи) |
| Время работы | 6 часа |
| Время зарядки | 2.5 - 3 часа |
| Дальность передачи | На открытых пространствах глубина до 130 футов (приблизительно 40 метров) |
| Sampскорость | 48кГц |
| Задержка | <6мс |
| Вес товара | 0.46 килограммов (1.01 фунта) |
| Полярная диаграмма | Однонаправленный |
| Тип разъема | Разъем 6.35 мм (с адаптером 3.5 мм в комплекте) |
| СКП | 797417770397 |
9. Гарантия и поддержка
For warranty information and technical support, please refer to the documentation provided with your purchase or contact the seller/manufacturer directly. Specific warranty terms may vary by region and retailer.


