1. Введение
Thank you for choosing the FLYLINKTECH 5000A Jump Starter. This portable device is designed to provide instant power to jump-start 12V vehicles, charge electronic devices, and offer emergency lighting. Please read this manual thoroughly before use to ensure safe and optimal performance.
2 Важная информация по безопасности
- Перед использованием всегда убедитесь, что пусковое устройство полностью заряжено.
- Не пытайтесь запустить двигатель при помощи прикуривателя, если аккумулятор замерз.
- Подключите кл.amps correctly: red to positive (+), black to negative (-). Reverse polarity can cause damage.
- Не подключайте красный и черный кл.ampвместе.
- Хранить в недоступном для детей месте.
- Используйте в хорошо проветриваемом помещении.
- Не подвергайте устройство воздействию экстремальных температур или прямых солнечных лучей в течение длительного времени.
- Если устройство сильно нагревается во время использования, немедленно отключите его от сети.
- Для получения подробной информации о процедуре запуска двигателя с помощью пусковых проводов обратитесь к руководству по эксплуатации вашего автомобиля.
3. Содержимое упаковки
Проверьте наличие всех предметов в посылке:
- FLYLINKTECH 5000A Jump Starter (Model BD10)
- Умные кабели-перемычки
- Зарядный кабель USB-C
- Кейс для хранения EVA
- Руководство пользователя

Image: Contents of the FLYLINKTECH 5000A Jump Starter package, including the jump starter unit, smart jumper cables, USB-C charging cable, and EVA storage case.
4. Продукт закончилсяview
Familiarize yourself with the components and ports of your jump starter:
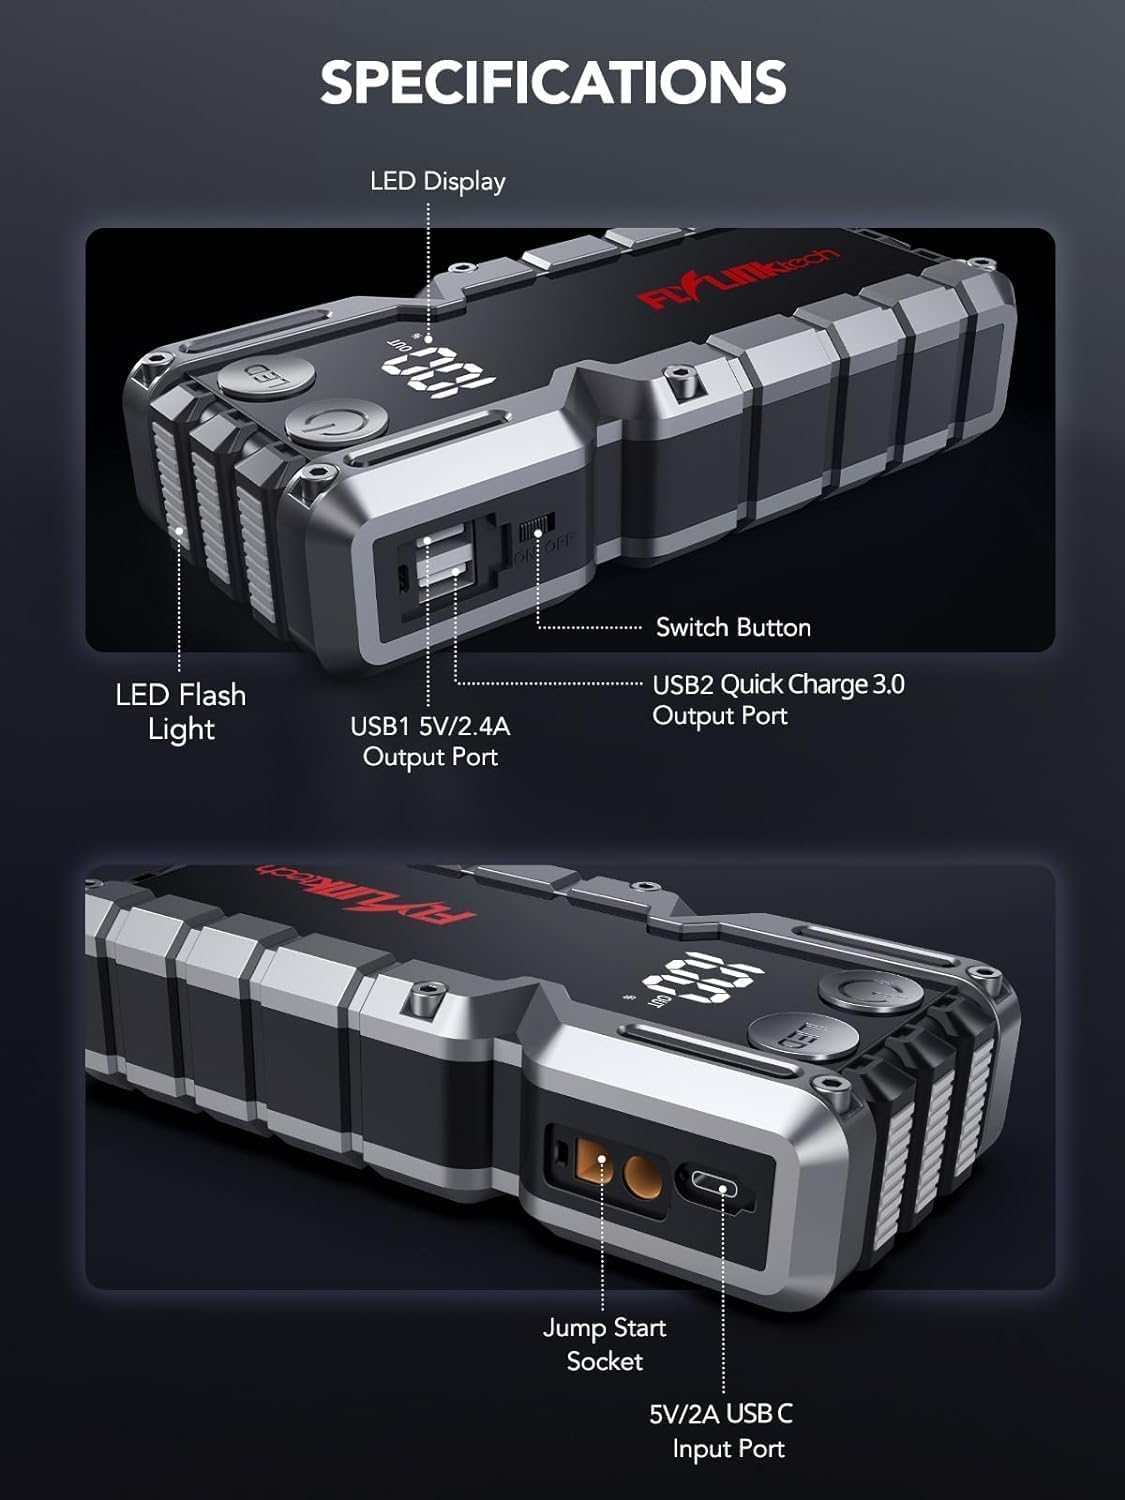
Изображение: подробное view of the jump starter showing the LED display, LED flashlight, power button, switch button, USB1 5V/2.4A output port, USB2 Quick Charge 3.0 output port, Jump Start Socket, and 5V/2A USB-C input port.
- Светодиодный дисплей: Показывает процент заряда батареиtage.
- Светодиодный фонарик: Обеспечивает освещение в нескольких режимах.
- Кнопка питания: Активирует устройство и управляет режимами работы фонарика.
- Кнопка переключения: Основной регулятор мощности.
- Выход USB1 (5 В/2.4 А): Стандартный USB-порт для зарядки.
- Выход USB2 (QC3.0): Quick Charge 3.0 port for faster charging.
- Розетка для запуска двигателя: Подключается к интеллектуальным пусковым кабелям.
- Вход USB-C (5 В/2 А): Used to recharge the jump starter.
5. Зарядка пускового устройства
Перед первым использованием полностью зарядите пусковое устройство. Рекомендуется заряжать устройство каждые 3-6 месяцев для поддержания работоспособности батареи.
- Подключите прилагаемый зарядный кабель USB-C к входному порту USB-C на пусковом устройстве.
- Connect the other end of the USB-C cable to a 5V/2A USB wall adapter (not included) or a car charger.
- На светодиодном дисплее будет отображаться ход зарядки. Устройство полностью заряжено, когда на дисплее отобразится 100%.

Image: The jump starter connected via USB to charge a smartphone and a tablet, demonstrating its power bank functionality.
6. Запуск двигателя от внешнего источника питания
Follow these steps carefully to safely jump-start your 12V vehicle:
- Подготовьте пусковое устройство: Ensure the jump starter is at least 50% charged. Turn off your vehicle's ignition and all accessories (headlights, radio, etc.).
- Подключите кабели Smart Jumper Cables: Insert the blue plug of the smart jumper cables into the Jump Start Socket on the jump starter. Ensure a firm connection. The indicator light on the smart clamp Будут мигать красным и зеленым.
- Подключение к аккумулятору транспортного средства:
- Прикрепите красный (+) clamp к положительной клемме аккумулятора вашего автомобиля.
- Прикрепите черный (-) clamp к отрицательной клемме аккумулятора вашего автомобиля.
После правильного подключения индикатор на смарт-контроллере загорится.amp станет сплошным зеленым.
- Запустите автомобиль: Go into your vehicle and start the engine. If the vehicle does not start immediately, wait 30 seconds and try again. If it still doesn't start, press the "BOOST" button on the smart clamp for 3 seconds until the green light turns solid, then try starting the car again within 30 seconds.
- Отсоедините кабели: Once the engine starts, immediately remove the smart jumper cables from the vehicle battery, then disconnect them from the jump starter.

Image: Visual guide for jump-starting: 1. Insert jump clamp 1. Подключите усилитель. 2. Подключите clamps to car battery. 3. Start your car. 4. Remove clamps.

Изображение: Умный шкафamps connected to the jump starter, illustrating the 10-layer safety protections including short circuit, reverse charge, over charge, reverse polarity, over discharge, over current, reverse connection, and high temperature protection.
7. Использование в качестве внешнего аккумулятора
The jump starter can also be used to charge your electronic devices.
- Connect your device's USB charging cable to either the USB1 (5V/2.4A) or USB2 (QC3.0) output port on the jump starter.
- Пусковое устройство автоматически начнет заряжать ваше устройство.
- The LED display will show the remaining battery capacity of the jump starter.

Image: The jump starter functioning as a portable power bank, with two USB output ports (5V/2.4A and Quick Charge 3.0) actively charging a smartphone and a tablet.
8. Использование светодиодного фонарика
The built-in 600-lumen LED flashlight has three modes for various situations:
- Чтобы включить/выключить: Press and hold the LED button for 3 seconds.
- Для переключения режимов: Once the light is on, short press the LED button to switch between:
- Постоянно включено: Для общего освещения.
- Режим SOS: Flashes the international SOS signal for emergencies.
- Режим строба: Быстрое мигание для предупреждения или подачи сигнала.

Image: The jump starter with its LED flashlight active, illustrating the three available modes: standard flashlight, SOS signal, and strobe light for emergencies.
9. Техническое обслуживание
- Уборка: Протрите устройство мягкой сухой тканью. Не используйте агрессивные химикаты или абразивные материалы.
- Хранилище: Store the jump starter in its EVA case in a cool, dry place away from direct sunlight. Ensure it is charged to at least 50% before storing for extended periods. Recharge every 3-6 months.
- Уход батареи: The internal lithium-ion battery is designed for long life. Avoid fully discharging the unit frequently.

Водостойкая конструкция.

Rugged ABS shell for drop resistance.

Operates in extreme temperatures (-4°F to 140°F).
10. Поиск Неисправностей
| Проблема | Возможная причина | Решение |
|---|---|---|
| Vehicle won't start after connecting. | Аккумулятор пускового устройства разряжен; неправильный зарядamp соединение; аккумулятор автомобиля полностью разряжен. | Убедитесь, что пусковое устройство полностью заряжено. Проверьте кл.amp connections (red to +, black to -). Press the "BOOST" button on the smart clamp for 3 seconds and try again. |
| Смарт clamp Индикаторная лампочка горит красным/мигает. | Обратная полярность; короткое замыкание; перегрев. | Отключить кл.amps and re-connect correctly. Check for any short circuits. Allow unit to cool down if overheated. |
| Пусковое устройство не заряжает. | Неисправный зарядный кабель или адаптер; плохое соединение. | Ensure USB-C cable and adapter are working and connected securely. Try a different cable or adapter. |
| Светодиодный фонарик не работает. | Not activated correctly; low battery. | Press and hold the LED button for 3 seconds to activate. Ensure the jump starter has sufficient charge. |
11. Технические характеристики
| Особенность | Деталь |
|---|---|
| Пиковый ток | 5000А |
| Емкость аккумулятора | 18000 мАч (66.6 Втч) |
| Старт Томtage | 12В |
| Совместимость двигателя | До 9.0 л бензина / 8.0 л дизельного топлива |
| USB-выход 1 | 5В/2.4А |
| USB-выход 2 | QC3.0 |
| Вход USB-C | 5В/2А |
| Светодиодный фонарик | 600-Lumen (Constant, SOS, Strobe) |
| Рабочая температура | от -4°F до 140°F (от -20°C до 60°C) |
| Размеры | 4.2 х 9 х 19 см |
| Масса | 540 г (1.19 фунта) |
| Меры безопасности | 10-Layer (Short Circuit, Reverse Polarity, Over-Current, etc.) |
12. Гарантия и поддержка
The FLYLINKTECH 5000A Jump Starter comes with an industry-leading Гарантия 3 год с даты покупки. Данная гарантия распространяется на производственные дефекты и обеспечивает надежную работу.
For technical support, warranty claims, or any questions regarding your product, please contact FLYLINKTECH customer service through the retailer's platform or visit our official webсайт.
Сохраните чек о покупке для подтверждения гарантии.