1. Введение
This instruction manual provides detailed guidance for the installation, operation, and maintenance of your BETOWEY TK-X2 Motorcycle Intercom Microphone and Speaker Kit. This kit is designed exclusively for seamless integration with BETOWEY TK-X2 motorcycle intercom systems and cannot be used independently. It enhances your riding communication experience with clear audio and versatile setup options.

Image 1: The accessory kit is suitable for the TK-X2 Helmet Intercom, showing the main unit and various components.
2. Содержимое упаковки
Пожалуйста, убедитесь, что в комплект поставки входят все следующие компоненты:
- Проводной микрофон
- Проводной микрофон на штанге
- Speakers (pair)
- Clamp для основного блока
- Hook-and-Loop Fasteners for Main Unit
- Hook-and-Loop Fasteners for Speakers and Microphones
3. Настройка и установка
This kit offers versatile options for microphone types and installation methods to suit various helmet designs and user preferences.
3.1. Microphone Types
The kit includes two types of microphones:
- Проводной микрофон: Ideal for full-face helmets where the microphone can be discreetly placed inside the helmet.
- Wired Boom Microphone: Suitable for open-face or modular helmets, allowing the microphone to be positioned closer to the mouth.
3.2. Установка динамиков
- Найдите карманы для ушей внутри шлема.
- Attach the hook-and-loop fasteners to the back of each speaker.
- Securely place the speakers into the helmet's ear pockets. Ensure they are positioned comfortably over your ears.
3.3. Установка микрофона
- Choose the appropriate microphone type for your helmet.
- For the wired microphone, attach its hook-and-loop fastener to a suitable flat surface inside the helmet, near your mouth.
- For the wired boom microphone, attach its hook-and-loop fastener to the inside of the helmet's chin bar or cheek pad, positioning the boom arm towards your mouth.
- Route the microphone cable discreetly along the helmet's interior to the location where the main intercom unit will be mounted.
3.4. Монтаж основного блока
Two methods are available for mounting the main intercom unit:
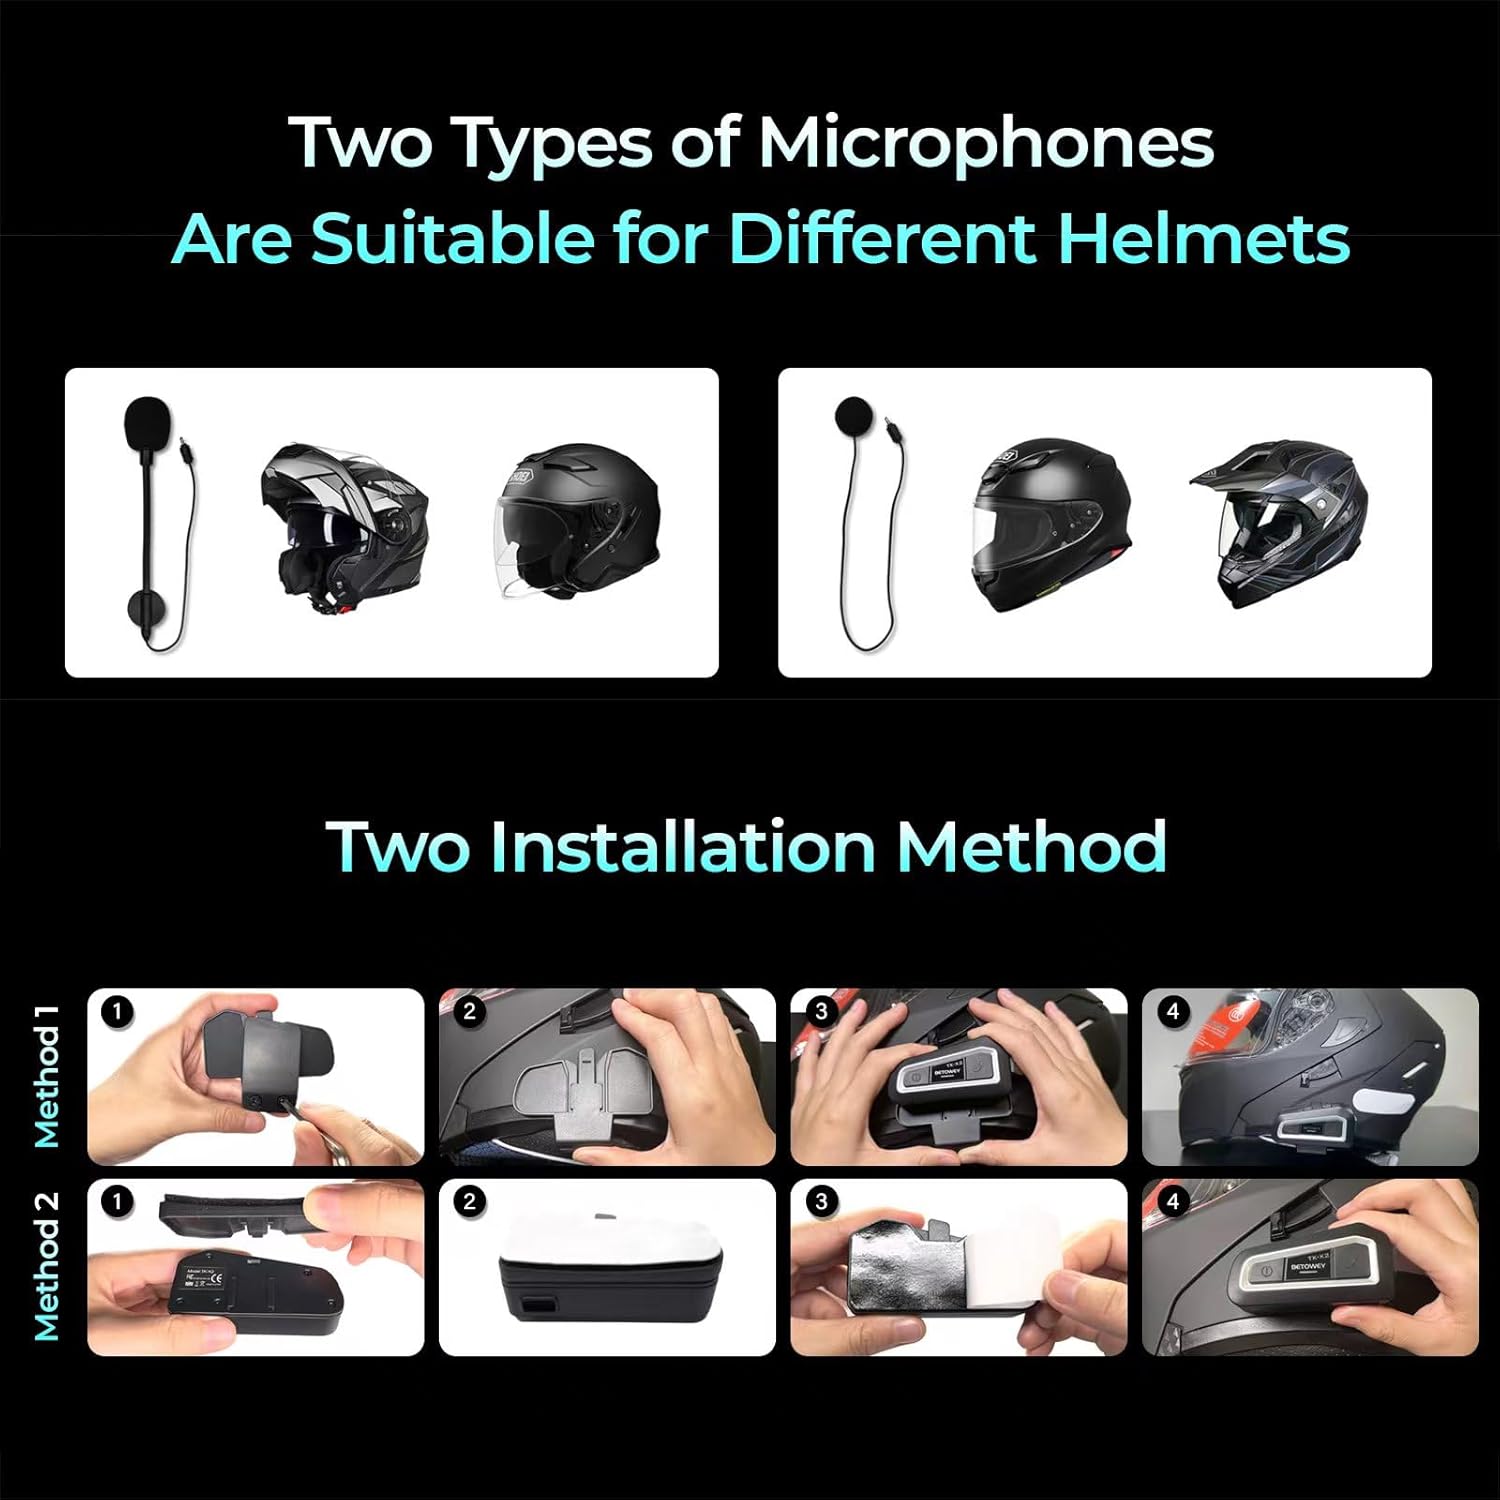
Image 2: Illustrates two types of microphones suitable for different helmets and two installation methods for the main unit.
Способ 1: Клamp Установка
- Ослабьте винты на кл.amp.
- Сдвиньте кл.amp onto the edge of your helmet, typically on the left side.
- Затяните винты, чтобы закрепить замок.amp плотно прикрепить к шлему.
- Slide the main intercom unit onto the clamp пока не раздастся щелчок.
Method 2: Hook-and-Loop Fastener Installation
- Clean the desired mounting surface on the helmet (e.g., side of the helmet).
- Peel off the protective backing from one side of the hook-and-loop fastener.
- Firmly press the adhesive side onto the helmet surface.
- Attach the corresponding hook-and-loop fastener to the back of the main intercom unit.
- Align and press the main unit onto the fastener on the helmet until it is securely attached.
3.5. Connecting to the TK-X2 Intercom
- Once the speakers, microphone, and main unit are installed, connect the speaker/microphone cable from the kit into the designated port on your BETOWEY TK-X2 intercom unit.
- Убедитесь, что соединение надежно, чтобы предотвратить прерывания звука.
4. Инструкция по эксплуатации
This kit provides the audio input (microphone) and output (speakers) for your BETOWEY TK-X2 intercom system. Refer to your BETOWEY TK-X2 intercom's main instruction manual for detailed operating procedures, including power on/off, pairing, volume control, and communication functions. This accessory kit does not have independent operational controls.
The advanced noise reduction technology integrated into the microphone ensures clear audio transmission even in noisy riding environments.
5. Техническое обслуживание
To ensure the longevity and optimal performance of your microphone and speaker kit, follow these maintenance guidelines:
- Уборка: Gently wipe the speakers and microphone with a soft, dry cloth. Avoid using harsh chemicals or abrasive materials.
- Хранилище: При длительном неиспользовании храните комплект в прохладном, сухом месте, вдали от прямых солнечных лучей и экстремальных температур.
- Уход за кабелем: Во избежание повреждений не допускайте резких изгибов или чрезмерного натяжения кабелей.
6. Поиск Неисправностей
If you encounter issues with your microphone and speaker kit, consider the following:
- Нет звука из динамиков:
- Ensure the speaker cable is fully plugged into the intercom unit.
- Check the volume settings on your TK-X2 intercom.
- Убедитесь, что динамики расположены правильно и ничем не загорожены.
- Микрофон не улавливает голос:
- Ensure the microphone cable is securely connected to the intercom unit.
- Проверьте положение микрофона: он должен располагаться близко ко рту.
- Confirm that the correct microphone type is selected or compatible with your intercom's settings (if applicable).
- Плохое качество звука/помехи:
- Проверьте надежность всех кабельных соединений.
- Убедитесь, что кабели не зажаты и не повреждены.
- Verify that the microphone is not obstructed by helmet padding or clothing.
For further assistance, please refer to your BETOWEY TK-X2 intercom's main manual or contact BETOWEY customer support.
7. Технические характеристики
| Особенность | Описание |
|---|---|
| Бренд | БЕТОВЕЙ |
| Название модели | For TK-X2 |
| Технология связи | Проводной |
| Специальная характеристика | Микрофон в комплекте |
| Совместимые устройства | Motorcycle intercom |
| Цвет | Черный |
| Включенные компоненты | Speakers, Hook-and-Loop Fasteners for Main Unit, Wired Microphone, Wired Boom Microphone, Clamp |
| Полярная диаграмма | Суперкардиоида |
| Форм-фактор микрофона | Plug-on |
| Рекомендуемое использование | Motorcycle Communication, Riding |
8. Гарантия и поддержка
For information regarding warranty coverage and customer support, please refer to the documentation provided with your original BETOWEY TK-X2 intercom system or visit the official BETOWEY webСохраните чек о покупке в качестве подтверждения покупки на случай предъявления гарантийных претензий.


