1. Введение
This user manual provides essential information for the safe and efficient operation of your HYCHIKA 3.6V Cordless Electric Rechargeable Screwdriver Drill Set. Please read this manual thoroughly before first use and keep it for future reference.
The HYCHIKA 3.6V Cordless Electric Screwdriver is designed for various screwing and light drilling tasks around the home. It features a maximum torque of 6 N-m, a 6.35 mm quick-change chuck, and a versatile design that allows for both pistol and straight grip configurations.
2. Инструкции по технике безопасности
Всегда соблюдайте основные меры предосторожности при использовании электроинструментов, чтобы снизить риск возникновения пожара, поражения электрическим током и травм.
- Безопасность рабочей зоны: Поддерживайте чистоту и хорошее освещение рабочего места. Загромождённые или тёмные помещения могут стать причиной несчастных случаев. Не работайте с электроинструментами во взрывоопасной среде, например, в присутствии легковоспламеняющихся жидкостей, газов или пыли.
- Электробезопасность: Избегайте контакта тела с заземленными поверхностями, такими как трубы, радиаторы, плиты и холодильники. Не подвергайте электроинструменты воздействию дождя или влаги.
- Личная безопасность: Always wear eye protection. Use safety glasses, goggles, or a face shield. Wear hearing protection when operating noisy tools. Dress properly; avoid loose clothing or jewelry.
- Использование и уход за инструментом: Не прилагайте чрезмерных усилий при работе с электроинструментом. Используйте подходящий для вашей задачи электроинструмент. Отсоедините вилку от источника питания и/или извлеките аккумулятор перед выполнением любых регулировок, заменой принадлежностей или хранением электроинструмента.
- Использование и уход за аккумуляторной батареей: Заряжайте аккумулятор только с помощью зарядного устройства, указанного производителем. Не используйте аккумуляторные батареи с другими электроинструментами. Когда аккумуляторная батарея не используется, держите ее подальше от других металлических предметов.
3. Содержимое упаковки
Убедитесь, что все перечисленные ниже предметы входят в комплект. Если какие-либо предметы отсутствуют или повреждены, обратитесь в службу поддержки клиентов.
- 1 x HYCHIKA 3.6V Cordless Screwdriver
- 19 х Отвертка бит
- 1 x Extension Bar
- 1 х зарядный адаптер
- 1 х Руководство пользователя

Figure 3.1: Contents of the HYCHIKA 3.6V Cordless Screwdriver package, including the screwdriver, various bits, and charging adapter.
4. Характеристики и компоненты продукта
Familiarize yourself with the different parts of your cordless screwdriver.

Figure 4.1: Key components of the screwdriver, including the magnetic chuck, PUSH button, front LED light, On/Off switch, LED charger indicator, 3.5mm charger port, and forward & reverse button.
- Magnetic Chuck: 1/4 inch (6.35mm) quick-change chuck for easy bit installation and removal.
- Передний светодиодный фонарь: Освещает рабочую зону для улучшения видимости в темное время суток.
- Переключатель Вкл/Выкл: Activates and deactivates the screwdriver.
- Forward & Reverse Button: Controls the rotation direction for screwing and unscrewing.
- LED Charger Indicator: Provides status of battery charging.
- 3.5mm Charger Port: Connection point for the charging adapter.
- Нажать кнопку: Used to adjust the grip configuration from pistol to straight.
5. Настройка
5.1 Зарядка аккумулятора
The screwdriver is powered by a 3.6V 2000 mAh Lithium-Ion battery. Before first use, fully charge the battery.
- Connect the charging adapter to the 3.5mm charger port on the screwdriver.
- Подключите зарядное устройство к стандартной электрической розетке.
- The LED charger indicator will illuminate during charging. Once fully charged, the indicator may change color or turn off depending on the model.
- После завершения зарядки отключите зарядное устройство.

Figure 5.1: The screwdriver connected to its charging adapter, indicating a full charge.
The screwdriver is designed to maintain full power output even when the battery is low, ensuring consistent performance until the battery is depleted.
5.2 Установка отверточных бит
The screwdriver features a 1/4 inch (6.35mm) magnetic quick-change chuck for easy bit installation.
- Выберите биту, подходящую для вашей задачи.
- Insert the bit into the magnetic chuck until it is securely seated. The magnetic chuck will hold the bit firmly in place.
- To remove a bit, simply pull it out of the chuck. Bits with grooves are designed for easier removal.

Figure 5.2: Visual guide for inserting a bit into the magnetic chuck and removing it.
6. Инструкция по эксплуатации
6.1 Adjusting Grip Configuration
The screwdriver can be used in two grip configurations: pistol grip or straight grip, for enhanced versatility and comfort.
- To change the grip, press and hold the "PUSH" button located at the top of the screwdriver.
- While holding the button, rotate the handle ninety degrees to switch between pistol and straight configurations.
- Release the "PUSH" button once the desired configuration is achieved. The handle will lock into place.
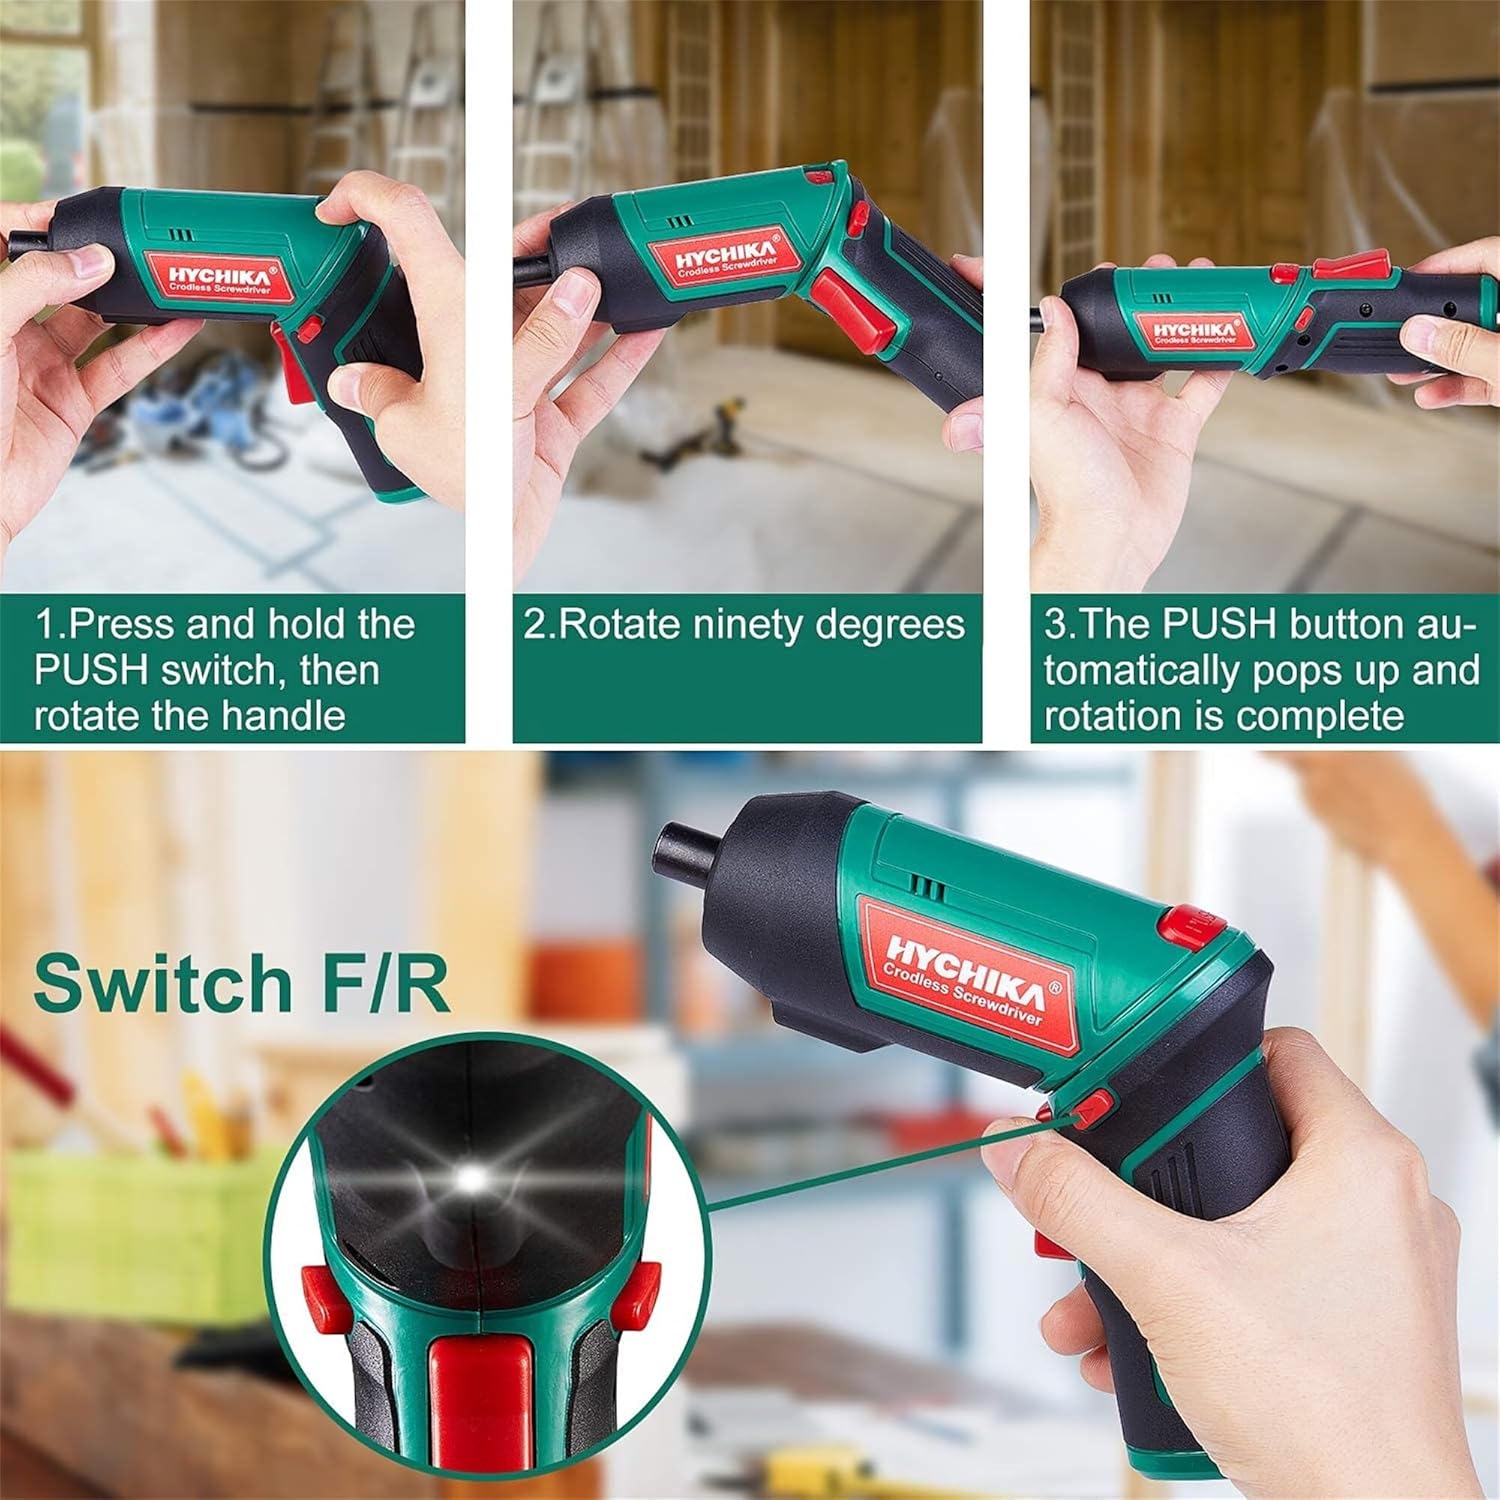
Figure 6.1: Demonstrates the process of transforming the screwdriver's grip by pressing the PUSH button and rotating the handle.
6.2 Прямое и обратное движение
The forward/reverse button controls the direction of rotation for screwing and unscrewing.
- To drive screws (forward rotation), push the forward/reverse button to the left (when view(с задней стороны инструмента).
- To remove screws (reverse rotation), push the forward/reverse button to the right.
- When the button is in the center position, the tool is locked, preventing accidental activation.
6.3 Использование светодиодного рабочего фонаря
The built-in LED light automatically illuminates when the screwdriver is in operation, providing visibility in dimly lit areas.

Figure 6.2: The integrated LED light provides clear illumination for working in dark environments.
7. Техническое обслуживание
Regular maintenance ensures the longevity and optimal performance of your screwdriver.
- Уборка: Поддерживайте вентиляционные отверстия в чистоте и защищайте их от пыли. Используйте мягкую, твердую тряпку.amp ткань для очистки инструмента casinг. Не используйте едкие химикаты или абразивные чистящие средства.
- Уход за битами: Clean screwdriver bits after use. Store them in the provided case to prevent loss and damage.
- Хранение батареи: If storing the tool for an extended period, ensure the battery is partially charged (around 50%) and store it in a cool, dry place. Recharge the battery every 3-6 months to maintain its health.
- Общий осмотр: Periodically check for any loose screws, damaged cords, or worn parts. Do not use the tool if any damage is observed.
8. Поиск Неисправностей
This section addresses common issues you might encounter with your screwdriver.
| Проблема | Возможная причина | Решение |
|---|---|---|
| Отвертка не включается. | Батарея разряжена. Forward/Reverse switch is in the center (locked) position. | Полностью зарядите аккумулятор. Нажмите переключатель прямого/обратного хода влево или вправо. |
| Отвертка быстро теряет мощность. | Аккумулятор заряжен не полностью. Battery life degraded. | Перед использованием убедитесь, что аккумулятор полностью заряжен. If battery life is significantly reduced, contact customer support for replacement options. |
| Bits are not held securely in the chuck. | Bit is not fully inserted. Chuck is dirty or damaged. | Push the bit firmly into the chuck until it clicks into place. Clean the chuck area. If damage is visible, contact customer support. |
Если проблема сохраняется после попытки устранения этих неполадок, обратитесь в службу поддержки клиентов.
9. Технические характеристики
| Особенность | Спецификация |
|---|---|
| Бренд | Overstock (HYCHIKA) |
| Номер модели | c131a012-0da9-4306-aeab-b1d9ff5cd4b7 |
| Томtage | 3.6 Вольт |
| Источник питания | Питание от батареи |
| Скорость | 180 об/мин |
| Пункт Крутящий момент | 6 Newton Meters (6 N-m) |
| Тип батареи | Литий-ионный |
| Емкость аккумулятора | 2000 мАч |
| Размер Чака | 1/4 дюйма (6.35 мм) |
| Материал | Пластик, Резина |
| Цвет | Зеленый |
| СКП | 616859793583 |
10. Гарантия и поддержка
Overstock offers lifetime after-sales service for this product. For any questions, concerns, or technical assistance, please contact our customer support team.
Please have your model number (c131a012-0da9-4306-aeab-b1d9ff5cd4b7) and purchase information ready when contacting support.


