1. Продукт закончилсяview
The DieseRC Wireless Remote Control Switch is a versatile 433Mhz RF relay receiver designed for controlling various electrical devices. It offers stable and reliable performance with high reception sensitivity, allowing control within approximately 30 meters in open areas, even through walls and doors. This product is ideal for home automation, industrial control, and DIY projects.

The system includes a relay receiver and a transmitter keyfob. The receiver features potential-free contacts (dry contacts) and operates on a wide voltage range of 100V to 250V AC. The high-quality 5A relay ensures durability with over 100,000 operations. One receiver can store up to 20 transmitters, and a single transmitter can control multiple receivers simultaneously. The secure EV1527 learning code technology enhances security.
2. Подробная информация о продукте и его комплектующие
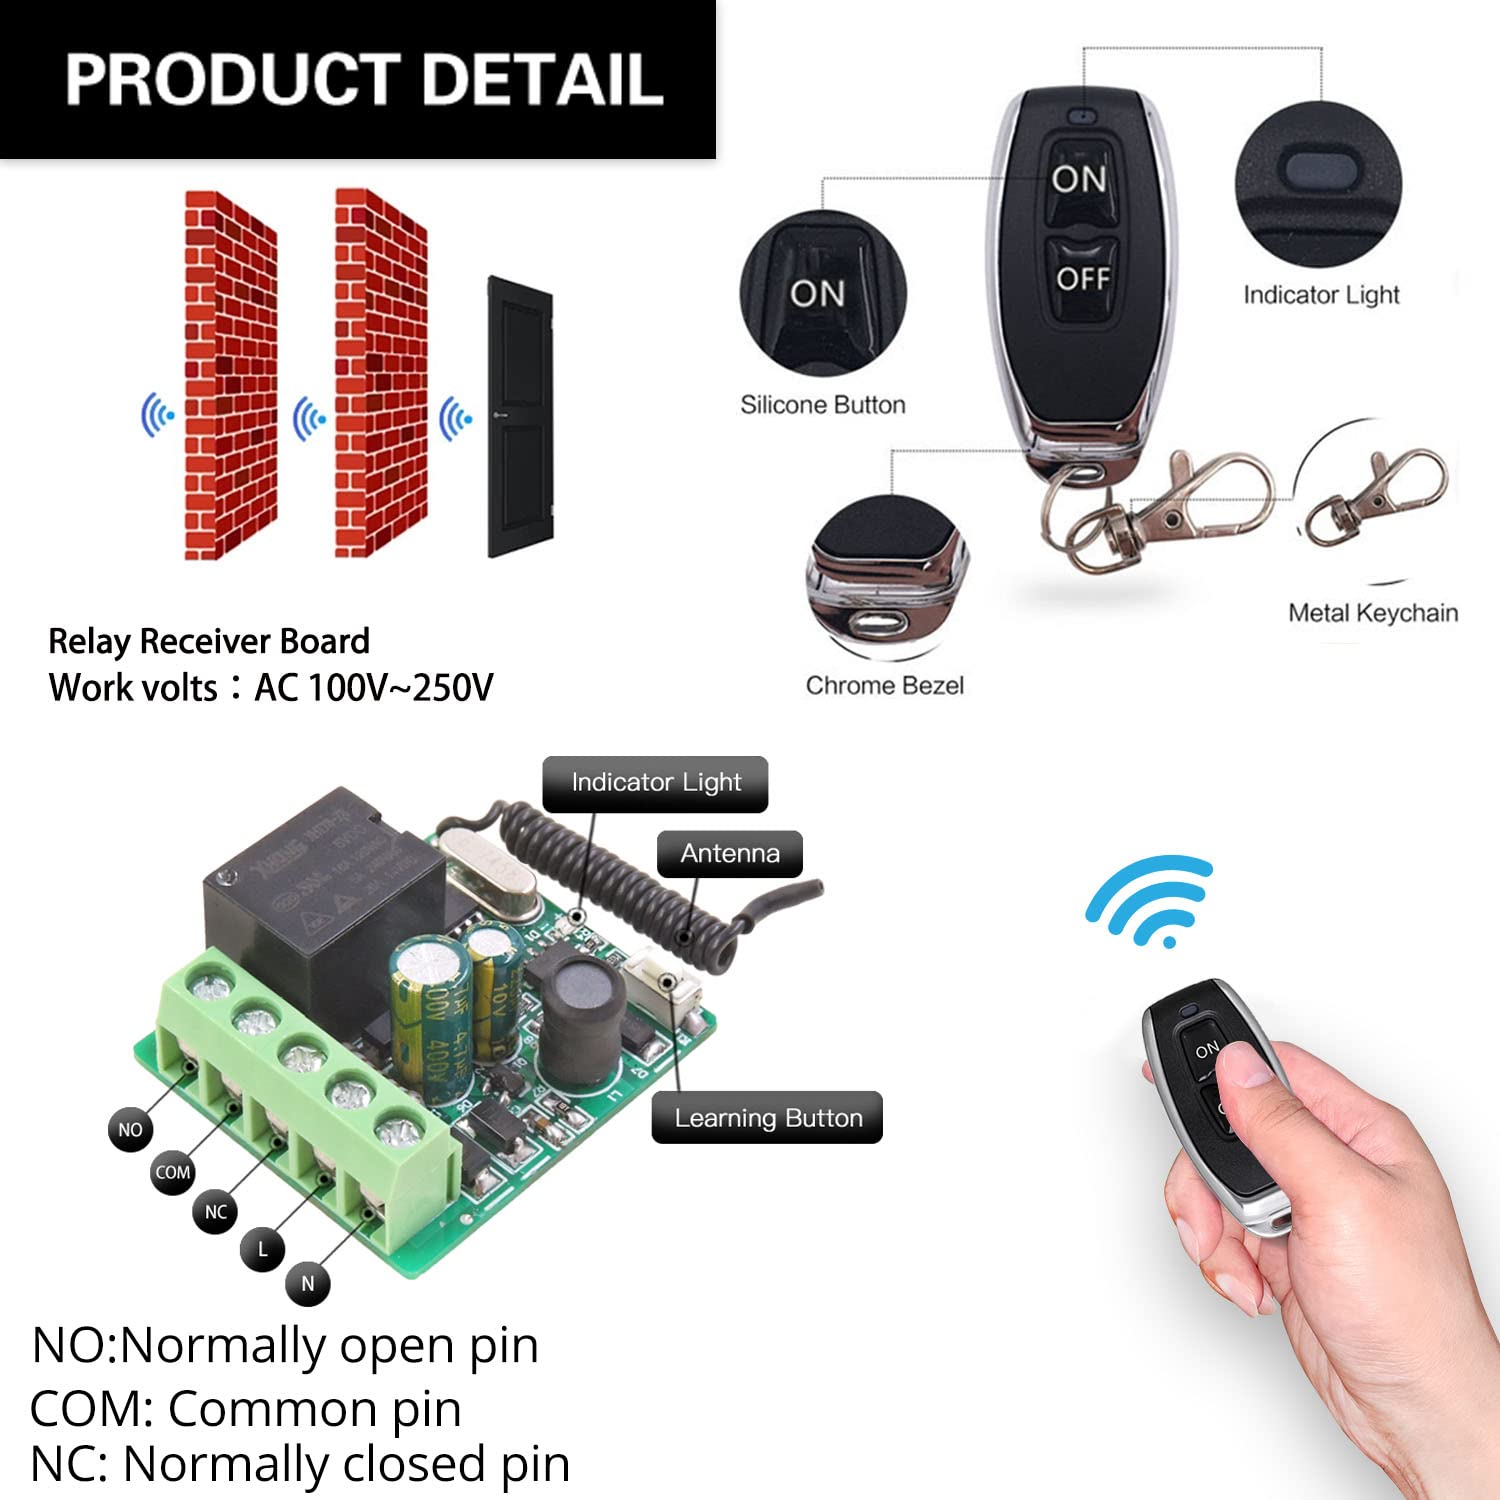
Familiarize yourself with the main components of the DieseRC relay receiver and remote control.

- NO (Normally Open Pin): Контакт разомкнут, когда реле обесточено.
- COM (Common Pin): The common terminal for the relay contact.
- NC (Normally Closed Pin): Контакт замыкается, когда реле обесточено.
- L & N: Live and Neutral input terminals for power supply (AC 100V~250V).
- Световой индикатор: Provides visual feedback on the receiver's status.
- Антенна: Для приема радиочастотных сигналов от передатчика.
- Кнопка обучения: Used for programming and resetting the receiver.
3. Настройка и подключение
Before connecting, ensure the power supply is disconnected. The receiver supports AC 100V~250V input. The relay provides potential-free (dry) contacts, meaning it acts as a switch without providing power to the connected device. You will need to supply power to your device separately.
3.1 Схем электропроводки
- AC Device Control: Connect the AC power source to the L and N terminals of the receiver. Connect your AC device (e.g., lamp) to the NO and COM terminals.
- DC Device Control: Connect the AC power source to the L and N terminals of the receiver. Connect your DC device to the NO and COM terminals, ensuring the DC power supply is also connected to the device.
- Passive Output (Dry Contact): For applications requiring a simple switch closure, connect the device's control circuit to the NO and COM terminals. The receiver itself does not supply power through these contacts.

For garage door openers, the relay acts as a momentary switch. Connect the NO and COM terminals to the wall button/console terminals of your existing wired garage door opener. The receiver's L and N terminals should be connected to an AC 100-250V power source.
3.2 Initial Pairing and Reset
Before programming new modes, it is recommended to reset the receiver to clear any previous pairings.
- Сброс: Press the learning button on the receiver 8 times. The indicator light will flash rapidly, then turn off, indicating successful reset. All previously paired remote controls will no longer work.
4. Режимы работы и программирование
The DieseRC receiver supports four operating modes: Momentary, Toggle, Latched, and Delay. You can program the receiver to your desired mode by following the steps below.


4.1 Momentary Mode (Press and Hold)
In Momentary mode, the relay activates only while the remote button is pressed and held. It deactivates upon release.
- Нажмите кнопку обучения на приемнике. 1 раз. Индикатор загорится.
- Press any button on your remote control. The indicator light will flash, then turn off, indicating successful pairing.
4.2 Toggle Mode (Press On/Off)
В режиме переключения однократное нажатие кнопки на пульте дистанционного управления активирует реле, а повторное нажатие деактивирует его.
- Нажмите кнопку обучения на приемнике. 2 раза. Индикатор загорится.
- Press any button on your remote control. The indicator light will flash, then turn off, indicating successful pairing.
4.3 Latched Mode (Separate On/Off Buttons)
In Latched mode, one button on the remote activates the relay, and another button deactivates it. This mode requires a remote with at least two distinct buttons (e.g., ON and OFF).
- Нажмите кнопку обучения на приемнике. 3 раза. Индикатор загорится.
- Press the 'ON' button on your remote control. The indicator light will flash.
- Press the 'OFF' button on your remote control. The indicator light will flash, then turn off, indicating successful pairing.
4.4 Delay Mode (Timed Off)
In Delay mode, the relay activates when the remote button is pressed and held, and automatically deactivates after a set time (5, 10, 15, or 20 seconds) upon release.
- Нажмите кнопку обучения на приемнике. 4, 5, 6, or 7 times to set the delay time:
- 4 times for 5-second delay
- 5 times for 10-second delay
- 6 times for 15-second delay
- 7 times for 20-second delay
- Press any button on your remote control. The indicator light will flash, then turn off, indicating successful pairing.
5. Приложения
The DieseRC Wireless Remote Control Switch is highly versatile and can be used in a wide range of applications:

- Домашняя автоматизация: Control lights, fans, and other appliances remotely.
- Автоматические открыватели гаражных ворот: Integrate with existing wired garage door systems for remote access.
- Electric Locks & Door Systems: Provide remote control for access systems.
- Ventilation Devices: Remotely switch on/off exhaust fans or other ventilation units.
- Water Pumps: Control small water pumps for irrigation or other purposes.
- Передача сигнала: Use for various signal transmission applications.
- Проекты «сделай сам»: A flexible component for custom remote control solutions.
6. Техническое обслуживание
Для обеспечения долговечности и оптимальной работы беспроводного пульта дистанционного управления DieseRC следуйте этим рекомендациям по техническому обслуживанию:
- Замена батареи (передатчик): The transmitter keyfob uses 2 CR2016 batteries. To replace them, locate the screw port on the back of the transmitter, disassemble the casing, and replace the batteries. Ensure correct polarity.
- Уборка: Use a soft, dry cloth to clean the receiver and transmitter. Do not use harsh chemicals or abrasive cleaners.
- Среда: Avoid exposing the devices to extreme temperatures, high humidity, or direct sunlight. Keep them away from strong electromagnetic fields.
- Инспекция: Periodically check wiring connections to ensure they are secure and free from damage.
7. Поиск Неисправностей
If you encounter issues with your DieseRC Wireless Remote Control Switch, try the following troubleshooting steps:
- Удаленно не отвечает:
- Check if the transmitter battery is depleted. Replace if necessary.
- Убедитесь, что приемник включен и индикаторная лампочка на нем горит.
- Verify that the remote is properly paired to the receiver in the correct operating mode (refer to Section 4). If unsure, perform a reset (Section 3.2) and re-program the desired mode.
- Ограниченный диапазон:
- Ensure there are no significant obstructions (thick walls, metal structures) between the transmitter and receiver.
- Avoid placing the receiver near large metal objects or other devices that emit strong RF signals, which can cause interference.
- Check the receiver's antenna for any damage or obstruction.
- Устройство не активируется/не деактивируется:
- Confirm that the wiring connections to your device are correct and secure (refer to Section 3.1).
- Ensure the connected device is functioning correctly when directly powered or switched.
- Verify that the operating mode programmed is suitable for your application (e.g., Momentary for garage doors, Toggle for lights).
- Indicator Light Not Functioning:
- Проверьте питание приемника.
- If the receiver is powered but the light is off and it's not responding, the unit may be faulty.
8. Технические характеристики
| Особенность | Спецификация |
|---|---|
| Номер модели | RX26 |
| Рабочий объемtage | Переменный ток 100В~250В |
| Рабочая частота | 433МГц |
| Тип реле | Potential-Free Contacts (Dry Contacts) |
| Номинальный ток реле | 5A |
| Батарея для пульта дистанционного управления | 2 x CR2016 (в комплекте) |
| Код обучения | EV1527 |
| Дистанция управления | До 30 метров (открытая площадка) |
| Страна происхождения | Китай |
9. Гарантия и поддержка
For any inquiries, technical support, or warranty claims, please contact the manufacturer/importer directly.

Производитель / Импортер: Компания Huizhou Wenqiao Electronic Technology Co., Ltd.
Адрес: Комната 03, 12 этаж, корпус T19, Восточный прибрежный сад, Фанчжилунхувань, ул. Санхуань Южная, 27, район Хуэйчэн, город Хуэйчжоу, провинция Гуандун, Китай 516001
Электронная почта службы: dieseelectronic@163.com
Сохраните чек о покупке для гарантийных целей.