1. Введение
Спасибо за покупкуasing the DOOMAY Digital Alarm Clock. This compact and versatile alarm clock is designed for convenience and readability, featuring an adjustable LCD display, snooze function, weekend mode, and temperature display. This manual will guide you through the setup, operation, and maintenance of your new alarm clock to ensure optimal performance.
2. Информация по технике безопасности
- Держите устройство вдали от воды и мест с высокой влажностью.
- Избегайте воздействия прямых солнечных лучей или экстремальных температур на часы.
- Не пытайтесь разбирать или ремонтировать устройство самостоятельно. Обратитесь к квалифицированному специалисту для обслуживания.
- Use only the specified battery type (2 x AAA batteries).
- Если устройство не будет использоваться в течение длительного времени, извлеките из него батарейки, чтобы предотвратить утечку.
- Храните батареи в недоступном для детей месте.
3. Содержимое упаковки
- DOOMAY Digital Alarm Clock (1 unit)
- AAA Batteries (2 units)
- Руководство пользователя (этот документ)
4. Продукт закончилсяview
Familiarize yourself with the components and controls of your DOOMAY Digital Alarm Clock.
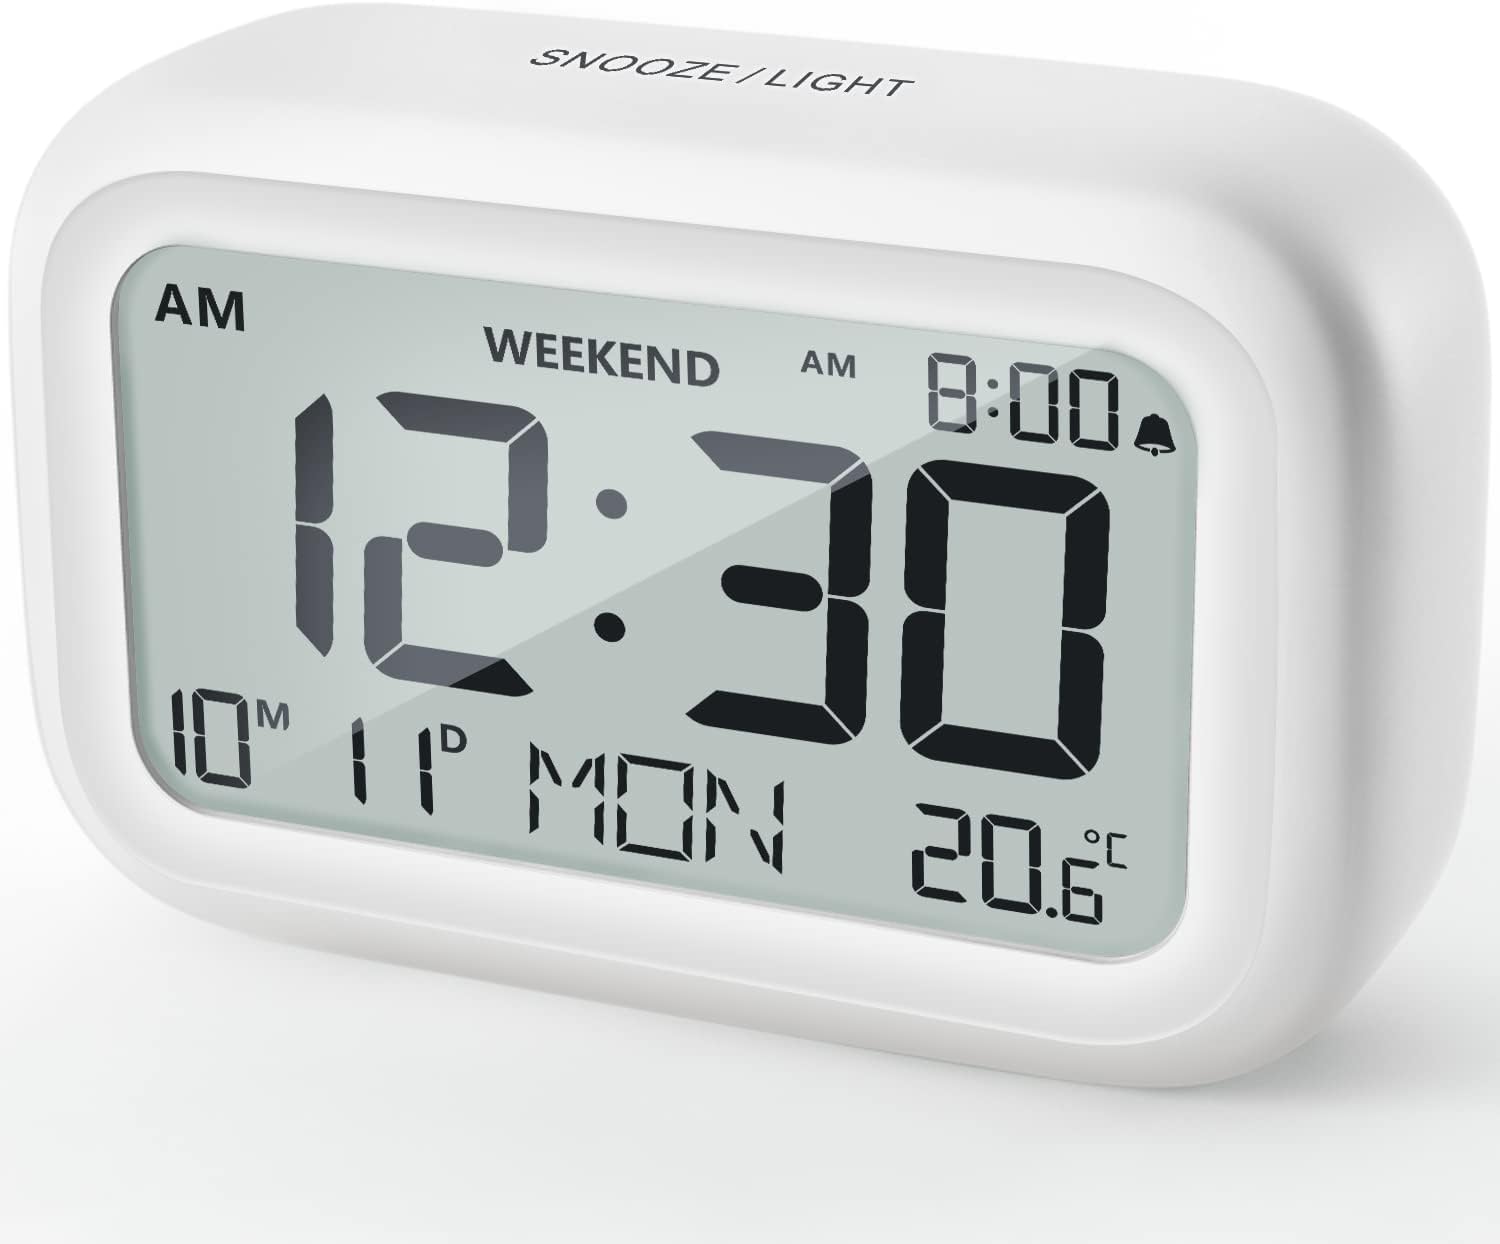
Рисунок 4.1: Передняя часть View of the Alarm Clock
This image displays the front of the DOOMAY Digital Alarm Clock, highlighting its large, clear LCD screen. The screen shows the current time (12:30), AM indicator, day of the week (MON), date (10th month, 11th day), and indoor temperature (20.6°C). The top of the clock has a "SNOOZE/LIGHT" button.

Рисунок 4.2: Ключевые особенностиview
This diagram illustrates the main functionalities of the alarm clock: 12/24H time display, calendar, alarm setting, adjustable volume, snooze function, backlight, weekend mode, and temperature display. The clock itself is shown on a wooden table, displaying 7:00 AM, Friday, and 28.8 degrees.

Figure 4.3: Back Panel Controls
This image shows the rear of the alarm clock, detailing the various control buttons and the battery compartment. Buttons are clearly labeled for: 12/24H time format, Alarm setting, Weekend mode, Date setting, Minus (-) for decreasing values, Plus (+) for increasing values, and °C/°F for temperature unit selection. The battery compartment is visible, designed for two AAA batteries.
Элементы управления и дисплей:
- ЖК-дисплей: Shows time, date, day of week, AM/PM indicator, alarm status, and temperature.
- Кнопка повтора сигнала/подсветки (сверху): Activates snooze function during alarm; illuminates backlight for 5 seconds.
- 12/24H Button (Back): Переключает между 12-часовым и 24-часовым форматами времени.
- ALARM Button (Back): Переходит в режим настройки будильника.
- WEEKEND Button (Back): Activates/deactivates weekend mode.
- DATE Button (Back): Enters date setting mode.
- MINUS (-) Button (Back): Decreases values during setting; adjusts alarm volume.
- PLUS (+) Button (Back): Increases values during setting; adjusts alarm volume.
- °C/°F Button (Back): Переключение между единицами измерения температуры по Цельсию и Фаренгейту.
5. Настройка
5.1 Установка аккумулятора
- Откройте крышку батарейного отсека, расположенную на задней стороне часов.
- Вставьте две (2) батарейки AAA, соблюдая полярность (+ и -).
- Плотно закройте крышку батарейного отсека.
- The display will light up, and the clock will be ready for initial setup. A low battery symbol will appear when batteries need replacement. If the display shows "8888" flashing, it's also an indication to change batteries.
5.2 Первоначальная настройка времени и даты
- Установить время:
- Нажмите 12/24ч button to switch between 12-hour (with AM/PM) and 24-hour formats.
- Нажмите и удерживайте 12/24ч Нажмите и удерживайте кнопку в течение 3 секунд, чтобы войти в режим установки времени. Цифры часов начнут мигать.
- Используйте + or - кнопки для настройки часов.
- Нажмите 12/24ч Нажмите кнопку еще раз, чтобы подтвердить час и перейти к настройке минут. Цифры минут начнут мигать.
- Используйте + or - кнопки для настройки минут.
- Нажмите 12/24ч button one more time to exit time setting.
- Установить дату:
- Нажмите и удерживайте ДАТА button for 3 seconds to enter date setting mode. The year digits will flash.
- Используйте + or - кнопки для настройки года.
- Нажмите ДАТА button again to confirm the year and move to month setting.
- Adjust the month using + or -.
- Нажимать ДАТА again to move to day setting.
- Adjust the day using + or -.
- Нажимать ДАТА one more time to exit date setting. The day of the week will automatically adjust.
6. Инструкция по эксплуатации
6.1 Установка будильника
- Нажмите и удерживайте ТРЕВОГА Нажмите кнопку на 3 секунды. Цифры, обозначающие время будильника, начнут мигать.
- Используйте + or - кнопки для установки желаемого времени срабатывания будильника.
- Нажмите ТРЕВОГА button again to confirm the hour and move to minute setting. The alarm minute digits will flash.
- Используйте + or - кнопки для установки желаемой минуты будильника.
- Нажмите ТРЕВОГА button one more time to exit alarm setting. The alarm icon (bell symbol) will appear on the display, indicating the alarm is active.
- To turn the alarm ON/OFF, simply press the ТРЕВОГА button once. The bell icon will appear/disappear.
6.2 Функция повтора
When the alarm sounds, gently tap the large СНУЗ / СВЕТ button on the top of the clock. The alarm will pause for 9 minutes and then sound again. This can be repeated multiple times.

Figure 6.1: Activating Snooze
This image demonstrates how to activate the snooze function by touching the top of the alarm clock. The text highlights that this action provides an additional 9 minutes of sleep after the alarm sounds.
To completely turn off the alarm after it sounds (without snoozing), press any button on the back of the clock.
6.3 Weekend Mode
The weekend mode allows the alarm to sound only from Monday to Friday, preventing it from ringing on Saturday and Sunday.

Figure 6.2: Weekend Mode Activated
This image shows the alarm clock display with the "WEEKEND" indicator prominently displayed, signifying that the weekend mode is active. The accompanying text clarifies that in this mode, the alarm will only sound from Monday to Friday, ensuring undisturbed weekends.
- To activate Weekend Mode, press the ВЫХОДНЫЕ button once. The "WEEKEND" indicator will appear on the display.
- To deactivate Weekend Mode, press the ВЫХОДНЫЕ button again. The "WEEKEND" indicator will disappear.
6.4 Adjustable Alarm Volume
The alarm clock offers two volume levels: Low (70 dB) and High (85 dB).

Figure 6.3: Alarm Volume Levels
This image visually represents the two available alarm volume settings: L01 (85 dB) for a louder alarm and L02 (70 dB) for a softer alarm. The alarm clock is shown in a bedroom setting, emphasizing its use as a bedside device.
- В обычном режиме отображения времени нажмите + or - buttons to cycle between the two alarm volume levels. The current volume level will be briefly displayed.
6.5 Функция подсветки
To illuminate the display in low light conditions, simply tap the СНУЗ / СВЕТ button on the top of the clock. The backlight will activate for approximately 5 seconds, providing clear visibility of the time and other information.
Figure 6.4: Backlight in Action
This image provides a side-by-side comparison of the alarm clock's display. On the left, the clock is shown in a well-lit environment. On the right, the same clock is shown in a dark setting with its 5-second backlight activated, demonstrating how the display becomes clearly visible at night.
6.6 Отображение температуры
The clock displays the indoor temperature. You can switch between Celsius (°C) and Fahrenheit (°F) units.
- To change the temperature unit, press the ° C / ° F кнопка на задней панели часов.
7. Техническое обслуживание
7.1 Очистка
Протрите часы мягкой сухой тканью. Не используйте абразивные чистящие средства или растворители, так как они могут повредить поверхность.
7.2. Замена батареи
When the low battery indicator appears on the display, or if the display shows "8888" flashing, it is time to replace the batteries. Follow the steps in Section 5.1 Battery Installation to replace the two AAA batteries.
8. Поиск Неисправностей
| Проблема | Возможная причина | Решение |
|---|---|---|
| Дисплей пустой или тусклый. | Батарейки разряжены или установлены неправильно. | Замените батарейки новыми батарейками типа ААА, соблюдая правильную полярность. |
| Сигнализация не срабатывает. | Alarm is not activated, or Weekend Mode is ON. | Ensure the alarm icon is displayed. Check if Weekend Mode is active and deactivate if necessary. |
| Функция отложенного будильника не работает. | Not tapping the SNOOZE/LIGHT button correctly. | Ensure a firm, brief tap on the top SNOOZE/LIGHT button when the alarm is sounding. |
| Неверное время/дата. | Not set correctly or batteries were removed. | Refer to Section 5.2 Initial Time and Date Setting to re-set. |
9. Технические характеристики
| Особенность | Деталь |
|---|---|
| Номер модели | 5293Великобритания |
| Бренд | ДУМАИ |
| Размеры (Д x Ш x В) | 10.9 x 3.81 x 6.9 см (4.29 x 1.5 x 2.72 дюймов) |
| Масса | 127.01 г (0.28 фунта) |
| Материал | Акрилонитрилбутадиенстирол (АБС) |
| Источник питания | 2 батарейки ААА (в комплекте) |
| Тип дисплея | Цифровой LCD |
| Уровни громкости будильника | Low (70 dB), High (85 dB) |
| Длительность повтора | 9 минуты |
| Продолжительность подсветки | 5 секунд |
| Единицы измерения температуры | Цельсия (°C) / Фаренгейта (°F) |
10. Гарантия и поддержка
DOOMAY products are designed for reliability and performance. For any questions, technical support, or warranty claims, please contact your retailer or visit the official DOOMAY website for assistance. Please retain your proof of purchase for warranty purposes.
For further information, you may visit the brand's Amazon store page: DOOMAY Store on Amazon


