Введение
This manual provides essential instructions for the safe and effective operation, setup, maintenance, and troubleshooting of your ESAB EMP 210 Multi-Process Welder. Please read this manual thoroughly before using the equipment to ensure proper function and safety.

Рисунок 1: The ESAB EMP 210 Multi-Process Welder shown with its complete set of accessories, including MIG gun, TIG torch, electrode holder, ground clamp, gas regulator, and welding wire spool. This image illustrates the comprehensive package provided for various welding applications.
Меры предосторожности
Always prioritize safety when operating welding equipment. Failure to follow safety guidelines can result in serious injury or death. Refer to relevant safety standards and regulations in your region.
- Используйте соответствующие средства индивидуальной защиты (СИЗ), включая сварочный шлем, перчатки, защитную одежду и защитную обувь.
- Обеспечьте достаточную вентиляцию, чтобы избежать вдыхания сварочных дымов.
- Защитите находящихся поблизости людей от электрических дуг и искр.
- Никогда не выполняйте сварку вблизи легковоспламеняющихся материалов.
- Обеспечьте надлежащее заземление сварочного аппарата.
- Перед проведением любых работ по техническому обслуживанию или замене расходных материалов отключите питание.
Настраивать
1. Распаковка и осмотр
Аккуратно извлеките сварочный аппарат и все принадлежности из упаковки. Осмотрите на наличие повреждений при транспортировке. Немедленно сообщите о любых повреждениях поставщику.
2. Подключение питания
The ESAB EMP 210 operates on both 120V and 230V AC power. The machine automatically detects the input voltage. Ensure the power source is properly rated for the welder's requirements.
- 120 В Работа: Use a dedicated 20A circuit.
- 230 В Работа: Use a dedicated 30A circuit.
3. Gas Connection (MIG/TIG)
For MIG and TIG welding, connect the appropriate shielding gas cylinder (e.g., Argon, C25) to the regulator provided. Attach the gas hose from the regulator to the gas inlet on the rear of the welder.
4. Welding Lead Connections
Подключите заземление.amp to the appropriate terminal on the welder and secure it to the workpiece. Connect the MIG gun, TIG torch, or electrode holder to their respective terminals as required for the chosen welding process.

Рисунок 2: Сверху вниз view of the ESAB EMP 210 welder, highlighting its compact design and integrated handle for portability. This perspective shows the overall form factor of the unit, which is designed for easy transport and setup.
Инструкция по эксплуатации
The ESAB EMP 210 offers MIG, Stick (MMA), and TIG (Lift TIG) welding capabilities. Select the desired process using the control panel.
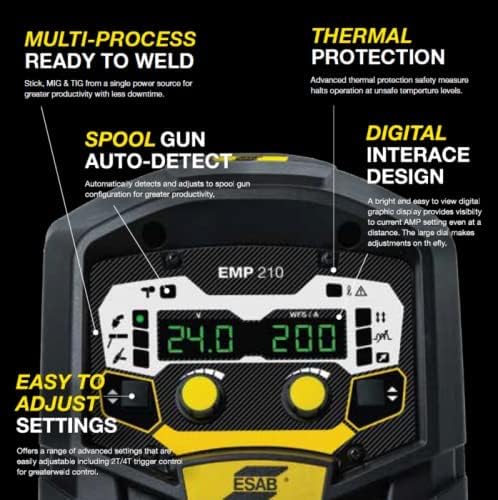
Рисунок 3: Подробный view of the ESAB EMP 210's digital control panel. This image shows the clear display for voltagе и amperage, along with the intuitive adjustment knobs and process selection buttons, emphasizing the "Digital Interface Design" and "Easy to Adjust Settings" features.
1. Панель управления оконченаview
The digital interface allows for precise control over welding parameters. Use the large dial and buttons to navigate menus and adjust settings such as ampярость, об.tagе. и скорость подачи проволоки.
2. Сварка MIG (GMAW)
- Install the appropriate welding wire spool and feed it through the MIG gun.
- Выберите режим MIG на панели управления.
- Отрегулируйте громкостьtagСкорость подачи проволоки зависит от толщины материала и типа проволоки.
- Ensure gas flow is set correctly (typically 15-25 CFH for solid wire).
3. Stick Welding (MMA/SMAW)
- Подключите держатель электрода и заземляющий контакт.amp.
- Select Stick mode.
- Вставьте соответствующий электрод в держатель.
- Регулировать amperage based on electrode type and diameter.
4. TIG Welding (GTAW - Lift TIG)
- Подключите сварочную горелку TIG и заземление.amp.
- Выберите режим TIG.
- Ensure pure argon shielding gas is connected and flowing.
- Регулировать amperage for the material and tungsten electrode size.
- Initiate arc using the Lift TIG method.

Рисунок 4: An individual performing welding operations with the ESAB EMP 210 Multi-Process Welder. The welder is visible in the background, and the operator is focused on the workpiece, demonstrating the machine in an active work environment.
Обслуживание
Regular maintenance ensures the longevity and optimal performance of your ESAB EMP 210 welder.
- Ежедневно: Clean the MIG gun nozzle, contact tip, and diffuser. Check ground clamp и кабельные соединения.
- Еженедельно/Ежемесячно: Inspect all cables for damage. Clean the wire feed mechanism. Check gas hose for leaks.
- Периодически: Use compressed air to blow dust and debris from inside the machine (ensure power is disconnected). Inspect cooling fan for obstructions.
- Replace worn consumables (contact tips, nozzles, electrodes, tungsten) as needed.
Поиск неисправностей
Refer to the following table for common issues and their potential solutions. If a problem persists, contact ESAB customer support.
| Проблема | Возможная причина | Решение |
|---|---|---|
| Нет дуги | No power, poor ground connection, incorrect settings, faulty torch/electrode holder. | Check power supply, ensure solid ground, verify settings, inspect connections. |
| Плохое качество сварки | Incorrect settings, contaminated material, improper technique, worn consumables. | Adjust parameters, clean workpiece, review technique, replace consumables. |
| Проблемы с подачей проволоки (MIG) | Incorrect tension, clogged liner, wrong contact tip, tangled wire. | Adjust drive roll tension, clean/replace liner, use correct contact tip, untangle wire. |
| Overheating (Thermal Protection) | Превышение допустимого рабочего цикла, плохая вентиляция. | Дайте аппарату остыть, обеспечьте достаточную циркуляцию воздуха вокруг устройства. |
Технические характеристики
| Особенность | Деталь |
|---|---|
| Бренд | ЭСАБ |
| Номер модели | 0324-0075 (EMP 210) |
| Vol входtage | 120 В / 230 В постоянного тока (автоматическое определение напряжения) |
| Сварочные процессы | MIG (GMAW), Stick (MMA/SMAW), TIG (GTAW - Lift TIG) |
| Максимальный выходной ток | 200А |
| Вес товара | 43 фунта |
| Размеры продукта | 23 x 18.5 x 18 дюйма |
| Дата первой доступности | 28 октября 2021 г. |
Гарантия и поддержка
Информация о гарантии
For detailed warranty terms and conditions, please refer to the official ESAB warranty statement included with your product or visit the official ESAB webГарантийное покрытие обычно распространяется на дефекты материалов и изготовления в течение определенного периода с даты покупки.
Поддержка клиентов
If you encounter any issues or have questions regarding your ESAB EMP 210 welder, please contact ESAB customer support. You can find contact information on the official ESAB webсайте или через вашего авторизованного дилера.
Официальный представитель ESAB Webсайт: www.esab.com


