1. Введение
Thank you for choosing the ETA Falco Smart Robot Vacuum Cleaner with Mopping Function. This manual provides essential information for the safe and efficient operation, maintenance, and troubleshooting of your device. Please read this manual thoroughly before using the product and keep it for future reference.
Важная информация по безопасности
- Всегда следите за тем, чтобы робот был установлен на устойчивой, ровной поверхности.
- Берегите устройство от воды и влаги.
- Не позволяйте детям или посторонним лицам управлять роботом.
- Use only the original charging adapter and accessories provided.
- Before cleaning or maintenance, ensure the robot is powered off and unplugged from the charging station.
- Avoid operating the robot near open flames or flammable materials.
2. Продукт закончилсяview
Компоненты и элементы управления
Familiarize yourself with the main parts and controls of your ETA Falco Smart robot vacuum cleaner.
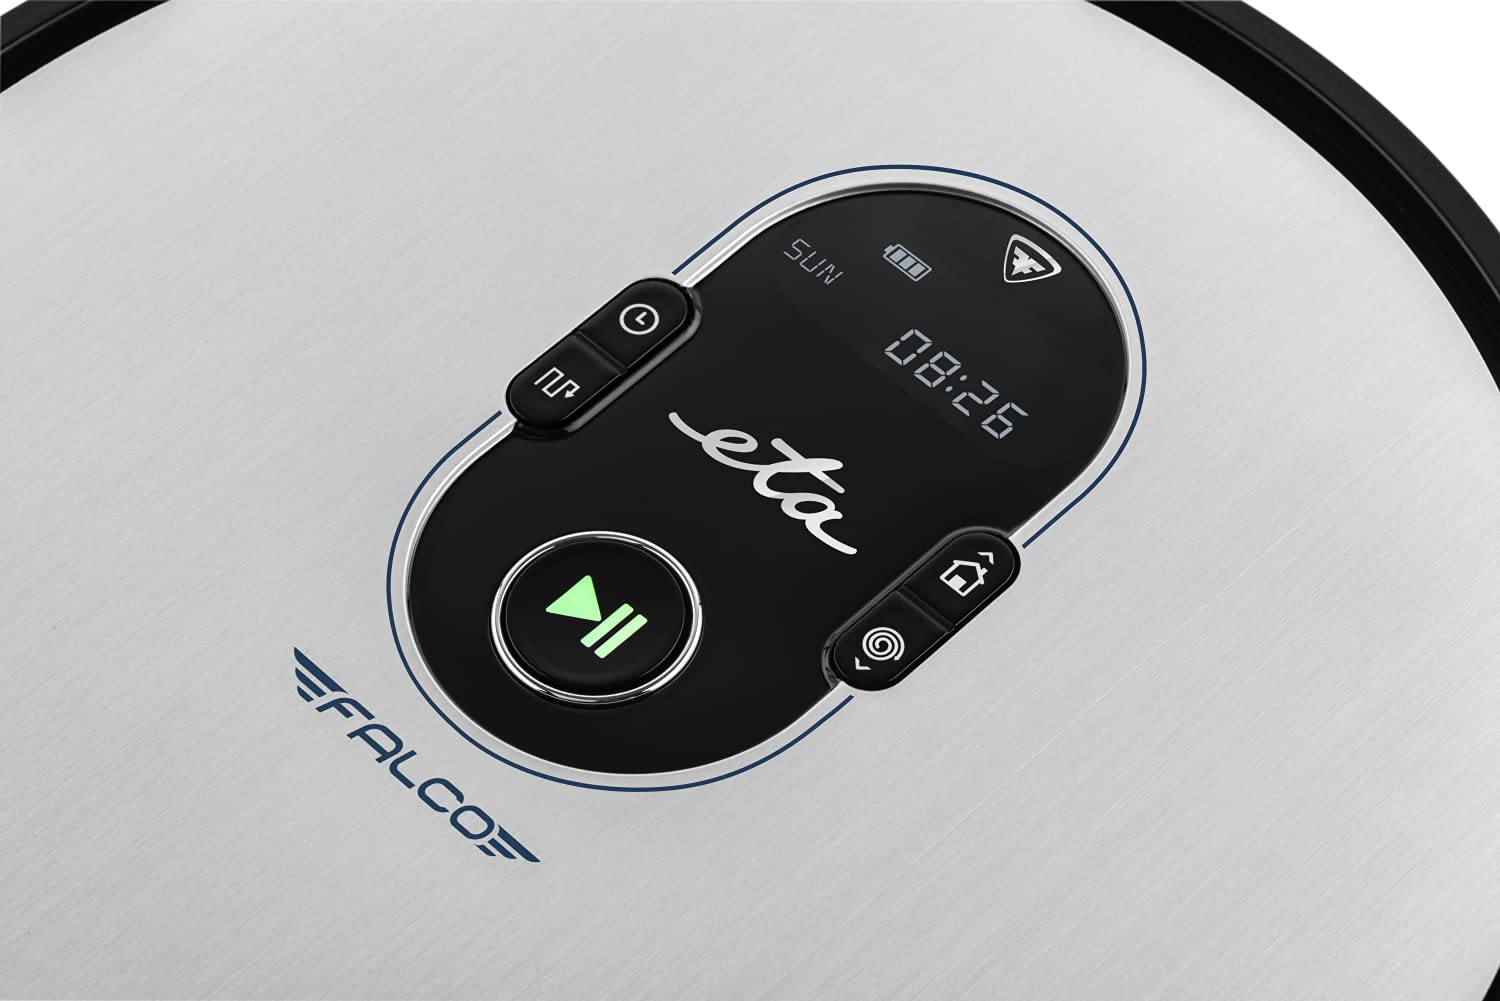
Изображение 2.1: Top panel controls. This image shows the main control panel on the top of the robot, including buttons for power, scheduling, and return to charging station, along with a digital display.

Изображение 2.2: Нижняя сторона view. This image displays the bottom of the robot, highlighting the main brush, two side brushes, and the mop attachment.

Изображение 2.3: Underside diagram. This diagram labels the key components on the robot's underside, including the side brushes, main brush, and mop attachment.
3. Содержимое упаковки
При распаковке убедитесь, что в наличии все следующие предметы:
- ETA Falco Smart Robot Vacuum Cleaner
- Зарядная станция
- Адаптер для зарядки
- Дистанционное управление
- 2x Spare Side Brushes
- Special Rotary and Lamella Brush
- 2x Cleaning Cloths (Mop Pads)
- Запасной HEPA-фильтр
- Mop Attachment with 300 ml Water Tank
- Виртуальная стена
4. Настройка
4.1 Первоначальная зарядка
- Разместите зарядную станцию у стены на открытом пространстве, убедившись, что на расстоянии 1 метра по бокам и 2 метров спереди нет препятствий.
- Connect the charging adapter to the charging station and plug it into a power outlet.
- Place the robot vacuum cleaner on the charging station. Ensure the charging contacts align. The robot will begin charging automatically. A full charge takes approximately 5 hours.
4.2 Установка боковых щеток
Attach the side brushes to the designated posts on the underside of the robot by pressing them down until they click into place. Ensure the 'L' and 'R' markings on the brushes match the corresponding markings on the robot.
4.3 Connecting to the ETA SMART App
The ETA SMART app enhances the functionality of your robot. Download the app from your smartphone's app store. Follow the in-app instructions to connect your robot to your home Wi-Fi network and pair it with the app.
4.4 Setting up the Virtual Wall
The virtual wall creates an invisible barrier to restrict the robot's access to certain areas. Place the virtual wall device on the floor where you want to create a boundary. Ensure the infrared beam is directed towards the area you wish to block. The robot will detect this beam and avoid crossing it.

Изображение 4.1: Robot with charging station and virtual wall. This image shows the robot positioned near its charging station, with a virtual wall device placed nearby to illustrate its function.
5. Инструкция по эксплуатации
5.1 Режимы очистки
The ETA Falco Smart offers four distinct cleaning modes:
- УМНАЯ: General cleaning mode for optimal coverage.
- КЛАССИКА: Стандартный режим уборки.
- КРАЙ: Очищает поверхности вдоль стен и краев мебели.
- ПЯТНО, МЕСТО: Concentrated cleaning in a specific area.
You can select these modes via the ETA SMART app or the remote control.
5.2 Планирование уборки
Use the ETA SMART app to set a cleaning schedule for your robot. You can program specific times and days for the robot to automatically start cleaning.
5.3 Ручное управление
You can manually control the robot's movement and functions using the remote control or the ETA SMART app. The app also allows you to monitor cleaning activity, battery charge, and view cleaning routes.

Изображение 5.1: ETA Smart App features. This image displays the ETA Smart App interface on a smartphone, highlighting features such as remote control, cleaning history, activity monitoring, battery status, cleaning modes (SMART, CLASSIC, EDGE, SPOT), cleaning schedule, mopping intensity control, and suction power adjustment.
5.4 Функция мытья полов
- Fill the 300 ml water tank with clean water. Do not use detergents or cleaning solutions that are not approved for robot vacuums.
- Attach a clean mop pad to the mop attachment.
- Slide the mop attachment into the designated slot on the underside of the robot.
- Запустите цикл уборки. Робот будет одновременно пылесосить и мыть пол.
6. Техническое обслуживание
Регулярное техническое обслуживание обеспечивает оптимальную производительность и продлевает срок службы вашего робота-пылесоса.
6.1 Cleaning the Dust Bin and Filter
- Нажмите кнопку освобождения пылесборника и извлеките пылесборник.
- Откройте мусорное ведро и высыпьте его содержимое в мусорный бак.
- Remove the HEPA filter and primary filter. Tap them gently to remove dust. If washable, rinse under running water and allow to air dry completely before reinserting.
- Wipe the inside of the dust bin with a dry cloth.
- Reassemble the filters and dust bin, then reinsert into the robot.
6.2 Очистка основной щетки
- Переверните робота.
- Снимите крышку основной щетки, нажав на фиксаторы.
- Выньте основную щетку.
- Use the cleaning tool (if provided) or scissors to remove hair and debris tangled around the brush.
- Clean the brush compartment.
- Вставьте основную щетку обратно и закрепите крышку.
6.3 Очистка боковых щеток
Periodically check the side brushes for tangled hair or debris. If necessary, remove them by gently pulling upwards and clean them. Replace worn or damaged brushes with the spare ones provided.
6.4 Очистка насадки для швабры и резервуара для воды
After each mopping session, remove the mop pad and wash it thoroughly. Empty any remaining water from the water tank and rinse it. Allow both to air dry completely before storing or reusing.
6.5 Очистка датчиков
Wipe the anti-drop sensors, bumper sensors, and charging contacts on the robot and charging station with a clean, dry cloth to ensure proper function.
7. Поиск Неисправностей
Если у вашего робота-пылесоса возникла проблема, ознакомьтесь со следующими распространенными проблемами и решениями:
| Проблема | Возможная причина | Решение |
|---|---|---|
| Робот не включается | Низкий заряд батареи; Выключите питание | Зарядите робота. Убедитесь, что выключатель питания включен. |
| Робот не заряжается | Контакты зарядки загрязнены; зарядная станция отключена | Очистите контакты зарядки; убедитесь, что зарядная станция подключена к сети. |
| Плохая производительность очистки | Мусорное ведро переполнено; Щетки запутаны; Фильтр забит | Опустошите пылесборник; очистите щетки; очистите/замените фильтр. |
| Робот часто застревает | Препятствия на полу; датчики загрязнены. | Clear floor of cables/small items; Clean sensors |
| Virtual wall not working | Virtual wall batteries low; Incorrect placement | Replace batteries; Adjust virtual wall position |
Если проблема сохраняется после применения этих решений, обратитесь в службу поддержки клиентов.
8. Технические характеристики
Technical specifications for the ETA Falco Smart Robot Vacuum Cleaner (Model ETA251590000):
| Особенность | Деталь |
|---|---|
| Производитель | Расчетное время прибытия |
| Размеры продукта (Д x Ш x В) | 32.5 х 33.5 х 7.5 см |
| Масса | 250 грамм |
| Номер модели товара | ETA251590000 (T2261) |
| Цвет модели | Синий |
| Материал | Пластик |
| Тип мощности | Питание от батареи |
| Томtage | 3 Volts (14.4V Li-ion battery, 2400 mAh) |
| Количество предметов в упаковке | 1 |
| Особые возможности | Pet brush compatibility, Smart App control, Floating brush system, HEPA filter, Virtual wall |
| Включенные компоненты | Battery, Filter, Charging station, Adapter, Remote control, Side brushes, Rotary brush, Cleaning cloths, Mop attachment, Virtual wall |
| Состав батареи | Литий-ионный |
| Срок службы батареи | До 120 минут |
| Время зарядки | Приблизительно 5 часов |
| Рекомендация по поверхности | Ламинат |
| Тип контроллера | Управление приложением |
| Наличие запасных частей | Информация о запасных частях недоступна |
9. Гарантия и поддержка
For warranty information, product support, or to inquire about spare parts, please refer to the warranty card included with your purchase or visit the official ETA webСохраните чек о покупке для предъявления гарантийных претензий.


