1. Важные инструкции по технике безопасности
При работе с электроинструментами всегда соблюдайте основные меры безопасности, чтобы снизить риск возгорания, поражения электрическим током и травм. Внимательно прочтите все инструкции перед использованием.
- Безопасность рабочей зоны: Поддерживайте чистоту и хорошее освещение рабочего места. Загромождённые или тёмные помещения могут стать причиной несчастных случаев. Не работайте с электроинструментами во взрывоопасной среде, например, в присутствии легковоспламеняющихся жидкостей, газов или пыли.
- Электробезопасность: Вилки электроинструментов должны соответствовать розетке. Никогда не модифицируйте вилку. Избегайте контакта тела с заземлёнными поверхностями, такими как трубы, радиаторы, плиты и холодильники.
- Личная безопасность: Всегда используйте средства защиты глаз. При длительной работе используйте средства защиты органов слуха. Одевайтесь правильно; не надевайте свободную одежду или украшения. Не допускайте контакта волос, одежды и перчаток с движущимися частями.
- Использование и уход за инструментом: Не прилагайте чрезмерных усилий при работе с электроинструментом. Используйте подходящий для вашей задачи электроинструмент. Отсоедините вилку от источника питания перед выполнением любых регулировок, заменой принадлежностей или хранением электроинструмента.
- Обслуживание: Обслуживайте электроинструменты. Проверьте, нет ли перекоса или заедания движущихся частей, поломки частей и любых других условий, которые могут повлиять на работу электроинструмента. В случае повреждения отремонтируйте электроинструмент перед использованием.
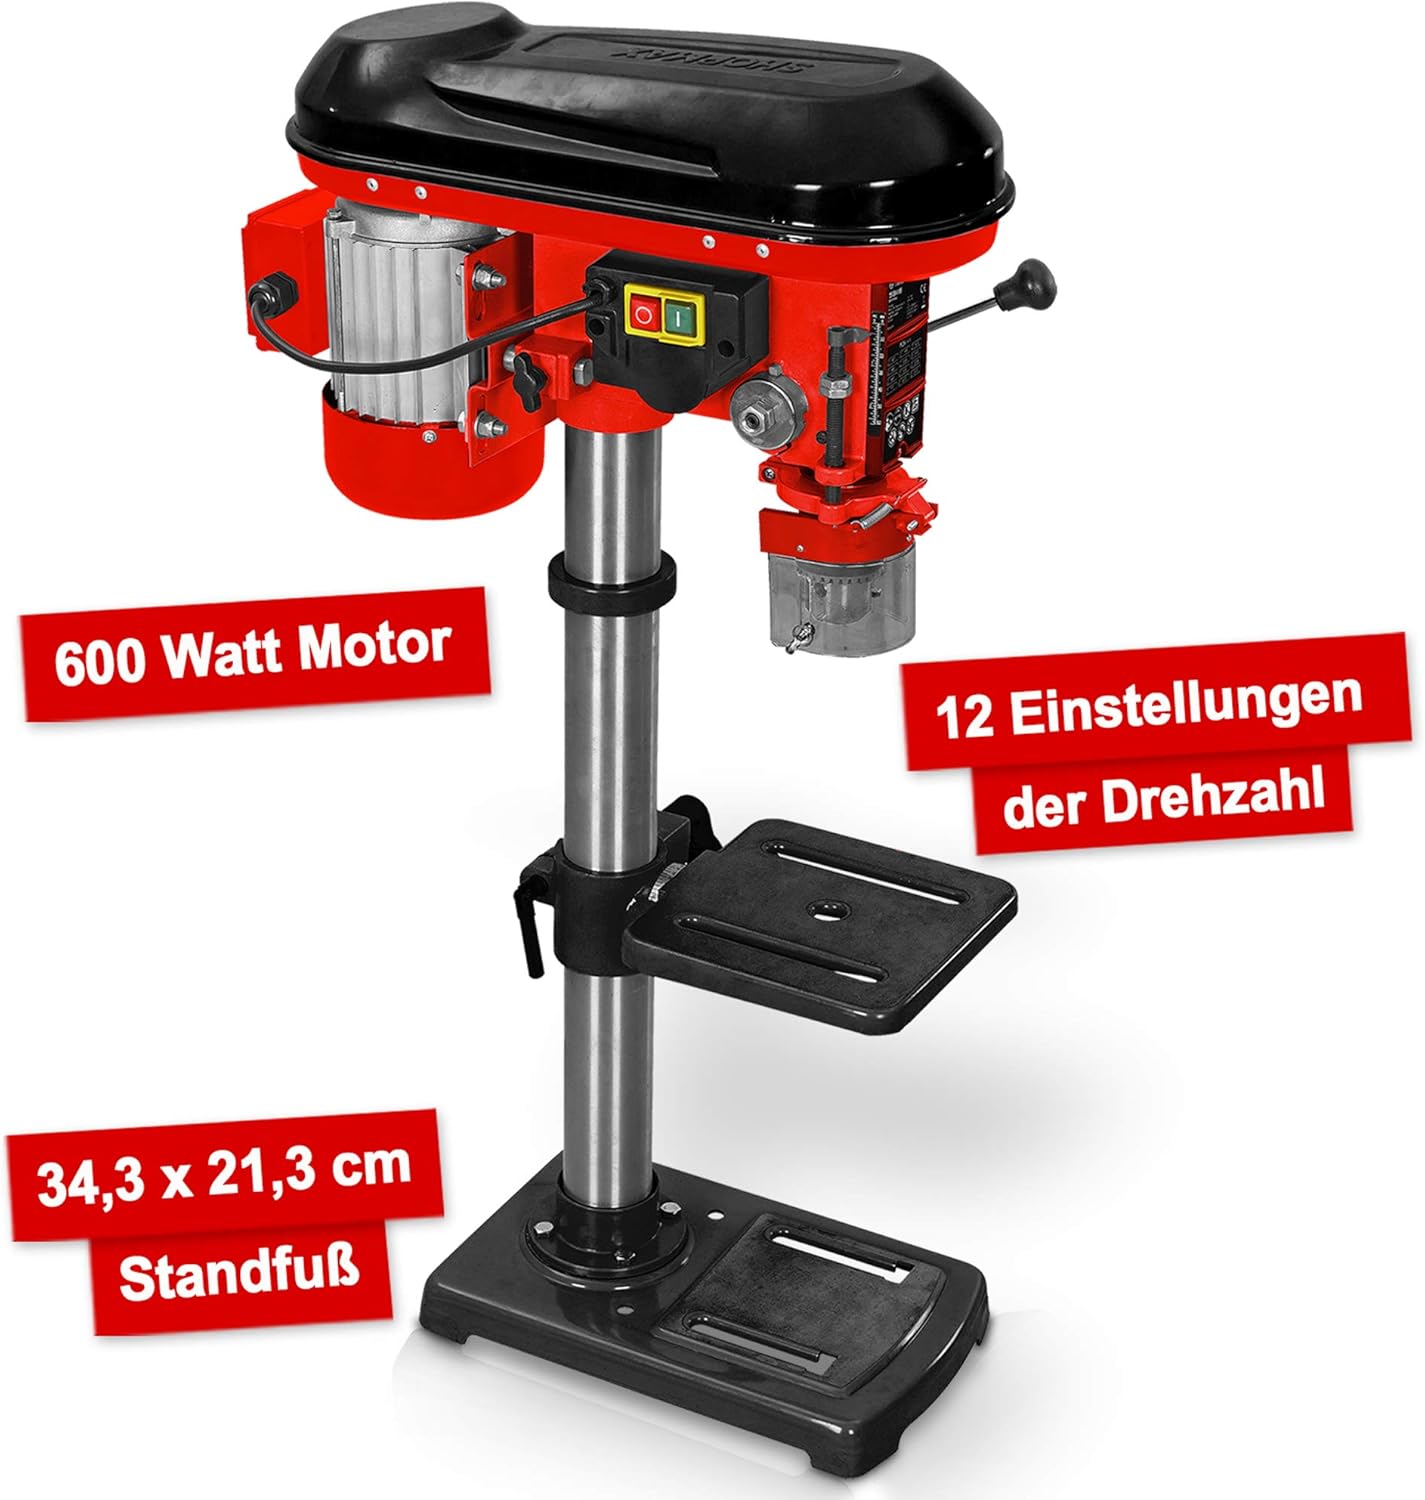
2. Продукт закончилсяview и компоненты
The Hecht Professional Pillar Drill is designed for precise drilling operations. Familiarize yourself with its main components for safe and effective use.

- Корпус мотора: Contains the 600W motor and belt drive system.
- Головное собрание: Includes the chuck, spindle, and depth stop.
- Столбец: The main support structure for the head assembly and drilling table.
- Drilling Table: Adjustable in height and angle for versatile drilling.
- Опорная плита: Provides stability and features mounting slots for securing to a workbench.
- Чак: Holds the drill bits securely (3-16 mm capacity).
- Speed Adjustment Lever: Used to change the drilling speed.
- Рукоятки подачи: Used to lower the chuck and drill bit into the workpiece.
- Переключатель Вкл/Выкл: Power control for the drill.
- Chip Protection Guard: Transparent guard for safety during operation.
3. Настройка и сборка
Follow these steps to assemble and set up your pillar drill before initial use.
- Распаковка: Аккуратно извлеките все компоненты из упаковки. Проверьте наличие повреждений или недостающих деталей.
- Установка опорной плиты: Place the base plate on a stable, level workbench. Secure it using appropriate bolts through the elongated slots on the base.
- Сборка колонны: Mount the column securely onto the base plate according to the provided hardware.
- Drilling Table Attachment: Slide the drilling table assembly onto the column. Adjust its height and secure it with the locking handle.
- Head Assembly Mounting: Carefully place the head assembly onto the top of the column and secure it.
- Установка патрона: Insert the chuck onto the spindle taper. Use a rubber mallet to gently tap it into place, ensuring a firm fit.
- Chip Guard: Attach the transparent chip protection guard around the chuck area.

4. Инструкция по эксплуатации
Understand how to properly operate your pillar drill for optimal performance and safety.
4.1 Selecting Drill Bits
Choose the appropriate drill bit for the material and desired hole size. The chuck accommodates bits from 3 mm to 16 mm. Ensure the drill bit is sharp and free from damage.
4.2 Установка сверл
- Убедитесь, что дрель отключена от сети.
- Open the chuck jaws using the chuck key.
- Insert the drill bit into the chuck, ensuring it is centered and seated firmly.
- Tighten the chuck jaws securely with the chuck key. Remove the chuck key immediately after tightening.
4.3 Регулировка скорости
The drill features 12 speed settings, adjustable via a belt drive system. Select the speed appropriate for your material and drill bit size. Lower speeds are generally for larger bits and harder materials, while higher speeds are for smaller bits and softer materials.


4.4 Adjusting Drilling Table
The drilling table can be adjusted in height and tilted up to +/- 45 degrees. Loosen the locking handle, position the table as required, and then securely tighten the handle.

4.5 Установка глубины бурения
Use the depth stop mechanism to set the desired drilling depth. This ensures consistent hole depths for repetitive tasks.
4.6 Процедура бурения
- Secure the workpiece firmly to the drilling table using clampили тиски. Никогда не держите заготовку руками.
- Adjust the table height and angle, and set the drilling depth.
- Выберите подходящую скорость.
- Turn on the drill using the On/Off switch.
- Slowly lower the drill bit into the workpiece using the feed handles, applying steady, even pressure.
- После достижения необходимой глубины извлеките сверло из заготовки.
- Turn off the drill.
5. Техническое обслуживание
Регулярное техническое обслуживание обеспечивает долговечность и безопасную работу вашего бурового станка.
- Уборка: After each use, clean the drill of dust and chips. Use a brush or compressed air. Do not use solvents that may damage plastic parts.
- Смазка: Periodically lubricate moving parts such as the column, spindle, and depth stop mechanism with light machine oil.
- Натяжение ремня: Check the tension of the drive belt regularly. Adjust if necessary to prevent slippage and ensure proper power transmission. Refer to the belt diagram inside the motor housing cover.
- Техническое обслуживание патрона: Keep the chuck jaws clean and free of debris. If the chuck becomes stiff, clean and lightly lubricate it.
- Электрический шнур: Inspect the power cord for any damage. Replace if frayed or cut.
6. Поиск Неисправностей
В этом разделе рассматриваются распространенные проблемы, с которыми вы можете столкнуться при работе с вашей центробежной дрелью.
| Проблема | Возможная причина | Решение |
|---|---|---|
| Дрель не запускается | Нет питания; Неисправный переключатель; Проблема с двигателем | Check power connection and circuit breaker; Inspect switch for damage; Consult qualified service personnel. |
| Чрезмерная вибрация | Loose mounting; Unbalanced drill bit; Worn bearings | Tighten mounting bolts; Replace or re-center drill bit; Consult service personnel for bearing replacement. |
| Сверло проскальзывает в патроне | Chuck not tightened sufficiently; Oily chuck jaws; Damaged chuck jaws | Tighten chuck firmly with key; Clean chuck jaws; Replace chuck if damaged. |
| Двигатель перегревается | Overloading; Insufficient ventilation; Prolonged use | Reduce load; Ensure clear ventilation; Allow motor to cool down. |
| Неточное бурение | Loose workpiece; Worn drill bit; Misaligned table | Secure workpiece firmly; Replace drill bit; Check and adjust table alignment. |
7. Технические характеристики
Technical data for the Hecht Professional Pillar Drill.
| Особенность | Спецификация |
|---|---|
| Производитель | Хехт |
| Номер модели товара | Standbohrmaschine Hecht |
| Источник питания | Проводной электрический |
| Томtage | 230 Вольт |
| Максимальная мощность | 600 Вт |
| Максимальная скорость вращения | 2700 об/мин |
| Количество скоростей | 12 |
| Макс. размер патрона | 16 мм |
| Материал | Металл |
| Цвет | Red Pillar Drill |
| Размеры упаковки | 71 х 45 х 27 см |
| Масса | 23 kilograms (approx.) |
| Среда использования | В помещении |
| Номер ссылки | 8595614925655 |
8. Гарантия и поддержка
For warranty information, please refer to the documentation provided with your purchase or contact the retailer. For technical support or spare parts inquiries, please contact Hecht customer service or your authorized dealer.
Please have your model number (Standbohrmaschine Hecht) and reference number (8595614925655) available when contacting support.


