1. Введение
The Autopilot APCET2 is a versatile temperature controller designed for both cooling and heating applications. It features automatic day and night set points, detected by a built-in photocell, allowing for precise temperature management. Easy-to-use knobs facilitate setting adjustments, and a Memory-lock feature ensures consistent performance by preventing accidental changes to set points.
Основные характеристики:
- Controls heating or cooling equipment with both day/night set points.
- Includes a 20-foot remote precision temperature sensor.
- Temperature control differential of +/- 3°F.
- Built-in photocell for automatic day/night detection.
- Temperature control range: 50°F–100°F (10°C–38°C).
- Electric power source.
2. Информация по технике безопасности
Перед использованием данного устройства, пожалуйста, внимательно ознакомьтесь со всеми инструкциями по технике безопасности. Несоблюдение этих инструкций может привести к поражению электрическим током, пожару или серьезным травмам.
- Только для использования в помещении: Данное устройство предназначено для использования в помещении в сухих местах. Не подвергать воздействию воды или высокой влажности.
- Электрические характеристики: Ensure the connected device's electrical rating does not exceed the thermostat's maximum load (1800 watts, 15 amps at 120V AC).
- Правильное заземление: Always plug the thermostat into a properly grounded 3-prong outlet.
- Избегайте перегрузки: Do not plug multiple high-power devices into the thermostat using a power strip or adapter.
- Размещение датчика: Position the temperature sensor away from direct heat sources, cold drafts, or direct sunlight to ensure accurate readings.
- Уборка: Disconnect power before cleaning. Use a dry cloth; do not use liquid cleaners.
- Дети и домашние животные: Храните устройство в недоступном для детей и домашних животных месте.
3. Продукт закончилсяview
The Autopilot APCET2 thermostat features a user-friendly design with clearly labeled controls and indicators.
Передний View:

Рисунок 3.1: Передний view of the Autopilot APCET2 thermostat. This image displays the main control panel, including the two temperature setting knobs, the day/night mode switch, the heating/cooling mode switch, and the integrated power outlet for connecting your device. The "ON" and "POWER" indicator lights are also visible.
- Day/Night Temperature Knobs: Two separate knobs for setting desired temperatures for day and night cycles.
- Day/Night Mode Switch: Toggles between 24-hour operation or automatic day/night detection via photocell.
- Heating/Cooling Mode Switch: Selects whether the thermostat controls a heating or cooling device.
- Встроенная розетка: Where the controlled device is plugged in.
- Световой индикатор питания: Загорается, когда на устройство подается питание.
- Output Indicator Light: Illuminates when power is being supplied to the connected device.
Назад View:

Рисунок 3.2: Назад view of the Autopilot APCET2 thermostat. This image shows the standard 3-prong power plug for connecting the thermostat to a wall outlet, along with the screws for potential wall mounting.
- Вилка питания: Standard 3-prong plug for connecting to a 120V AC wall outlet.
- Монтажные отверстия: For optional wall mounting.
Размеры:
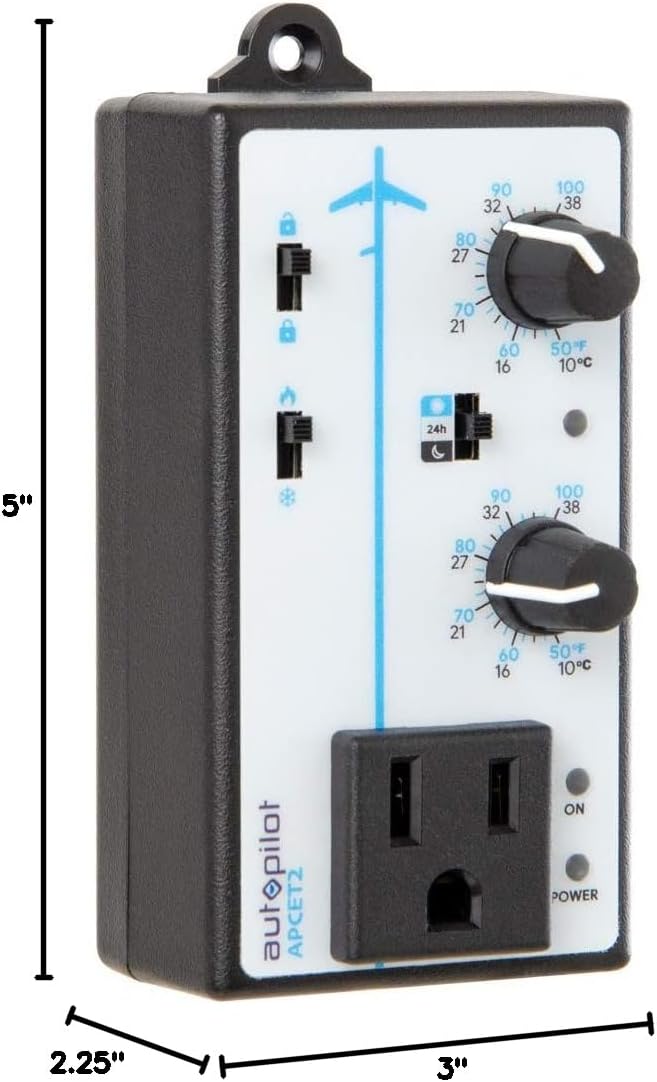
Рисунок 3.3: Dimensions of the Autopilot APCET2 thermostat. The image indicates the device measures approximately 3 inches deep, 2.25 inches wide, and 5 inches high.
4. Инструкции по настройке
- Распакуйте устройство: Carefully remove the Autopilot APCET2 thermostat and its components from the packaging.
- Подключите датчик температуры: Plug the 20-foot remote precision temperature sensor into the designated port on the side of the thermostat. Ensure a secure connection.
- Расположите датчик: Place the temperature sensor in the area where you want to monitor and control the temperature. Avoid placing it in direct sunlight, near heat sources, or in drafts, as this can affect accuracy.
- Подключите термостат к сети: Insert the 3-prong plug of the Autopilot APCET2 thermostat into a standard 120V AC grounded wall outlet. The Power indicator light should illuminate.
- Подключите свое устройство: Plug the heating or cooling device you wish to control into the integrated power outlet on the front of the thermostat.
- Первоначальная проверка: Перед началом работы убедитесь в надежности всех соединений.
5. Инструкция по эксплуатации
The Autopilot APCET2 offers flexible temperature control with day and night settings and heating/cooling modes.
5.1 Selecting Operating Mode (Heating or Cooling)
- Найдите Heating/Cooling Mode Switch on the front panel (typically marked with flame and snowflake icons).
- Установите переключатель в значок пламени для Режим нагрева. In this mode, the connected device will turn ON when the temperature drops below the set point and turn OFF when it rises above the set point (considering the +/- 3°F differential).
- Установите переключатель в значок снежинки для Режим охлаждения. In this mode, the connected device will turn ON when the temperature rises above the set point and turn OFF when it drops below the set point (considering the +/- 3°F differential).
5.2 Setting Day and Night Temperatures
The thermostat allows for distinct day and night temperature settings.
- Day Temperature Setting: Используйте upper knob (associated with the sun icon) to set your desired daytime temperature. Rotate the knob clockwise to increase the temperature and counter-clockwise to decrease it. The range is 50°F–100°F (10°C–38°C).
- Night Temperature Setting: Используйте lower knob (associated with the moon icon) to set your desired nighttime temperature. Rotate the knob clockwise to increase the temperature and counter-clockwise to decrease it. The range is 50°F–100°F (10°C–38°C).
5.3 Day/Night Detection Mode
The thermostat can automatically switch between day and night settings using its built-in photocell.
- Найдите Day/Night Mode Switch (typically marked with a 24h icon and sun/moon icons).
- Установите переключатель в sun/moon icon для Автоматическое определение дня/ночи. The built-in photocell will detect ambient light levels and automatically switch between your set day and night temperatures.
- Установите переключатель в 24h icon для 24-Hour Operation. In this mode, the thermostat will continuously use the Day Temperature Setting, regardless of light conditions.
5.4 Memory-Lock Feature
The Memory-lock feature prevents accidental changes to your set points.
- К замок the settings, slide the small switch next to the padlock icon to the заблокированное положение. This will prevent the temperature knobs from being accidentally adjusted.
- К разблокировать the settings, slide the switch to the открытое положение.
6. Техническое обслуживание
Regular maintenance ensures optimal performance and longevity of your Autopilot APCET2 thermostat.
- Уборка: Disconnect the thermostat from the power outlet before cleaning. Use a soft, dry cloth to wipe the exterior. Do not use abrasive cleaners, solvents, or immerse the unit in water.
- Уход за датчиком: Keep the temperature sensor clean and free from dust or debris. Ensure the sensor cable is not pinched or damaged.
- Хранилище: If storing the device for an extended period, disconnect it from power, clean it, and store it in a cool, dry place.
7. Поиск Неисправностей
If you encounter issues with your Autopilot APCET2 thermostat, refer to the following common problems and solutions:
| Проблема | Возможная причина | Решение |
|---|---|---|
| Device not turning ON/OFF at set temperature. | Incorrect mode selected (Heating/Cooling). Temperature differential not met. Thermostat not receiving power. Connected device is faulty or not powered. | Verify the Heating/Cooling switch is in the correct position. Allow for the +/- 3°F temperature differential. Check if the thermostat is securely plugged into a live outlet and the Power indicator is ON. Test the connected device by plugging it directly into a wall outlet. |
| Temperature settings cannot be adjusted. | Memory-lock feature is engaged. | Slide the Memory-lock switch to the unlocked position. |
| Day/Night mode not switching automatically. | Photocell mode not selected. Photocell is obstructed or in constant light/darkness. | Ensure the Day/Night Mode switch is set to the sun/moon icon. Check that the photocell (small sensor on the front) is not covered and is exposed to natural light changes. |
| Неточные показания температуры. | Temperature sensor improperly placed or damaged. | Relocate the sensor away from direct heat, cold drafts, or sunlight. Inspect the sensor and cable for damage. |
Если проблема сохраняется после попытки устранения этих неполадок, обратитесь в службу поддержки клиентов.
8. Технические характеристики
| Бренд | Автопилот |
| Название модели | Advanced Day & Night Cooling or Heating |
| Номер модели | APCET2 |
| Размеры продукта | 3"Д x 2.25"Ш x 5"В |
| Тип контроллера | Knob & Push Button |
| Специальная характеристика | Lockable (Memory-lock) |
| Цвет | Черный |
| Конкретные применения | Temperature Control in Grow Rooms, Controlling Heating and Cooling Equipment |
| Тип контроля температуры | Программируемый |
| Включенные компоненты | 20' remote precision temperature sensor |
| Источник питания | Электрический |
| Томtage | 120 Вольт |
| Ватtage | 1800 Вт |
| Вес товара | 8.1 унции |
| Диапазон регулирования температуры | 50–100 ° C (10–38 ° F) |
| Перепад температур | +/- 3 ° F |
| Тип дисплея | ЖК-дисплей |
| Подсветка | Да |
| Тип крепления | Настенное крепление |
9. Гарантия и поддержка клиентов
For warranty information or technical assistance, please contact Autopilot customer support. Refer to the product packaging or the official Autopilot webсайт для получения самых актуальных контактных данных.
When contacting support, please have your product model number (APCET2) and purchase information readily available.


