Введение
The Perel EDIN305N is a 230V 16A 3600W DIN-rail mount digital weekly timer designed for indoor use. This device allows for precise, programmable control of electrical circuits, enabling automatic switching ON and OFF of connected appliances or lighting systems over a weekly cycle. It features a clear digital display and multiple programming options to suit various scheduling needs.
Меры предосторожности
ПРЕДУПРЕЖДЕНИЕ: Electrical installation should only be performed by a qualified electrician. Incorrect wiring can lead to electric shock, fire, or damage to the device and connected equipment. Always disconnect power at the main circuit breaker before installation or maintenance.
- Ensure the power supply matches the device's specifications (230V~50Hz).
- Не превышайте максимальную нагрузочную способность 16 А / 3600 Вт.
- This device is designed for indoor use only. Avoid exposure to moisture, dust, or extreme temperatures.
- Не пытайтесь вскрывать или ремонтировать устройство самостоятельно. По всем вопросам обслуживания обращайтесь к квалифицированному персоналу.
- Хранить в недоступном для детей месте.
Продукт болееview
The Perel EDIN305N digital timer consists of a main body with a digital display, control buttons, and terminal blocks for electrical connections. A transparent cover protects the display and buttons.
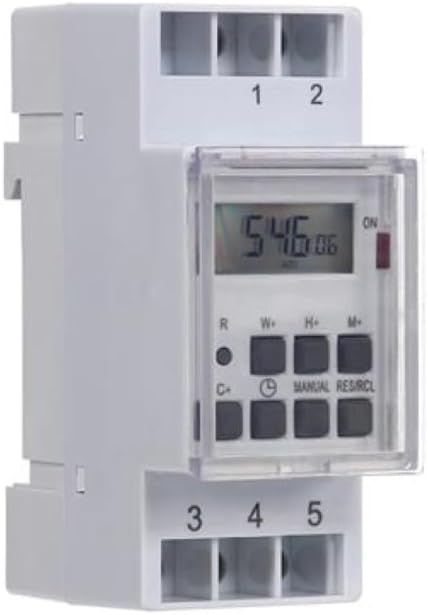
Рисунок 1: Передний view of the Perel EDIN305N Digital Weekly Timer. The image displays the LCD screen, control buttons (R, W+, H+, M+, C+, Clock, Manual, RES/RCL), and numbered terminal blocks (1, 2 at the top, 3, 4, 5 at the bottom).
Кнопки управления:
- R: Reset button (recessed).
- В+: Weekday setting.
- Н+: Установка часа.
- М+: Minute setting.
- C+: Clear program.
- Значок часов: Used to set current time and day, and to exit programming mode.
- РУКОВОДСТВО: Manual override for ON/AUTO/OFF modes.
- РЕЗ/РКЛ: Reset/Recall program.
Клеммные колодки:
- 1, 2: Power supply input (N, L).
- 3, 4, 5: Output terminals for controlled circuit (Common, Normally Open, Normally Closed).
Технические характеристики
| Параметр | Ценить |
|---|---|
| Номер модели | ЭДИН305Н |
| Томtage | 230В~50Гц |
| Макс. ток | 16А |
| Макс. мощность | 3600 Вт |
| Количество настроек | 7 (программы включения/выключения) |
| Тип крепления | DIN-рейка |
| Размеры (Д x Ш x В) | 2.36 x 3.54 x 1.57 дюйма (60 x 90 x 40 мм) |
| Масса | 0.12 кг (4.2 унции) |
| Материал | Пластик |
| Цвет | Белый |
| Требуются батареи | No (internal battery for memory backup) |
Установка
1 Монтаж
The Perel EDIN305N is designed for DIN-rail mounting. Securely attach the timer to a standard 35mm DIN-rail within an electrical enclosure. Ensure sufficient space for wiring and ventilation.
2. Электропроводка
ВАЖНЫЙ: Ensure power is disconnected at the main circuit breaker before proceeding with wiring. Follow local electrical codes and regulations.
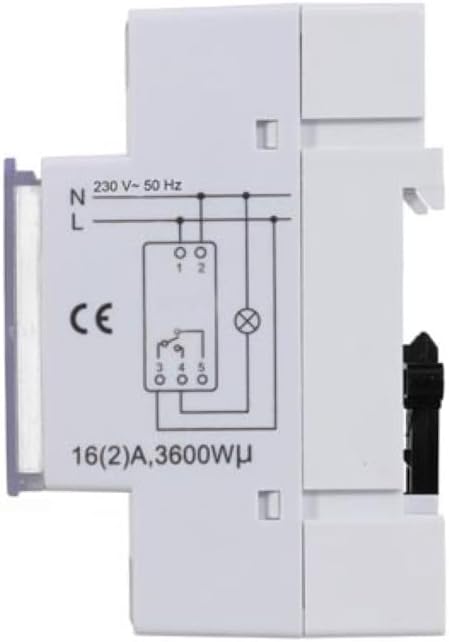
Рисунок 2: Сторона view of the Perel EDIN305N Digital Weekly Timer showing the electrical wiring diagram. It illustrates connections for Neutral (N), Live (L), and the output contacts (1, 2, 3, 4, 5) for controlling a load.
Refer to the wiring diagram (Figure 2) and the terminal block labels on the device:
- Connect the Neutral (N) wire of your 230V AC supply to terminal 1.
- Connect the Live (L) wire of your 230V AC supply to terminal 2.
- For the controlled circuit:
- Terminal 3: Common contact for the relay output.
- Terminal 4: Normally Open (NO) contact. The circuit connected here will be ON when the timer is active.
- Terminal 5: Normally Closed (NC) contact. The circuit connected here will be OFF when the timer is active.
- Connect the load (e.g., light, appliance) between the Live (L) supply and either terminal 4 (for NO operation) or terminal 5 (for NC operation), with terminal 3 connected to the Live (L) supply. Alternatively, connect the load between terminal 4 or 5 and the Neutral (N) supply, with terminal 3 connected to the Live (L) supply. Consult a qualified electrician for specific load wiring configurations.
Первоначальная настройка и работа
1. Включение и перезагрузка
After wiring and restoring power, the display will illuminate. If the display is blank or shows erratic characters, press the recessed R (Reset) button using a pointed non-metallic object (e.g., a pen tip). This will clear all settings and restore default values.
2 Установка текущего времени и дня
- Нажмите и удерживайте Значок часов кнопка.
- Удерживая Значок часов , нажмите W+ to set the current day of the week (1=Monday, 7=Sunday).
- Удерживая Значок часов , нажмите H+ to set the current hour (0-23).
- Удерживая Значок часов , нажмите M+ установить текущую минуту (0-59).
- Выпустите Значок часов Кнопка. Время и день установлены.
3 Программирование циклов включения/выключения
Таймер поддерживает до 7 программ включения/выключения. Каждая программа состоит из времени включения и времени выключения.
- Нажмите Значок часов button once to enter programming mode. The display will show "1 ON".
- Нажимать W+ to select the day(s) for this program. You can choose a single day, a block of days (e.g., Mon-Fri), or all days.
- Нажимать H+ to set the ON hour for program 1.
- Нажимать M+ to set the ON minute for program 1.
- Нажмите Значок часов Нажмите кнопку еще раз. На дисплее отобразится «1 ВЫКЛ».
- Repeat steps 2-4 to set the OFF day(s), hour, and minute for program 1.
- To set additional programs (2-7), press the Значок часов button to cycle through "2 ON", "2 OFF", etc., and repeat the setting process.
- После установки всех желаемых программ нажмите кнопку РУКОВОДСТВО кнопку для выхода из режима программирования и возврата к отображению текущего времени.
4. Ручное управление
Нажмите РУКОВОДСТВО Нажимайте кнопку несколько раз, чтобы переключаться между режимами работы:
- НА: The output is continuously ON, overriding all programs.
- АВТО: The timer operates according to the programmed ON/OFF cycles.
- OFF: The output is continuously OFF, overriding all programs.
Убедитесь, что таймер установлен на АВТО для запрограммированной работы.
5. Clearing Programs
Чтобы закрыть определённую программу:
- Enter programming mode by pressing the Значок часов button until the desired program number (e.g., "3 ON") is displayed.
- Нажмите C+ button. This will clear both the ON and OFF times for that specific program.
- Repeat for other programs as needed.
- Нажимать РУКОВОДСТВО для выхода из режима программирования.
To clear all programs and reset the device, use the recessed R Кнопка (Сброс).
Обслуживание
- Протирайте устройство мягкой сухой тканью. Не используйте абразивные чистящие средства или растворители.
- Ensure the transparent cover is closed to protect the display and buttons from dust and splashes.
- Regularly check electrical connections for tightness, especially in high-vibration environments.
Поиск неисправностей
| Проблема | Возможная причина | Решение |
|---|---|---|
| Дисплей пуст. | Отсутствует источник питания; внутренняя батарея разряжена. | Check power connections (terminals 1 & 2). Ensure main power is ON. If power is present, press the R (Reset) button. The internal battery recharges when connected to power. |
| Таймер не включается/выключается в соответствии с запрограммированными параметрами. | Incorrect program settings; timer in manual ON/OFF mode. | Verify program settings (time, day, ON/OFF). Ensure the timer is in АВТО режим, нажав кнопку РУКОВОДСТВО кнопка. |
| Connected appliance not receiving power. | Incorrect wiring; appliance fault; timer fault. | Check wiring according to Figure 2. Test the appliance directly. If wiring and appliance are fine, the timer may be faulty. |
| Buttons unresponsive or display erratic. | Software glitch; low internal battery. | Нажмите на утопленную кнопку R (Reset) button. Ensure the timer has been connected to power for at least 24 hours to fully charge the internal battery. |
Утилизация
Do not dispose of this product with general household waste. This electronic device contains materials that can be recycled. Please dispose of it at a designated collection point for electrical and electronic equipment waste, in accordance with local regulations.
Гарантия и поддержка
Perel products are manufactured to high quality standards. For warranty information, technical support, or service inquiries, please refer to the documentation provided with your purchase or contact your local Perel distributor or retailer. Please have your model number (EDIN305N) and purchase details ready when contacting support.


