1. Введение
Спасибо за покупкуasing the American Audio WM-419 4-Channel UHF Handheld Wireless Microphone System. This system is designed to provide high-quality, reliable wireless audio for various applications, including PA systems, karaoke, mobile entertainment, schools, and houses of worship. This manual provides essential information for the proper setup, operation, and maintenance of your WM-419 system.
Please read this manual thoroughly before operating the unit to ensure optimal performance and to prevent damage.
2. Содержимое упаковки
Убедитесь, что все перечисленные ниже компоненты включены в ваш комплект:
- 1 x WM-419 Wireless Receiver Unit
- 4 беспроводных ручных микрофона
- 4 зажима для микрофона
- 8 батарейки типа АА (для микрофонов)
- 1 адаптер питания для ресивера
- 1 x 1/4" аудиокабель
- Руководство пользователя (этот документ)
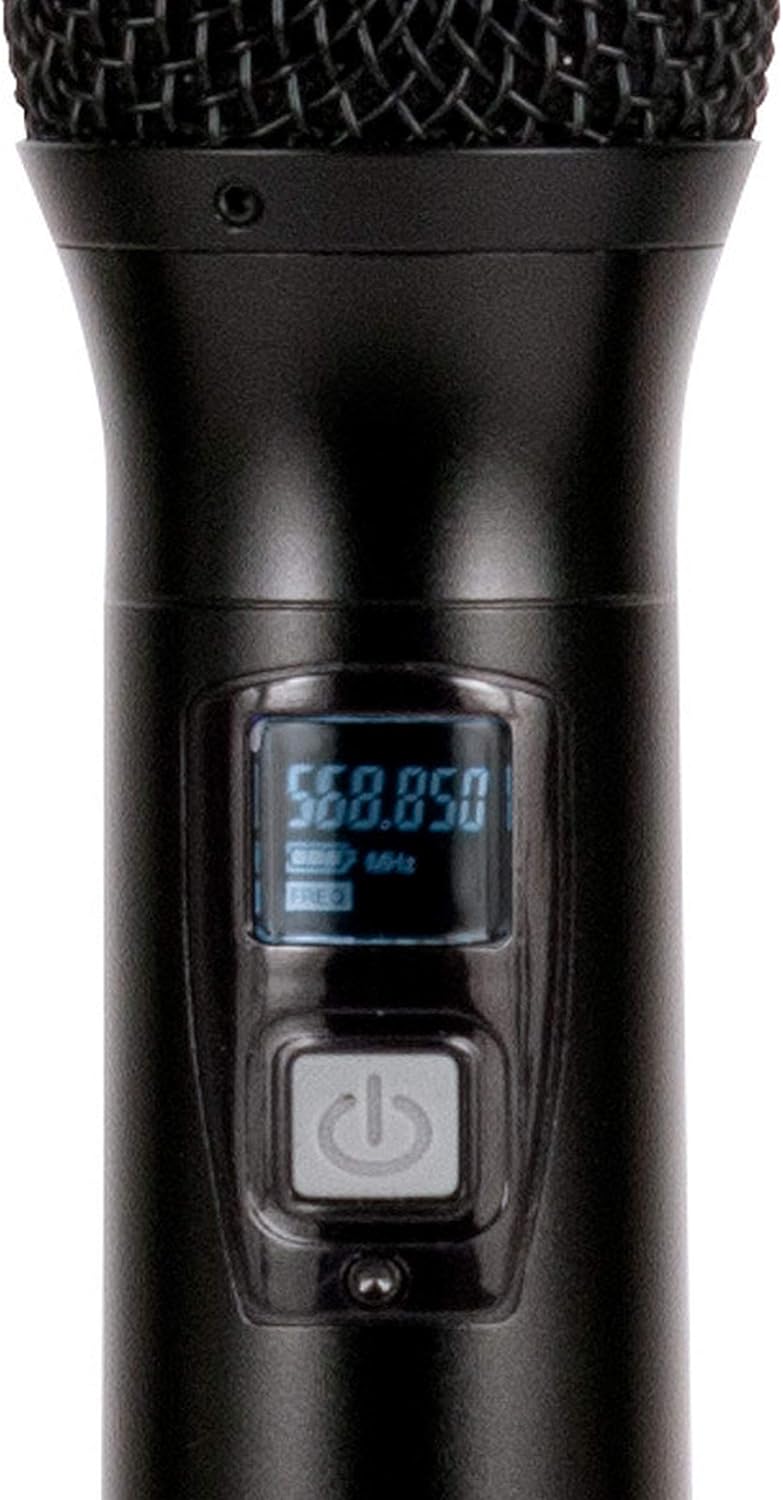
Рисунок 2.1: Included components of the WM-419 system. This image displays the receiver, four handheld microphones, four detachable antennas, eight AA batteries, a power adapter, and a 1/4" audio cable, along with four microphone clips.
3.Основные характеристики
- 4-Channel UHF Wireless Handheld Microphone System
- Intelligent Frequency Autoscan with IR Synchronization
- Individual Volume Control for each microphone channel on the receiver
- XLR Audio Output for each microphone channel
- 50 Channels Available per Receiver (200 total channels)
- 16-Bit Pilot Technology to assist with eliminating frequency interference
- Wireless Range: Up to 300 feet / 90 meters (line of sight)
- Microphone Battery Life: 6-10 hours (with included AA batteries)
- OLED Screen on Handheld MIC Transmitters
4. Руководство по установке
4.1 Размещение приемника
Place the WM-419 receiver on a stable, flat surface, away from strong electromagnetic interference sources. Ensure there is adequate ventilation around the unit. For optimal signal reception, position the receiver's antennas vertically and ensure they are not obstructed.

Рисунок 4.1: Передний view of the WM-419 receiver with microphones. This image shows the receiver unit with its four antennas extended, and the four handheld microphones resting on top, illustrating the compact design.
4.2 Подключение приемника
- Подключение питания: Connect the included power adapter to the DC 12-15V input on the rear panel of the receiver. Plug the adapter into a suitable power outlet.
- Аудиовыход: Connect the receiver to your PA system, mixer, or amplifier using the XLR audio outputs for individual microphone channels (Balanced A, B, C, D) or the AF MIX OUT (1/4" unbalanced) for a combined output.

Рисунок 4.2: Rear panel connections of the WM-419 receiver. This image highlights the DC power input, four balanced XLR outputs (A, B, C, D), and a mixed 1/4" audio output, along with the antenna connections.
4.3 Installing Batteries in Microphones
Each handheld microphone requires two AA batteries. Ensure correct polarity when inserting the batteries.
- Unscrew the bottom cap of the microphone to reveal the battery compartment.
- Вставьте две батарейки типа АА, соблюдая полярность (+/-).
- Плотно закрутите нижнюю крышку обратно.

Рисунок 4.3: Four handheld microphones. This image displays the four individual handheld microphones, each featuring an OLED display and power button, ready for battery installation and use.
5. Инструкция по эксплуатации
5.1 Включение/выключение питания
- Получатель: Press the POWER button on the front panel of the receiver to turn it on or off.
- Микрофоны: Press and hold the power button on each handheld microphone for a few seconds to turn it on or off. The OLED screen will illuminate when powered on.
5.2 Frequency Synchronization (IR Sync)
The WM-419 features Intelligent Frequency Autoscan and IR Synchronization for easy setup.
- Turn on the receiver and the desired microphone.
- На приемнике нажмите СКАНИРОВАНИЕ button for the channel you wish to set. The receiver will automatically scan for an available clear frequency.
- Once a frequency is found, the display will show "SYNC". Position the IR window of the microphone (usually near the bottom of the display) close to the IR sensor on the receiver (located near the channel display).
- Нажмите НАБОР button on the receiver for that channel. The frequency information will be transmitted to the microphone via infrared. The microphone's display should show the same frequency as the receiver, indicating successful synchronization.
- Repeat this process for each microphone.

Рисунок 5.1: Receiver front panel detail. This image provides a close-up view of the receiver's illuminated OLED displays for each channel, showing frequency information, signal strength, and individual volume controls.

Рисунок 5.2: Microphone OLED display. A detailed view of one handheld microphone's OLED screen, showing the current frequency and battery indicator, along with the power/mute button.
5.3 Регулировка громкости
Each channel on the receiver has an independent volume control knob. Adjust these knobs to achieve the desired audio level for each microphone.
5.4 Muting Microphones
A short press of the power button on the handheld microphone will mute/unmute the microphone. The OLED display will indicate the mute status.
6. Техническое обслуживание
- Уборка: Use a soft, dry cloth to clean the surfaces of the receiver and microphones. Do not use abrasive cleaners or solvents.
- Замена батареи: Replace microphone batteries when the low battery indicator appears on the microphone's OLED screen or when audio quality degrades. Always use fresh AA batteries.
- Хранилище: When not in use for extended periods, remove batteries from the microphones to prevent leakage. Store the system in a cool, dry place.
7. Поиск Неисправностей
| Проблема | Возможная причина | Решение |
|---|---|---|
| Нет звука с микрофона | Microphone not powered on; Batteries dead; Microphone not synchronized; Receiver volume too low; Output cable disconnected. | Ensure microphone is on; Replace batteries; Perform IR sync; Increase receiver channel volume; Check audio cable connections to mixer/PA. |
| Помехи/статическое напряжение | Nearby electronic devices; Other wireless systems on same frequency; Obstructions between mic and receiver; Receiver too far from microphone. | Move receiver away from interference sources; Perform Autoscan and re-sync to a clear frequency; Ensure line of sight; Reduce distance between mic and receiver. |
| Короткий диапазон беспроводной связи | Antennas not properly positioned; Obstructions; Low microphone battery. | Ensure antennas are vertical and unobstructed; Minimize physical barriers; Replace microphone batteries. |
| Дисплей микрофона не работает | Dead batteries; Microphone not powered on. | Replace batteries; Press and hold power button to turn on. |
8. Технические характеристики
| Особенность | Деталь |
|---|---|
| Название модели | American Audio WM-419 |
| Форм-фактор микрофона | Микрофонная система (ручная) |
| Количество каналов | 4 (50 channels available per receiver, 200 total) |
| Технология связи | UHF Wireless, XLR |
| Источник питания | Receiver: AC Adapter; Microphones: 2 x AA Batteries (per mic) |
| Battery Life (Microphones) | 6-10 часа |
| Дальность беспроводной связи | Up to 300 feet / 90 meters (line of sight) |
| Отношение сигнал / шум | 70 дБ |
| Уровень шума | 85 дБ |
| Размеры продукта (приемник) | 22 x 14 x 6 дюйма |
| Вес товара | 9 фунта |
| Цвет | Черный |
| Совместимые устройства | Звуковая система, караоке-машина |
| Специальная характеристика | Volume Control (individual channel) |
| Полярная диаграмма | Однонаправленный |
9. Гарантия и поддержка
For warranty information and technical support, please contact ADJ Products directly or visit their official webСохраните чек о покупке в качестве подтверждения покупки на случай предъявления гарантийных претензий.
Производитель: ADJ Продукты
Бренд: АДДж
Webсайт: www.adj.com
10. Информация по технике безопасности
ВНИМАНИЕ! Этот продукт может подвергать вас воздействию химических веществ, включая свинец, который, как известно в штате Калифорния, вызывает рак и врожденные дефекты или другие нарушения репродуктивной системы. Для получения дополнительной информации перейдите на www.P65Warnings.ca.gov.
- Не подвергайте устройство воздействию дождя или влаги.
- Не снимайте крышку. Внутри нет деталей, которые пользователь может обслуживать самостоятельно. Обслуживание должно осуществляться квалифицированным персоналом.
- Обеспечьте надлежащую вентиляцию. Не закрывайте вентиляционные отверстия.
- Используйте только адаптер питания, поставляемый в комплекте с устройством.
- Утилизируйте батареи ответственно, в соответствии с местными правилами.


