1. Введение
This manual provides essential instructions for the installation, operation, and maintenance of your EPEVER 80A MPPT Solar Charge Controller. This device is designed to manage the power flow from your solar panels to your battery bank, ensuring efficient charging and protecting your batteries from overcharge and over-discharge. It supports 12V, 24V, 36V, and 48V battery systems automatically and is compatible with various lead-acid battery types including Sealed, AGM, Gel, and Flooded batteries.
2. Информация по технике безопасности
Перед установкой и эксплуатацией внимательно прочтите все инструкции и предупреждения. Несоблюдение этих инструкций может привести к поражению электрическим током, пожару или серьёзным травмам.
- Ensure all wiring is correctly polarized and securely connected. Incorrect wiring can damage the controller and other components.
- Always disconnect the battery first, then the solar panel, before performing any maintenance or disconnection. Reconnect in reverse order: solar panel first, then battery.
- Установите контроллер в хорошо проветриваемом помещении, вдали от легковоспламеняющихся материалов и коррозионных газов.
- The controller is designed for indoor use. Protect it from direct sunlight, high temperatures, and moisture.
- Use appropriate circuit breakers or fuses for both the solar panel and battery circuits to prevent overcurrent.
- This device is a common negative ground controller. Ensure proper grounding.
- Do not attempt to disassemble or repair the controller yourself. Contact qualified service personnel.
3. Продукт закончилсяview
3.1 Основные характеристики
- Автоматическая система voltage identification: 12V/24V/36V/48V DC.
- Передовая технология MPPT с ультрабыстрой скоростью отслеживания (эффективность до 99.5%).
- Максимальная эффективность преобразования постоянного тока в постоянный достигает 98.7%.
- Automatic control system to limit charging power and current.
- Real-time energy recording and statistical functions.
- Функция компенсации температуры батареи.
- Isolated RS-485 communication interface with MODBUS protocol.
- Support for parallel operation of up to 8 units to expand system capacity.
- Compatible with Sealed, AGM, Gel, and Flooded lead-acid batteries.
3.2 Физические размеры

Рисунок 3.2.1: Physical dimensions of the EPEVER 80A MPPT Solar Charge Controller. The controller measures approximately 394mm (L) x 240mm (W) x 134mm (H).
The controller has a robust design with integrated heat sinks for efficient thermal management. The overall dimensions are approximately 394mm in length, 240mm in width, and 134mm in height. The mounting holes are designed for secure installation.
3.3 Идентификация компонентов
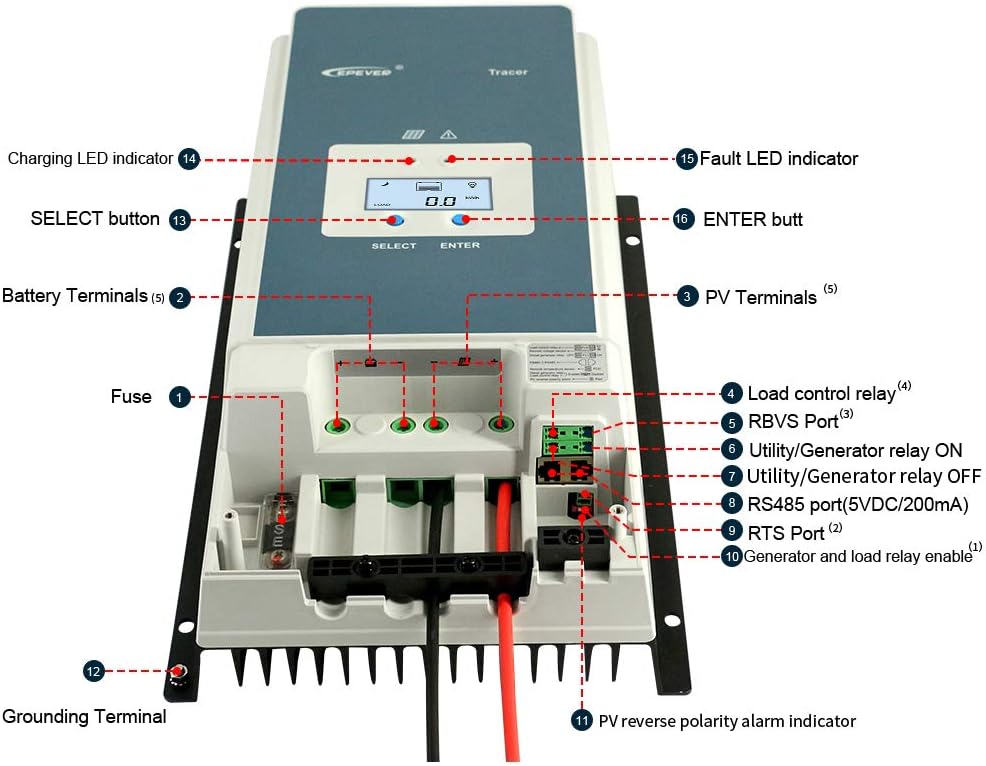
Рисунок 3.3.1: Передний view of the EPEVER 80A MPPT Solar Charge Controller with labeled components.
- Предохранитель: Overcurrent protection for the battery circuit.
- Клеммы аккумулятора: Подключитесь к аккумуляторной батарее.
- Фотоэлектрические терминалы: Подключитесь к массиву солнечных панелей.
- Load Control Relay: Output for connecting DC loads (if applicable).
- RBVS Port: Объем удаленной батареиtage Sensor port.
- Utility/Generator Relay ON: Control signal for external utility/generator.
- Utility/Generator Relay OFF: Control signal for external utility/generator.
- RS485 Port (5VDC/200mA): Communication port for remote monitoring or parallel connection.
- Порт RTS: Remote Temperature Sensor port.
- Generator and Load Relay Enable: Control input for generator and load relays.
- PV Reverse Polarity Alarm Indicator: LED indicator for PV reverse polarity.
- Терминал заземления: Для заземления системы.
- Кнопка ВЫБОР: Используется для навигации по пунктам меню.
- Светодиодный индикатор зарядки: Указывает состояние зарядки.
- Fault LED Indicator: Указывает на системные ошибки.
- Кнопка ENTER: Используется для подтверждения выбора.
3.4 Интерфейс дисплея

Рисунок 3.4.1: Example screens of the LCD display showing various system parameters.
The integrated LCD provides real-time monitoring of system parameters such as PV voltagе, зарядный ток, емкость аккумулятораtage, load status, and temperature. Use the "SELECT" and "ENTER" buttons to navigate through the display screens and adjust settings.
4. Настройка и установка
Правильная установка имеет решающее значение для безопасной и эффективной работы вашего контроллера заряда солнечных батарей. Внимательно следуйте этим шагам.
4.1 Монтаж контроллера
- Choose a vertical mounting location that is well-ventilated and protected from direct sunlight, high temperatures, and moisture.
- Ensure there is sufficient clearance around the controller for heat dissipation, especially above and below the heat sink fins.
- Mount the controller securely using appropriate fasteners for the mounting surface.
4.2 Подключение проводки
Важный: Always connect the battery first, then the solar panel. Disconnect in the reverse order: solar panel first, then battery. Ensure all connections are tight and secure to prevent loose connections and overheating.

Рисунок 4.2.1: Standard connection diagram for the EPEVER 80A MPPT Solar Charge Controller with a single battery, PV panel, and AC load via an inverter.
- Подключите аккумулятор: Connect the positive and negative terminals of the battery bank to the controller's battery terminals. Observe correct polarity. Use recommended cable size (e.g., 16mm² / 6AWG).
- Подключите солнечную панель: Connect the positive and negative terminals of the solar panel array to the controller's PV terminals. Ensure the PV open circuit voltage не превышает 150 В постоянного тока.
- Подключите нагрузку (опционально): If using the load control feature, connect your DC load to the controller's load terminals.
- Connect Remote Temperature Sensor (RTS): Plug the RTS cable into the RTS port. This ensures accurate battery temperature compensation.
- Connect Remote Battery VoltagЭлектронный датчик (RBVS) (опционально): Plug the RBVS cable into the RBVS port for more accurate battery voltagизмерение эл.
- Заземление: Подключите клемму заземления контроллера к заземлению.
4.3 Параллельное соединение (дополнительно)
The EPEVER 80A MPPT controller supports parallel operation of up to 8 units to increase system capacity. This requires an RS485 communication cable and proper configuration.
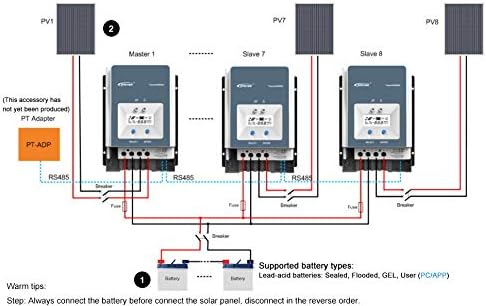
Рисунок 4.3.1: Diagram illustrating the parallel connection of multiple EPEVER MPPT controllers to a single battery bank.
For parallel connection, ensure all controllers are connected to the same battery bank and configured correctly via the RS485 communication port. Refer to the advanced user manual for detailed instructions on parallel setup and master/slave configuration.
4.4 Выбор типа батареи
The controller supports various lead-acid battery types. It is crucial to select the correct battery type in the controller's settings to ensure optimal charging and battery longevity.
- Герметичный: For sealed lead-acid batteries.
- ГОСА: Для аккумуляторов с абсорбирующим стекловолоконным сепаратором.
- Гель: For Gel cell batteries.
- Затоплено: For flooded (wet cell) lead-acid batteries.
- Пользователь: Allows for custom charging parameters for specific battery types (e.g., non-standard lead-acid or user-defined settings). Note: This controller is not designed for Lithium batteries.
Refer to your battery manufacturer's specifications for recommended charging voltages and select the corresponding type in the controller's menu. Incorrect battery type selection can damage your batteries.
5. Операция
5.1 Первоначальное включение
After all connections are made and verified, the controller will power on automatically. The LCD display will show the current system status. The Charging LED indicator will illuminate when charging is active.
5.2 Monitoring System Status
Use the "SELECT" button to cycle through various display screens, showing parameters such as:
- Том PVtage (V) and Current (A)
- Батарея Voltage (V) and Charging Current (A)
- Нагрузка Voltage (V) and Current (A)
- Battery Temperature (°C)
- Total Charged Energy (kWh)
- Total Discharged Energy (kWh)
5.3 Настройки параметров
To enter the parameter setting mode, press and hold the "ENTER" button for a few seconds. Use the "SELECT" button to navigate through parameters and the "ENTER" button to confirm changes. Parameters that can be adjusted include:
- Тип батареи
- Зарядка Voltage Setpoints (Float, Boost, Equalization)
- Load Control Mode (e.g., always on, dusk to dawn, timer)
- Время подсветки ЖК
- Коэффициент температурной компенсации
Refer to the detailed programming guide for specific values and advanced settings.
6. Техническое обслуживание
Регулярное техническое обслуживание обеспечивает долговечность и оптимальную работу вашего контроллера заряда.
- Проверьте соединения: Periodically inspect all wiring connections for tightness, corrosion, or damage. Tighten any loose connections.
- Очистите контроллер: Keep the controller clean and free of dust and debris. Use a dry cloth to wipe the exterior. Ensure the heat sink fins are not obstructed.
- Осмотр на предмет повреждений: Проверьте наличие каких-либо физических повреждений.asinнапример, кабели или клеммы.
- Производительность монитора: Regularly check the display for normal operation and compare readings with expected values.
- Техническое обслуживание аккумулятора: Follow your battery manufacturer's maintenance guidelines.
7. Поиск Неисправностей
В этом разделе описаны распространенные проблемы и возможные пути их решения. Если проблема не исчезнет, обратитесь в службу поддержки клиентов.
7.1 Common Protections and Indicators
The controller includes several protection mechanisms. The Fault LED indicator will illuminate or flash to indicate a fault condition.
- PV Over Current/Power: The solar input power or current exceeds the controller's rated limits. The controller will automatically limit the charging. Check PV array size.
- Короткое замыкание фотоэлектрической системы: A short circuit in the solar panel wiring. Disconnect PV, check wiring, and reconnect.
- Обратная полярность фотоэлектрического элемента: Solar panel connected with incorrect polarity. Disconnect PV, correct wiring, and reconnect. The PV reverse polarity alarm indicator will be active.
- Обратная зарядка в ночное время: Current flowing from battery to PV at night. This is usually prevented by the controller; if it occurs, check PV wiring.
- Батарея Over Voltage: Объем аккумулятораtage exceeds the overcharge protection setting. The controller will stop charging.
- Чрезмерный разряд батареи: Объем аккумулятораtage drops below the over-discharge protection setting. The load output will be disconnected.
- Перегрев аккумулятора: Battery temperature is too high. Charging current will be reduced or stopped. Ensure proper battery ventilation.
- Перегрев контроллера: Internal temperature of the controller is too high. Charging current will be reduced. Ensure adequate ventilation around the controller.
- ТВС, высокая громкостьtagПереходные процессы: Internal protection against voltagе шипы.
7.2 Общие шаги по устранению неполадок
- Нет дисплея/нет питания: Check battery connections and fuse. Ensure battery voltage is within the operating range (8V~68V).
- Нет зарядки: Check PV connections, ensure solar panels are receiving sunlight, and verify PV voltage is sufficient (above battery voltage). Check for PV short circuit or reverse polarity.
- Низкий ток зарядки: Check PV array size, shading, and battery state of charge. Ensure battery type settings are correct.
- Загрузка не работает: Проверьте соединения нагрузки, убедитесь в наличии напряжения батареи.tage is above over-discharge protection, and verify load control settings.
8. Технические характеристики
| Параметр | Ценить |
|---|---|
| Том системыtage | 12V / 24V / 36V / 48V DC Auto |
| Номинальный ток заряда | 80А |
| Макс. входная мощность фотоэлектрических модулей | 1000 Вт (12 В), 2000 Вт (24 В), 3000 Вт (36 В), 4000 Вт (48 В) |
| Максимум. Объем разомкнутой цепи PVtage | 150 В постоянного тока |
| Выбор типа батареи | Lead-acid (Gel, Sealed, AGM, Flooded) and User |
| Заземление | Common Negative Ground |
| Входная мощность батареиtage Диапазон | 8V ~ 68V |
| Температурная компенсация | -3 мВ / ℃ / 2 В (по умолчанию) |
| Рекомендуемый размер кабеля | 16 мм² (6AWG) |
| Размеры (Д x Ш x В) | 394мм × 236мм × 119мм |
| Масса | 4.5 кг (9.92 фунта) |
| Коммуникация | Isolated RS-485 (5VDC/200mA) with MODBUS protocol |
| Макс. эффективность | 98.7% |
9. Гарантия и поддержка
EPEVER products are designed for reliability and performance. This product comes with a standard manufacturer's warranty against defects in materials and workmanship. Please refer to the warranty card included with your product or visit the official EPEVER webсайт для получения подробных условий гарантии.
For technical support, troubleshooting assistance, or warranty claims, please contact EPEVER customer service through their official website or the contact information provided in your product packaging. When contacting support, please have your product model number and purchase date available.
Webсайт: www.epever.com (Exampссылка, фактическая ссылка может отличаться)


