1. Введение
This user manual provides comprehensive instructions for the setup, operation, and maintenance of your Reloop RP-1000 MK2 Professional Belt Drive Turntable System. Please read this manual thoroughly before using the product to ensure proper function and to prevent damage.
The Reloop RP-1000 MK2 is designed for both aspiring DJs and HiFi enthusiasts, offering high-quality audio reproduction through its belt-driven mechanism. This design effectively isolates the platter from motor vibrations, ensuring clear, distortion-free sound. The MK2 version features an enhanced top panel construction, improved metallic buttons, and a pre-fitted Ortofon OM Black pick-up system for immediate playback.
2. Инструкции по технике безопасности
To ensure safe operation and prolong the life of your turntable, please observe the following safety guidelines:
- Источник питания: Connect the unit only to an AC outlet with the correct voltage as indicated on the product. Ensure the power cord is not pinched or walked on.
- Влага: Не подвергайте устройство воздействию дождя, влаги или чрезмерной влажности. Не ставьте на устройство предметы, наполненные жидкостью, например, вазы.
- Вентиляция: Обеспечьте достаточную вентиляцию вокруг устройства. Не закрывайте вентиляционные отверстия.
- Источники тепла: Держите устройство вдали от источников тепла, таких как радиаторы, обогреватели, печи или другие приборы (включая amp(жирообразующие вещества), которые вырабатывают тепло.
- Уборка: Чистите только сухой тканью. Избегайте использования жидких чистящих средств или аэрозолей.
- Обслуживание: Do not attempt to service the unit yourself. Refer all servicing to qualified service personnel. Servicing is required when the apparatus has been damaged in any way, such as power-supply cord or plug is damaged, liquid has been spilled or objects have fallen into the apparatus, the apparatus has been exposed to rain or moisture, does not operate normally, or has been dropped.
- Размещение: Place the turntable on a stable, level surface to prevent vibrations and ensure proper tracking.
3. Содержимое упаковки
Пожалуйста, проверьте, что все перечисленные ниже предметы включены в ваш пакет:
- Поднос поворотного стола
- OM Black pick-up system (by Ortofon)
- звукоснимателя
- Слипмат
- Противовес
- Шнур питания
- Инструкция по эксплуатации (данный документ)
If any items are missing or damaged, please contact your retailer or Reloop customer support immediately.
4. Продукт закончилсяview
Familiarize yourself with the main components of your Reloop RP-1000 MK2 turntable.

Рисунок 4.1: Наклонный view of the Reloop RP-1000 MK2 turntable, showcasing the platter, tonearm, and control panel.
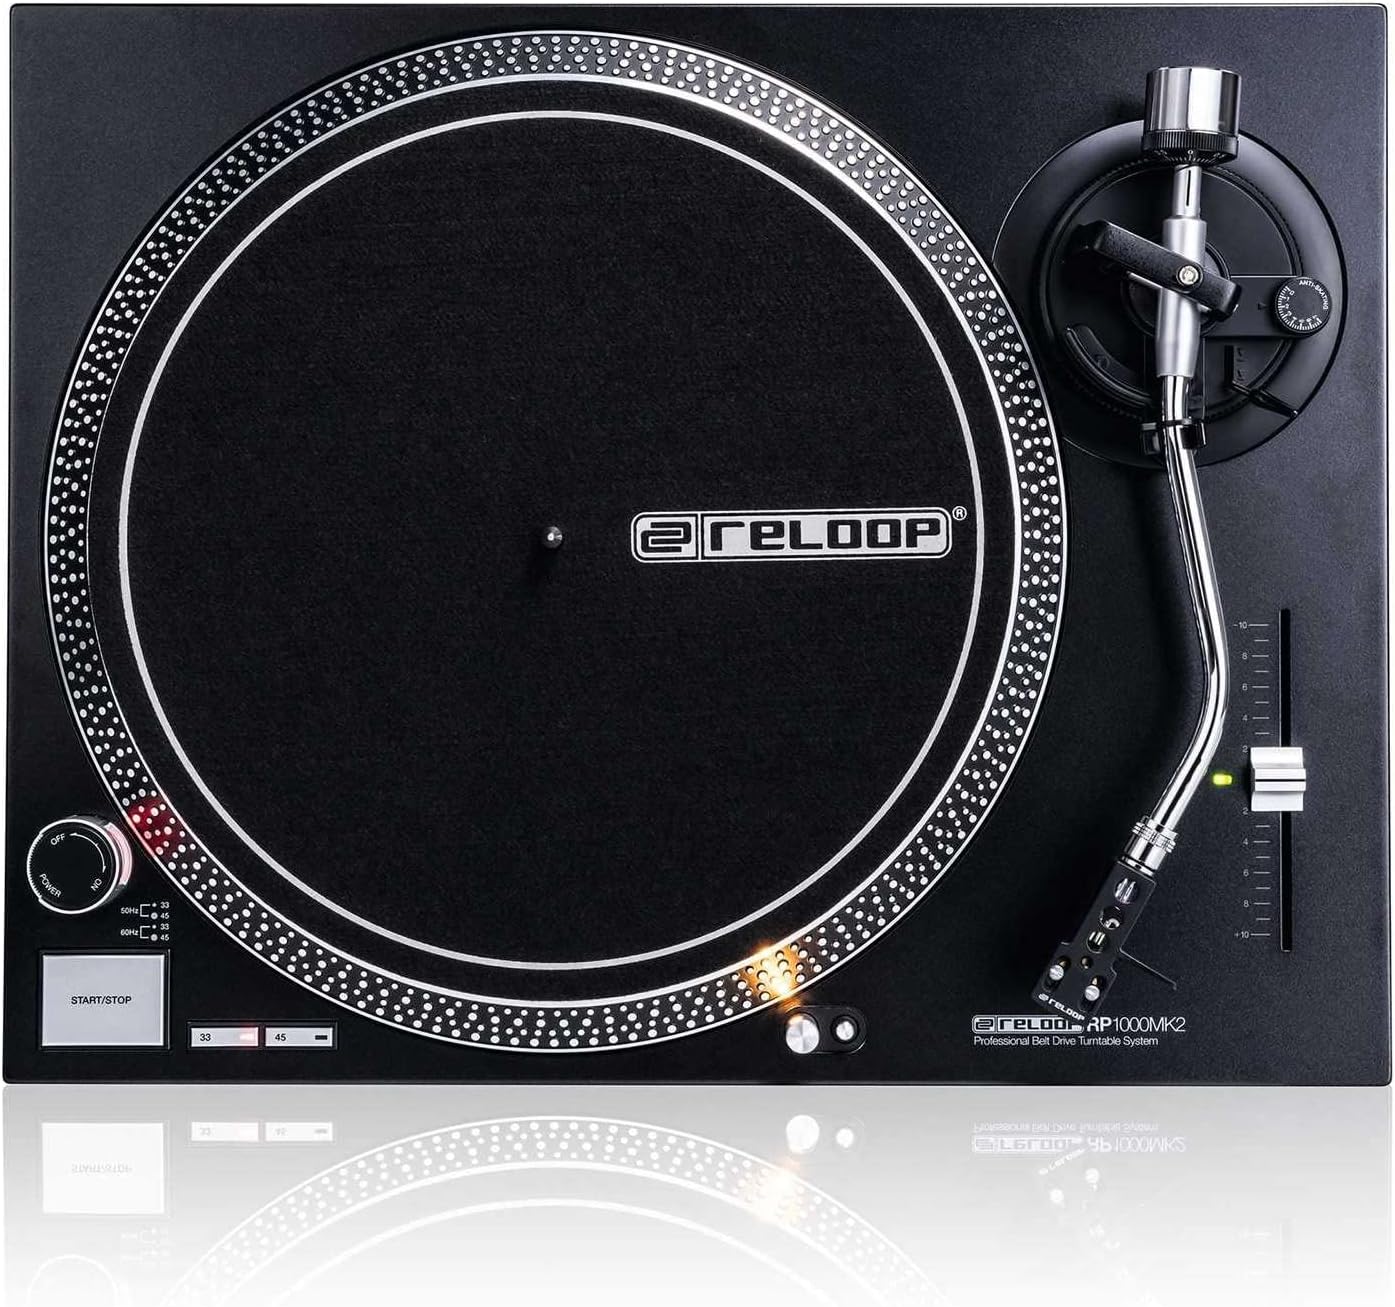
Рисунок 4.2: Сверху вниз view highlighting the platter, slipmat with Reloop logo, S-shaped tonearm, and pitch control slider.

Рисунок 4.3: Подробная информация view of the S-shaped tonearm, headshell, and the pre-fitted Ortofon OM Black pick-up system.

Figure 4.4: Close-up of the power knob, start/stop button, and speed selection buttons (33/45 RPM).
Ключевые компоненты:
- Блюдо: Precision-engineered, die-cast aluminum platter for stable rotation.
- Тонарм: Statically balanced S-shaped tonearm with hydraulic lift and anti-skating mechanism.
- Картридж: High-quality OM Black pick-up system by Ortofon, pre-fitted to a headshell.
- Управление по каналу тангажа: Adjustable slider with a range of +/-10% for fine speed adjustments.
- Speed Select Buttons: Buttons for selecting 33 1/3 RPM and 45 RPM playback speeds.
- Кнопка Пуск / Стоп: Controls the rotation of the platter.
- Целевой свет: Extendable aluminum target light to illuminate the needle position in dark environments.
- Shock-absorbing Feet: Improve isolation from unwanted vibrations.
5. Настройка
5.1 Распаковка и размещение
- Осторожно извлеките все компоненты из упаковки. Сохраните упаковку для будущей транспортировки или хранения.
- Place the turntable on a flat, stable, and level surface, away from direct sunlight, heat sources, and strong magnetic fields.
- Ensure there is sufficient space around the unit for ventilation.
5.2 Установка диска и ремня
- Place the platter onto the center spindle. Ensure it sits securely.
- Locate the drive belt. Carefully stretch the belt around the inner rim of the platter and hook it onto the motor pulley, which is visible through one of the platter's openings.
- Положите войлочный коврик поверх блюда.
5.3 Tonearm Setup
The OM Black pick-up system is pre-fitted to the headshell. Follow these steps to balance the tonearm:
- Attach the headshell with the pre-fitted cartridge to the front end of the tonearm. Secure it by turning the locking ring clockwise.
- Place the counterweight onto the rear of the tonearm and rotate it until it is approximately centered.
- Отпустите тонарм clamp and lower the tonearm lift.
- Carefully adjust the counterweight by rotating it forwards or backwards until the tonearm is perfectly balanced and floats horizontally.
- Once balanced, hold the counterweight steady and rotate only the numbered ring on the front of the counterweight to '0' (zero).
- Rotate the entire counterweight (including the numbered ring) counter-clockwise to set the recommended tracking force for the Ortofon OM Black cartridge, typically between 1.5 to 2.0 grams. Refer to the cartridge manufacturer's specifications for the precise recommended tracking force.
- Set the anti-skating dial to the same value as your tracking force.
- Верните тонарм на исходное положение и закрепите его зажимом.amp.
5.4 аудиоразъема и подключения питания
- Подключите аудиокабели RCA от выхода проигрывателя к входу PHONO вашего проигрывателя. ampусилитель или микшер. Убедитесь в правильном подключении левого (белый) и правого (красный) каналов.
- Подключите заземляющий провод от проигрывателя к клемме заземления на вашем устройстве. ampДля минимизации шума используйте усилитель или микшер.
- Plug the power cord into the turntable's power input and then into a suitable AC power outlet.
6. Инструкция по эксплуатации
6.1 Основные операции
- Включение питания: Turn the power knob clockwise to the "ON" position. The platter will not start spinning until the START/STOP button is pressed.
- Выберите скорость: Press the "33" or "45" button to select the desired playback speed according to the record you are playing. The corresponding LED will illuminate.
- Установить рекорд: Carefully place a vinyl record onto the platter.
- Стартовое блюдо: Press the START/STOP button. The platter will begin to rotate.
- Положение тонарма: Отпустите тонарм clamp. Use the tonearm lift lever to raise the tonearm. Carefully move the tonearm over the desired track on the record.
- Нижний тонарм: Gently lower the tonearm lift lever to allow the stylus to descend onto the record groove.
- Играет: The audio will now play through your connected audio system.
- Остановить воспроизведение: At the end of the record, or when you wish to stop, use the tonearm lift lever to raise the tonearm, return it to its rest, and secure it with the clamp. Press the START/STOP button to stop the platter rotation.
- Выключение: Turn the power knob counter-clockwise to the "OFF" position when not in use.
6.2 Using Pitch Control
The pitch control slider allows you to finely adjust the playback speed by +/-10%. Move the slider up or down to increase or decrease the speed. The center detent indicates 0% pitch adjustment (nominal speed).
6.3 Target Light
Press the aluminum target light button to extend the light, illuminating the needle position. This is particularly useful in low-light environments. Press it again to retract the light.
7. Техническое обслуживание
7.1 Чистка устройства
- Перед чисткой всегда отключайте шнур питания.
- Use a soft, dry, lint-free cloth to wipe the surface of the turntable.
- Для стойких пятен слегка нанесите...amp Можно использовать тряпку, а затем сразу же вытереть сухой. Избегайте использования абразивных чистящих средств и растворителей.
7.2 Уход за стилусом
- The stylus (needle) is a delicate component. Handle it with extreme care.
- Регулярно очищайте стилус мягкой щеточкой, предназначенной для чистки стилусов, аккуратно протирая его от задней части к передней.
- A worn or dirty stylus can damage your records and degrade sound quality. Replace the stylus when signs of wear are apparent (e.g., distorted sound, skipping).
7.3 Замена ремня
The belt is a wear-and-tear part. If you notice inconsistent speed or the platter not spinning, the belt may need replacement. Contact Reloop support or an authorized service center for replacement belts and instructions.
7.4 Dust Cover Care (if applicable)
If your turntable includes a dust cover, clean it with a soft, damp cloth. Avoid using dry cloths as they can scratch the acrylic surface. Do not use harsh chemicals.
8. Поиск Неисправностей
Before contacting support, please refer to the following common issues and their solutions:
| Проблема | Возможная причина | Решение |
|---|---|---|
| Нет питания / Диск не вращается | Power cord not connected; Power switch off; Belt not installed or broken. | Ensure power cord is securely plugged in. Turn power switch ON. Check if the drive belt is correctly installed around the platter and motor pulley. Replace belt if broken. |
| Нет звука или очень тихий звук | RCA-кабели подключены неправильно; Amplifier/mixer input incorrect; Stylus damaged or dirty; Cartridge not properly seated. | Проверьте разъемы RCA. amplifier/mixer (PHONO input). Ensure ground wire is connected. Clean stylus. Re-seat cartridge in headshell. |
| Искаженный звук / Пропуски | Stylus dirty or worn; Tracking force incorrect; Anti-skating incorrect; Turntable not level; Record dirty or damaged. | Clean or replace stylus. Re-adjust tracking force and anti-skating. Ensure turntable is on a level surface. Clean record. |
| Непостоянная скорость | Worn or stretched belt; Motor issue. | Inspect the drive belt for wear and replace if necessary. If the issue persists, contact service. |
9. Технические характеристики
| Особенность | Описание |
|---|---|
| Название модели | RP-1000 MK2 Professional Belt Drive Turntable System |
| Тип привода | Ремень безопасности |
| Моторная система | Powerful belt-drive motor system absorbs unwanted vibration and noise |
| блюдо | Precision-engineered, die-cast aluminum platter with stable rotation |
| Скорости | 2 selectable speeds (33 1/3 & 45 RPM) |
| Управление по каналу тангажа | Adjustable range of +/-10% |
| Тонарм | Statically balanced S-shaped tonearm with hydraulic lift and anti-skate |
| Строительство | Redesigned metal top panel, tactile buttons, reinforced housing construction, optimized damping features, shock-absorbing feet |
| Размеры (Ш x Г x В) | 17.72 x 13.86 x 5.67 дюйма (прибл. 45 x 35.2 x 14.4 см) |
| Масса | 16.06 фунта (приблизительно 7.3 кг) |
| Связность | Analog RCA output, Ground terminal |
| Источник питания | Corded Electric, 220 Volts (check local voltagе требования) |
10. Гарантия и поддержка
10.1 Информация о гарантии
Reloop products are manufactured to the highest quality standards. This product comes with a manufacturer's warranty. Please refer to the warranty card included in your package or visit the official Reloop webПодробные условия гарантии, применимые к вашему региону, см. на сайте.
Сохраните подтверждение покупки (чек или счет-фактуру), так как оно потребуется для предъявления претензий по гарантии.
10.2 Поддержка клиентов
Should you encounter any issues not covered in the troubleshooting section, or require further assistance, please contact Reloop customer support or your authorized dealer. Contact information can typically be found on the official Reloop webсайте или на упаковке вашего продукта.
For the latest information, FAQs, and support resources, please visit the official Reloop webсайт: www.reloop.com


