Введение
This manual provides essential information for the safe and efficient operation, maintenance, and troubleshooting of your Pretul 20 L, 2-1/2 HP (maximum power), 120 V Compressor. Please read this manual thoroughly before using the compressor to ensure proper handling and to prevent injury or damage.

Image: Pretul 20 L Air Compressor, a yellow and black portable unit with wheels and a handle.
Информация по безопасности
ВНИМАНИЕ: Несоблюдение данных инструкций по технике безопасности может привести к серьезным травмам или повреждению имущества.
- При работе с компрессором всегда надевайте соответствующие средства индивидуальной защиты (СИЗ), такие как защитные очки.
- Убедитесь, что компрессор установлен на устойчивой, ровной поверхности, чтобы предотвратить его опрокидывание.
- Не эксплуатируйте компрессор во влажной илиamp в условиях, или вблизи легковоспламеняющихся жидкостей или газов.
- Before performing any maintenance or adjustments, always disconnect the compressor from the power source and release all air pressure from the tank.
- Не допускайте детей и посторонних лиц в рабочую зону.
- Регулярно проверяйте сетевой шнур на наличие повреждений. Не используйте устройство, если шнур изношен или поврежден.
- Не модифицируйте компрессор или его компоненты. Используйте только оригинальные запасные части.
Продукт болееview и компоненты
Familiarize yourself with the various parts of your Pretul air compressor before operation.
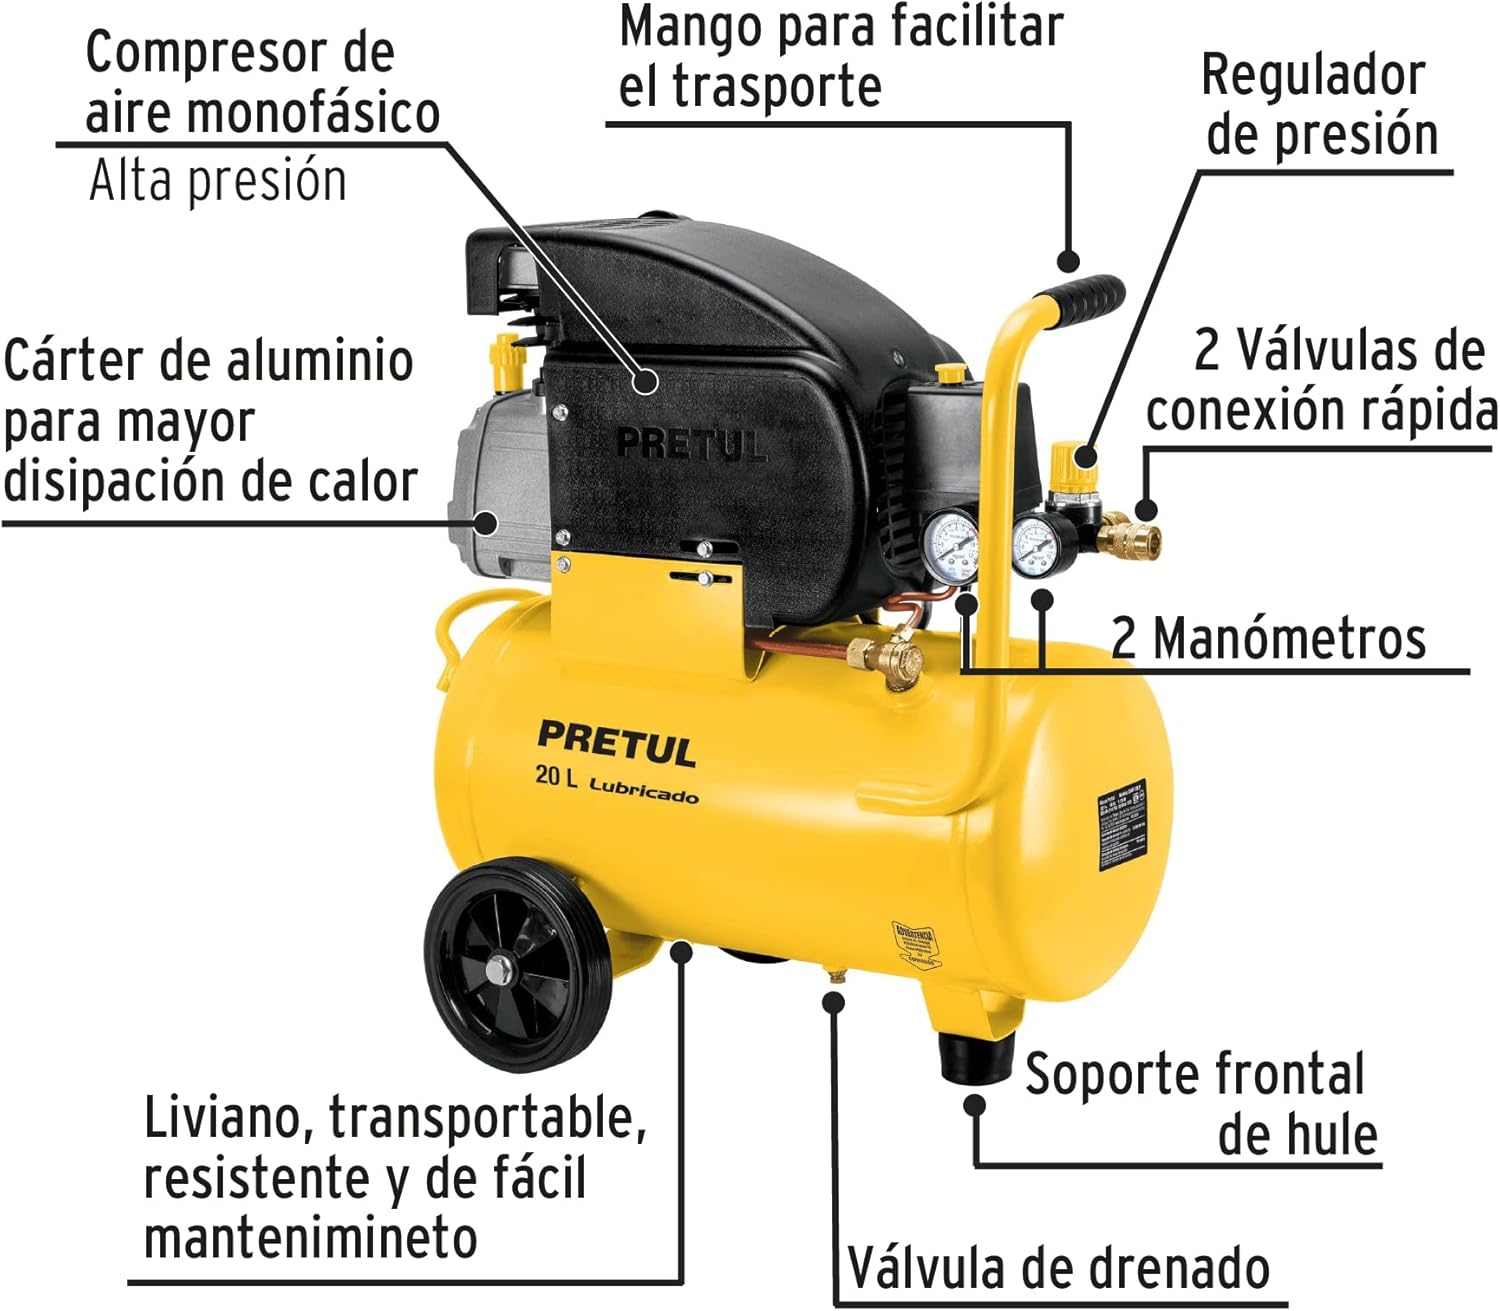
Image: Diagram showing the labeled components of the Pretul air compressor, including the single-phase air compressor, aluminum crankcase, transport handle, pressure regulator, quick-connect valves, pressure gauges, rubber front support, drain valve, and lightweight, transportable, resistant, and easy-to-maintain design.
- Single-phase air compressor: The main unit that compresses air.
- Aluminum Crankcase: Designed for better heat dissipation.
- Транспортная ручка: Для удобства переноски.
- Регулятор давления: Регулирует давление воздуха на выходе.
- Quick-Connect Valves: Для подсоединения пневматических инструментов и шлангов.
- Манометры: Отображение давления в резервуаре и регулируемого выходного давления.
- Rubber Front Support: Обеспечивает устойчивость.
- Сливной клапан: Расположен в нижней части резервуара для удаления влаги.
- Колеса: For easy movement of the compressor.
Технические характеристики
Key technical specifications for the Pretul 20 L Air Compressor.
| Особенность | Спецификация |
|---|---|
| Бренд | Цена |
| Название модели | 23065 |
| Номер детали | КОМП-20ЛП |
| Томtage | 120 Вольт |
| Максимальная мощность | 2.5 лошадиных сил |
| Емкость | 20 литра (5.2 галлона) |
| Уровень шума | 69 дБ |
| Источник питания | Проводной электрический |
| Вес товара | 21 килограммов (46.2 фунта) |
| Размеры продукта (Д x Ш x В) | 20.87 x 13.39 x 22.83 дюйма (53 x 34 x 58 см) |
| Рекомендуемое использование | Blow Cleaning, Spraying, Tire Inflation |
| Специальная характеристика | Built-In Gauge |

Image: Diagram illustrating the dimensions of the Pretul air compressor: Height 58 cm, Depth 53 cm, Base 34 cm.
Настраивать
1. Распаковка и осмотр
Carefully remove the compressor from its packaging. Inspect the unit for any signs of damage that may have occurred during shipping. Report any damage to your retailer immediately.

Image: The Pretul air compressor inside its retail packaging, showing the product details on the box.
2. Размещение
Place the compressor on a firm, level surface in a clean, well-ventilated area. Ensure there is adequate space around the unit for air circulation and maintenance access. Avoid placing it near heat sources or in direct sunlight.
3. Подключение питания
Connect the compressor to a grounded 120 V electrical outlet. Ensure the circuit can handle the compressor's power requirements (2.5 HP maximum power).
4. Oil Check (for oil-lubricated models)
This is an oil-lubricated compressor. Before first use, and periodically thereafter, check the oil level. Ensure the oil level is between the minimum and maximum marks on the dipstick or sight glass. Add appropriate compressor oil if necessary.
5. Handle and Wheel Assembly (if not pre-assembled)
If the handle and wheels are not pre-assembled, attach them according to the included hardware. The handle is designed for easy transport.

Image: A person demonstrating how to transport the Pretul air compressor using its integrated handle and wheels.
Инструкция по эксплуатации
1. Первоначальный запуск
- Убедитесь, что сливной клапан в нижней части резервуара закрыт.
- Plug the compressor into a suitable electrical outlet.
- Переведите выключатель питания в положение «ВКЛ». Компрессор начнет создавать давление.
- Allow the compressor to reach its maximum pressure and shut off automatically. This indicates the pressure switch is functioning correctly.
2. Adjusting Output Pressure
The compressor features a pressure regulator to control the air pressure delivered to your tools.
- Attach your air hose and tool to one of the quick-connect valves.
- Turn the pressure regulator knob (usually located near the output gauges) clockwise to increase pressure and counter-clockwise to decrease pressure.
- Monitor the output pressure gauge to set the desired pressure for your application.

Image: A person demonstrating the adjustment of the air regulating valve on the compressor, with an air hose connected.
3. Overcurrent Protector
Your compressor is equipped with an overcurrent protector to prevent motor damage in case of overload. If the compressor stops unexpectedly, check the overcurrent protector button. If it has popped out, allow the motor to cool down for a few minutes, then press the button to reset it.

Изображение: Крупный план view of the overcurrent protector button on the Pretul air compressor, with a person using a spray gun in the background.
4. Приложения
This compressor is suitable for various applications including:
- Blow Cleaning: Use an air blow gun to clean dust and debris from surfaces.
- Распыление: Connect a spray gun for painting or other liquid applications.
- Накачка шин: Use an inflation gun with a gauge to inflate tires and other inflatables.
Обслуживание
Регулярное техническое обслуживание имеет решающее значение для долговечности и оптимальной работы вашего компрессора.
1. Draining the Air Tank
WARNING: Always drain the tank after each use or at least daily. Moisture buildup can lead to rust and tank failure.
- Turn off the compressor and disconnect it from the power source.
- Open the drain valve located at the bottom of the air tank.
- Allow all condensed moisture to drain completely.
- Close the drain valve tightly after draining.
2. Oil Maintenance
As an oil-lubricated compressor, regular oil checks and changes are necessary.
- Проверьте уровень масла: Before each use, ensure the oil level is within the safe operating range.
- Поменять масло: Refer to the specific oil change interval recommended by Pretul (typically after the first 20 hours, then every 200 hours or 3 months, whichever comes first). Use only compressor-specific oil.
3. Уборка
- Содержите компрессор в чистоте, без пыли и мусора.
- Clean the air filter regularly (if accessible) to ensure proper airflow and prevent motor strain.
Поиск неисправностей
В этом разделе приведены решения распространенных проблем, с которыми вы можете столкнуться.
| Проблема | Возможная причина | Решение |
|---|---|---|
| Компрессор не запускается. | Нет электричества, сработал автоматический выключатель, неисправный выключатель. | Проверьте подключение к электросети, сбросьте автоматический выключатель, обратитесь в сервисную службу, если выключатель неисправен. |
| Компрессор работает непрерывно или слишком часто. | Air leak in system, faulty pressure switch. | Check all connections for leaks, tighten fittings. If problem persists, pressure switch may need replacement. |
| Низкое давление воздуха на выходе. | Pressure regulator set too low, air leak, clogged air filter. | Adjust pressure regulator, check for leaks, clean or replace air filter. |
| Чрезмерный шум или вибрация. | Ослабленные компоненты, изношенные детали, низкий уровень масла. | Check and tighten all fasteners, inspect for worn parts, check and add oil if needed. |
| Overcurrent protector trips. | Overload, motor overheating, low voltage. | Reduce load, allow motor to cool, ensure proper voltage supply. Reset button. |
Если у вас возникли проблемы, не перечисленные здесь, или предложенные решения не помогли устранить проблему, обратитесь в службу поддержки клиентов.
Гарантия и поддержка
Pretul products are manufactured to high-quality standards. For information regarding warranty coverage and terms, please refer to the warranty card included with your purchase or visit the official Pretul webсайт.
For technical assistance, spare parts, or service inquiries, please contact Pretul Customer Support. Details can typically be found on the product packaging or the manufacturer's webсайт.
Вы также можете посетить Pretul brand page on Amazon для получения более подробной информации.


