Продукт болееview
The Lux Pro Model P111 is a non-programmable thermostat designed for straightforward and reliable temperature control in your home. It offers essential features for managing your heating and cooling systems with ease.

Figure 1: Lux Pro P111 Non-Programmable Thermostat. This image displays the front view of the thermostat, showing its LCD screen, fan and system mode switches, and temperature adjustment buttons.
- Простая установка: Designed for simple setup with clear instructions.
- Непрограммируемая работа: Provides direct temperature control without complex scheduling.
- Двойная сила: Operates on 2 AA alkaline batteries (included) or 24-volt system power.
- Дисплей с подсветкой: Отличается простотой использования.view backlight for clear temperature readings.
- Защита оборудования: Includes a selectable 5- or 2-minute time delay to safeguard your HVAC equipment.
- Adjustable Limits: Allows setting of heating and cooling temperature limits.
- Варианты отображения температуры: Switch between Fahrenheit (℉) or Celsius (℃) display.

Figure 2: Key Features of Lux Pro P111 Thermostat. This graphic highlights features such as Keyboard Lockout, Adjustable Heating and Cooling Limits, Back-Lit Display, Dual Power, and a 5-Year Limited Warranty.
Совместимость системы
The Lux Pro P111 thermostat is designed for compatibility with various HVAC systems. Please review the following compatibility chart to ensure it meets your system requirements.

Figure 3: System Compatibility Chart. This chart details which heating and cooling systems are compatible (e.g., Gas/Oil/Electric Furnace, Heat Pump without Auxiliary Heat, 2-wire Hydronic, 750 Millivolt, Gas Fireplaces, Single Stage Cooling) and which are not (e.g., Heat Pump Multistage, Radiant Ceiling Heat, Electric Baseboards, 3-wire Hydronic, Multistage systems, Portable space heaters, Plug-in air conditioners).
Настройка и установка
Правильная установка имеет решающее значение для оптимальной работы вашего термостата. Если вы не уверены в каком-либо этапе, рекомендуется проконсультироваться с квалифицированным специалистом по системам отопления, вентиляции и кондиционирования воздуха.
1. Требования к электропитанию
The P111 thermostat can be powered by two (2) AA alkaline batteries or by a 24-volt system. Batteries are included for convenience and reliable operation.
2. Электрические схемы
Refer to the following diagrams for common wiring configurations. Ensure power to your HVAC system is turned off at the circuit breaker before beginning any wiring.
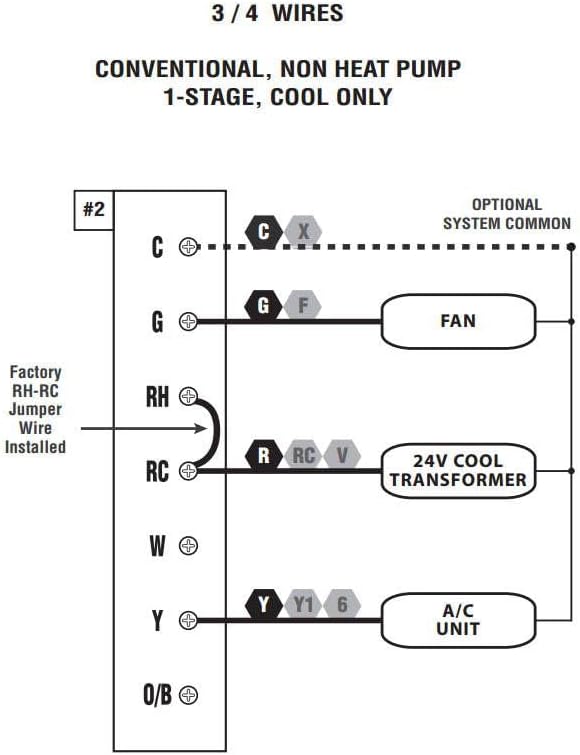
Figure 4: Wiring Diagram for 3/4 Wires. This diagram illustrates the wiring for a conventional, non-heat pump, 1-stage, cool-only system, showing connections for C (optional system common), G (FAN), RH (24V COOL TRANSFORMER), RC (24V COOL TRANSFORMER), and Y (A/C UNIT). A factory RH-RC jumper wire is installed.

Figure 5: Wiring Diagram for 4/5 Wires. This diagram shows the wiring for a conventional, non-heat pump, 1-stagе тепло и 1-еtage cool system, with connections for C (optional system common), G (FAN), RH (24V TRANSFORMER), RC (24V TRANSFORMER), W (HEATER), and Y (A/C UNIT). A factory RH-RC jumper wire is installed.

Figure 6: Wiring Diagram for 5/6 Wires. This diagram illustrates the wiring for a conventional, non-heat pump, 1-heat / 1-cool system with two transformers, showing connections for C (optional system common), G (FAN), RH (24V HEAT TRANSFORMER), RC (24V COOL TRANSFORMER), W (HEATER), and Y (A/C UNIT). The factory RH-RC jumper wire must be removed for this configuration.
3 Монтаж
The thermostat is designed for wall mounting. Use the provided screws and wall anchors for secure installation. Ensure the thermostat is level for accurate temperature readings.
Инструкция по эксплуатации
The Lux Pro P111 thermostat features an intuitive control panel for easy operation.

Figure 7: Control Panel Diagram. This diagram labels the key components of the thermostat's front panel: Fan Mode Switch (Fan Auto/On), System Mode Switch (Heat/Off/Cool), LCD Display Screen, SET Button, and UP and DOWN Buttons.
1. Переключатель системного режима
- НАГРЕВАТЬ: Включает систему отопления.
- OFF: Отключает как систему отопления, так и систему охлаждения.
- ПРОХЛАДНЫЙ: Активирует систему охлаждения.
2. Переключатель режима работы вентилятора
- АВТО: Вентилятор работает только во время активной работы системы отопления или охлаждения.
- НА: Вентилятор работает постоянно, независимо от того, активна ли система отопления или охлаждения.
3. Регулировка температуры
Используйте UP (▲) и ВНИЗ (▼) buttons to set your desired temperature. The current temperature will be displayed prominently on the LCD screen.
4. Активация подсветки
Press any button to activate the backlight for improved visibility in low-light conditions. The backlight will automatically turn off after a short period of inactivity.
5. Temperature Display (Fahrenheit/Celsius)
The thermostat allows you to switch between Fahrenheit (℉) and Celsius (℃) temperature displays. Refer to the full instruction manual for specific steps on how to change this setting, typically found in the advanced settings menu.
6. Equipment Protection Time Delay
The thermostat features a selectable 5- or 2-minute time delay for equipment protection. This delay prevents short cycling of your heating and cooling system, which can extend the lifespan of your equipment. This setting is usually configured during initial setup or in advanced settings.
7. Блокировка клавиатуры
To prevent unauthorized adjustments, the thermostat includes a keypad lockout feature. Consult the detailed manual for instructions on how to activate and deactivate this function.
Обслуживание
1. Замена батареи
When the battery indicator appears on the display, replace the two (2) AA alkaline batteries. Ensure proper polarity when inserting new batteries. The thermostat retains settings during battery replacement.
2. Уборка
Очистите внешнюю поверхность термостата мягкой тряпкой.amp Тщательно протрите тканью. Не используйте абразивные чистящие средства или растворители, так как они могут повредить покрытие или внутренние компоненты.
Поиск неисправностей
If you encounter issues with your Lux Pro P111 thermostat, consider the following common solutions:
- No Display or Low Battery Indicator: Replace the batteries with fresh AA alkaline batteries.
- Система не реагирует (отопление/охлаждение):
- Check that the system mode switch is set to HEAT or COOL.
- Ensure the fan mode switch is set to AUTO or ON.
- Verify that the circuit breaker for your HVAC system is not tripped.
- Confirm that the wiring connections are secure and correct according to the installation diagrams.
- Allow for the equipment protection time delay (5 or 2 minutes) to elapse before the system activates.
- Неверные показания температуры: Убедитесь, что термостат не подвергается воздействию прямых солнечных лучей, сквозняков или источников тепла, которые могут повлиять на его датчик.
- Клавиатура не отвечает: Check if the keypad lockout feature is active. Refer to the manual for deactivation steps.
При возникновении постоянных проблем обратитесь к полному руководству пользователя или в службу поддержки клиентов.
Технические характеристики
| Особенность | Деталь |
|---|---|
| Бренд | ЛЮКС |
| Название модели | Р111 |
| Размеры продукта | 4"Д x 7"Ш x 7"В |
| Тип контроллера | Кнопка нажатия |
| Особые возможности | Lighted Display, Temperature Display |
| Цвет | P111-white |
| Конкретные применения | Кондиционер, тепловой насос |
| Тип контроля температуры | Руководство |
| Включенные компоненты | Pro P111 Non-Programmable Thermostat; 1 Heat, 1 Cool |
| Источник питания | Battery Powered (2 AA batteries required), 24V System Powered |
| Вес товара | 1.6 унции |
| Томtage | 24 Вольт |
| Материал | Пластик |
| Тип крепления | Настенное крепление |
| Стиль | Непрограммируемый |
| Подсветка | Да |
| СКП | 021079141111 |
Гарантия и поддержка
Информация о гарантии
The Lux Pro P111 thermostat comes with a Ограниченная гарантия сроком на 5 годДанная гарантия распространяется на дефекты материалов и изготовления при условии нормального использования. Сохраните чек о покупке для предъявления гарантийных претензий.
Поддержка клиентов
For technical assistance, troubleshooting not covered in this manual, or warranty inquiries, please contact Lux customer support. Refer to the product packaging or the official Lux webсайт для получения самой актуальной контактной информации.
You can visit the official LUX Store for more information: Магазин LUX на Amazon


