1. Введение
This manual provides detailed instructions for the installation, operation, and maintenance of your Vibe Powerbox Micro Mono Amplifier, model POWERBOX400.1M-V7. Please read this manual thoroughly before attempting installation or operation to ensure proper use and to prevent damage to the unit or your vehicle's audio system.
The Vibe Powerbox Micro Mono Amplifier is a compact, high-performance Class D amplifier designed for car audio systems. It delivers up to 400W RMS, making it suitable for powering subwoofers. Its small footprint allows for flexible installation options.
2. Информация по технике безопасности
- Перед началом любых электромонтажных работ всегда отсоединяйте отрицательную клемму аккумуляторной батареи автомобиля.
- Убедитесь, что вся проводка правильно проложена и закреплена, чтобы предотвратить повреждения от движущихся частей или острых краев.
- Use appropriate gauge wiring for power and speaker connections as specified in this manual to prevent overheating and potential fire hazards.
- Не монтируйте ampэксплуатировать в местах, подверженных воздействию прямых солнечных лучей, чрезмерной жары, влаги или пыли.
- Если вы не уверены в каком-либо этапе процесса установки, проконсультируйтесь с профессиональным установщиком автоакустики.
- Эксплуатация amplifier at excessively high volumes for prolonged periods can cause hearing damage.
3. Содержимое упаковки
Перед началом установки убедитесь, что в упаковке присутствуют все элементы:
- Vibe Powerbox Micro Mono Amplifier (POWERBOX400.1M-V7)
- Remote Gain Control Unit
- Аудиокабели RCA
- Крепежные элементы (винты, разъемы)
- Руководство пользователя

4. Особенности продукта
- Class D Micro Amplifier design for high efficiency and compact size.
- Ultra-compact footprint for easy and discreet installation.
- Output: 1 x 400W RMS at 1 ohm, with a maximum output of 800W.
- Dimensions: 37 x 157 x 82mm (approximately 1.46 x 6.18 x 3.23 inches).
- Compatible with Critical Link Rapid kits for simplified integration.
- Features Deltabox™ Connectivity auto turn-on.
- VIBE Sound Studio™ Active crossovers.
- 1 Ohm Stable operation.
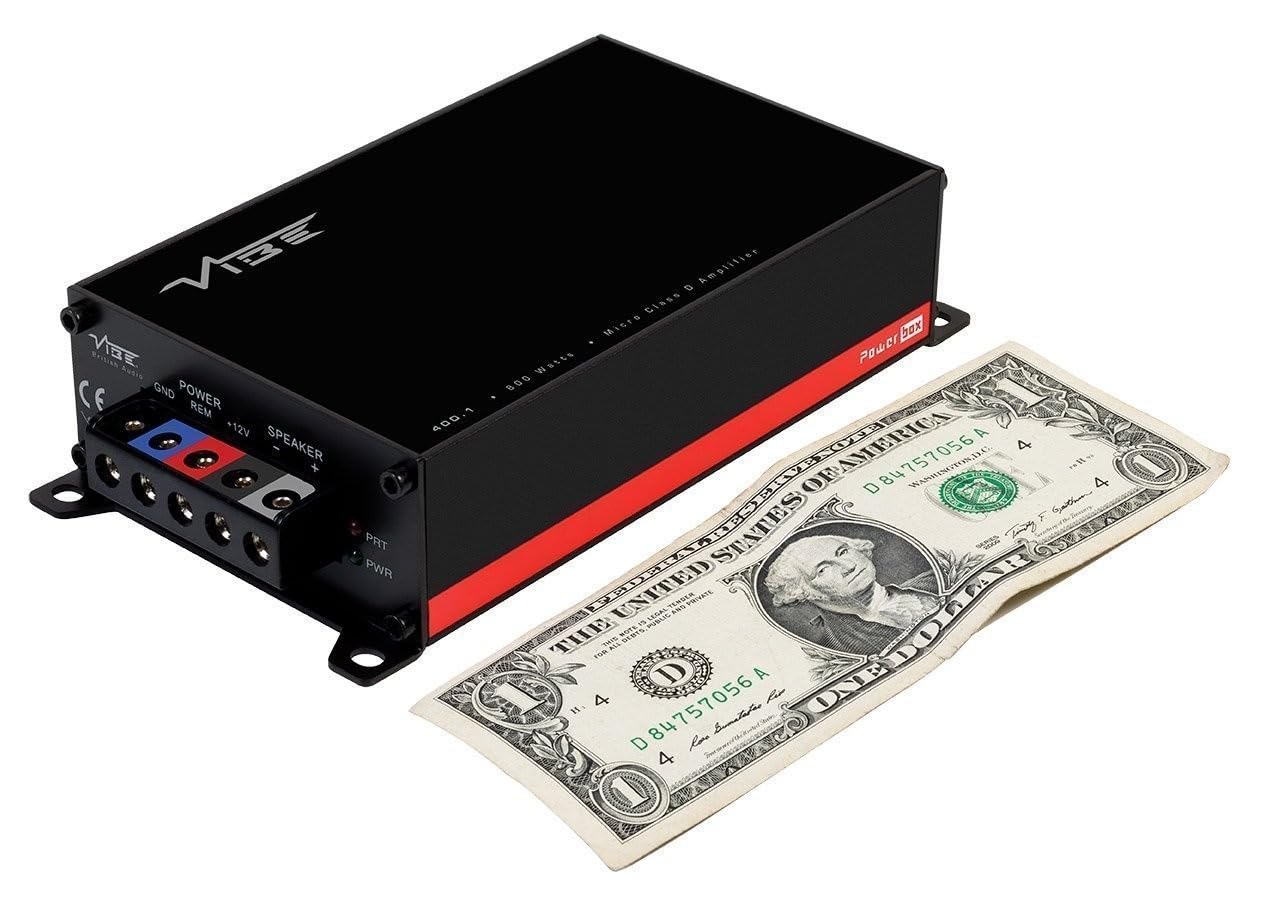
5. Идентификация компонентов
5.1 Power and Speaker Terminals

The power input section includes terminals for Ground (GND), Remote Turn-On (REM), and +12V power. The speaker output section provides terminals for connecting your subwoofer.
5.2 Input and Control Panel
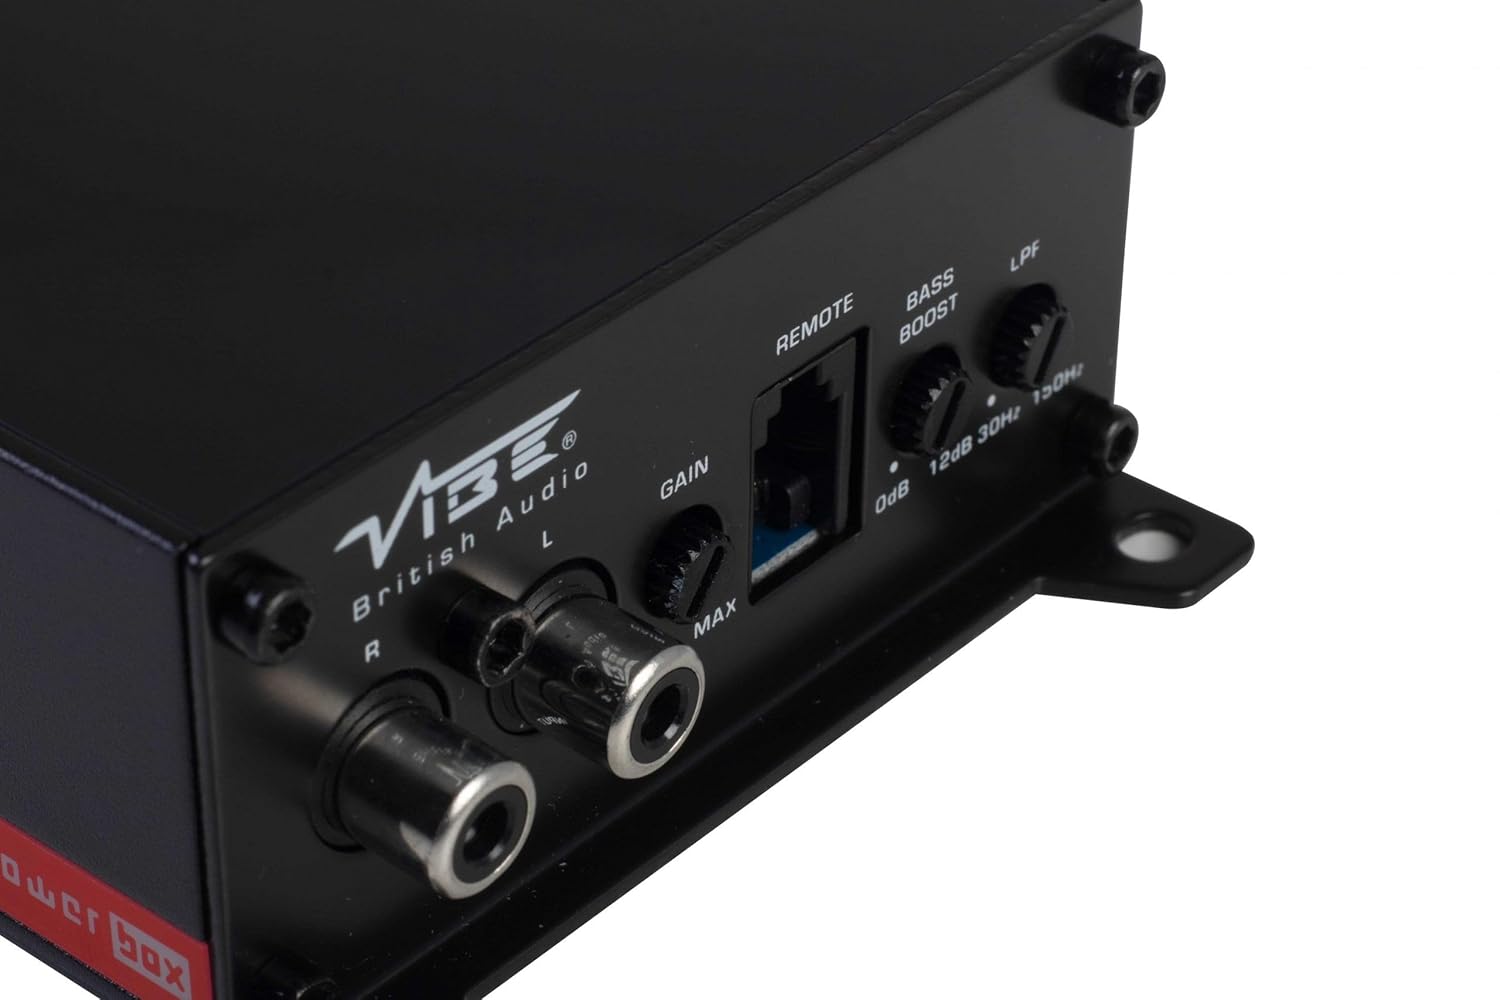
This panel features the RCA input jacks for audio signal, a Gain control knob to match the amplifier's input sensitivity to your head unit's output, a dedicated port for the remote gain control, a Bass Boost switch for enhancing low frequencies, and an LPF (Low Pass Filter) control to adjust the upper frequency limit for the subwoofer.
5.3 Remote Gain Control

The remote gain control unit connects to the amplifier via the 'REMOTE' port and allows for convenient adjustment of the subwoofer's output level from the vehicle's cabin.
6. Настройка и установка
Proper installation is crucial for optimal performance and safety. If you are not confident in your ability to install the ampДля получения дополнительной информации обратитесь за профессиональной помощью.
6.1 Место установки
Choose a mounting location that is dry, well-ventilated, and away from direct heat sources. The compact size of the Powerbox Micro allows for installation under seats, behind trim panels, or in other discreet locations. Ensure there is sufficient airflow around the ampлифтер для охлаждения.
6.2 Подключение проводки
Электропроводка:
- Подключите +12В terminal to the vehicle's positive battery terminal using a suitable gauge power cable (e.g., 8 AWG or 10 AWG). Install an in-line fuse holder within 18 inches (45 cm) of the battery.
- Подключите Земля terminal to a clean, unpainted metal surface on the vehicle's chassis. Ensure a good electrical connection. The ground cable should be of the same gauge as the power cable and as short as possible.
- Подключите БДГ (Remote Turn-On) terminal to the remote output of your head unit. This wire signals the amplifier to turn on and off with your stereo. If your head unit lacks a remote output, you can use an accessory wire that turns on with the ignition, or utilize the amplifier's auto-sense feature if applicable.
Проводка динамика:
- Подключите сабвуфер к Выход динамика terminals (+ and -). Ensure correct polarity. This amplifier is 1 Ohm stable, allowing flexibility in subwoofer impedance configurations. Refer to your subwoofer's specifications for optimal impedance matching.
Входной сигнал (RCA):
- Connect the RCA output from your head unit or signal processor to the ВХОД (Л/П) RCA jacks on the ampпожизненнее.
Дистанционная регулировка усиления:
- Plug the remote gain control unit into the dedicated УДАЛЕННЫЙ порт на amplifier. Route the cable to a convenient location for adjustment.
ISO T Harness / ISOAWK Kit:
- For simplified installation with existing stereo looms, an optional ISOAWK kit (available separately) can be used to make the amplifier compatible with an ISO T harness. This allows for plug-and-play integration for audio signal, power, and ground, potentially eliminating the need for separate battery connections.
7. Операция
7.1 Первоначальное включение
После того, как все соединения будут выполнены и проверены, подключите аккумулятор автомобиля обратно. Включите головное устройство. amplifier's power indicator (PWR) should illuminate green. If the protection indicator (PRT) illuminates red, refer to the troubleshooting section.
7.2 Регулировка усиления
The Gain control matches the ampЧувствительность входного сигнала усилителя к выходной громкостиtage вашего головного устройства. Чтобы установить усиление:
- Поверните amplifier's Gain control to its minimum (MIN) setting.
- Установите громкость головного устройства примерно на 75-80% от максимальной.
- Сыграйте динамичную музыку.
- Медленно увеличивайте amplifier's Gain control until you hear distortion, then back it off slightly until the sound is clear.
The remote gain control unit allows for real-time adjustment of the subwoofer level without affecting the main system volume.
7.3 Фильтр нижних частот (ФНЧ)
The LPF control sets the upper frequency limit for the amplifier's output. This is essential for subwoofers, ensuring they only reproduce low frequencies. Adjust the LPF knob (typically 30Hz to 150Hz) to blend the subwoofer's output seamlessly with your main speakers. A common starting point is around 80-100Hz.
7.4 усиление басов
The Bass Boost switch provides an adjustable low-frequency enhancement. Use this feature sparingly, as excessive bass boost can lead to distortion and potential damage to your subwoofer. Adjust the boost level (0dB to 12dB) to your preference.
8. Техническое обслуживание
- Уборка: Периодически протирайте ampПротрите внешнюю поверхность устройства мягкой сухой тканью. Не используйте агрессивные химикаты или абразивные чистящие средства.
- Соединения: Regularly check all power, ground, and speaker connections to ensure they are secure and free from corrosion. Loose connections can cause performance issues or damage.
- Вентиляция: Убедитесь, что ampОхлаждающие ребра усилителя не загромождены, что обеспечивает надлежащее рассеивание тепла.
9. Поиск Неисправностей
| Проблема | Возможная причина | Решение |
|---|---|---|
| Нет питания (светодиод PWR не горит) | Перегорел предохранитель, неисправно соединение питания/заземления, нет удаленного сигнала. | Проверьте предохранитель, убедитесь в исправности соединений +12 В, GND и REM. |
| Protection Mode (PRT LED on) | Перегрев, короткое замыкание в проводке динамика, слишком низкое сопротивление. | Ensure proper ventilation, check speaker wiring for shorts, verify speaker impedance. |
| Нет звука | No input signal, gain too low, speaker wires disconnected. | Check RCA input connections, adjust gain, verify speaker wiring. |
| Искаженный звук | Gain set too high, LPF incorrectly set, poor ground connection. | Reduce gain, adjust LPF, check ground connection. |
10. Технические характеристики
- Номер модели: БЛОК ПИТАНИЯ400.1M-V7
- AmpТип лифтера: Моно класса D Ampпожизненнее
- Среднеквадратичная выходная мощность: 1 x 400 Вт RMS при 1 Ом
- Максимальная выходная мощность: 800 Вт
- Размеры продукта (Д x Ш x В): Примерно 157 x 82 x 37 мм (6.18 x 3.23 x 1.46 дюйма)
- Масса: Примерно 1.54 фунта
- Томtage: 12 вольт (номинальное значение)
- Максимальный объем поставкиtage: 12 Вольт
- Тип крепления: Поверхностный монтаж
- Производитель: Vibe Audio
- Дата первой доступности: 21 июля 2018 г.
11. Гарантия и поддержка
Vibe Audio products are designed and manufactured to the highest standards. For warranty information and technical support, please refer to the warranty card included with your product or visit the official Vibe Audio webСохраните чек о покупке для предъявления гарантийных претензий.


