1. Введение
This manual provides comprehensive instructions for the installation, operation, and maintenance of your BlueBird A1390 Automatic Irrigation Tap Programmer. This device is designed to automate your garden watering schedule, ensuring efficient and consistent irrigation. Please read this manual thoroughly before using the product to ensure correct operation and to prevent damage.
2. Информация по технике безопасности
- Do not immerse the unit in water. The unit is designed to be weather-resistant, but not submersible.
- Use only 1.5V AA alkaline batteries. Do not mix old and new batteries, or different types of batteries.
- Если устройство не будет использоваться в течение длительного времени, извлеките из него батарейки, чтобы предотвратить утечку.
- Хранить в недоступном для детей месте.
- Не пытайтесь разбирать или ремонтировать устройство самостоятельно. Обратитесь к квалифицированному специалисту для обслуживания.
- Убедитесь, что все соединения надежны и не допускайте утечек.
3. Содержимое упаковки
Проверьте комплектацию на наличие следующих предметов:
- 1x BlueBird A1390 Automatic Irrigation Tap Programmer
- 1x Руководство пользователя (этот документ)
Note: 2 AA 1.5V batteries are required for operation and are not included in the package.
4. Продукт закончилсяview
The BlueBird A1390 features two main rotary dials for setting irrigation frequency and duration, along with a battery indicator and an ON/OFF switch.
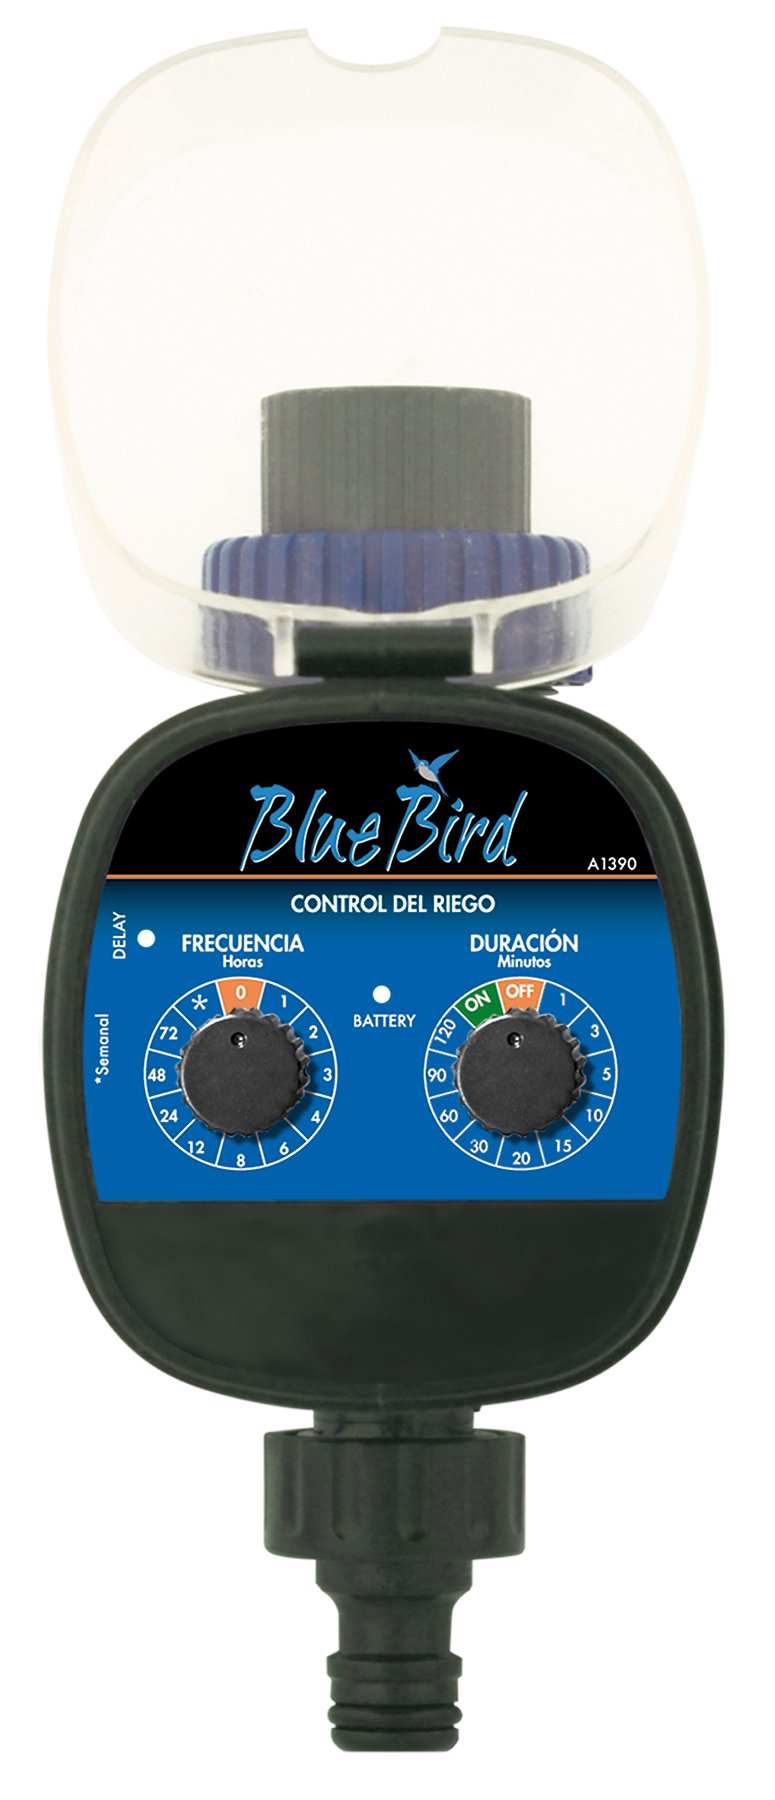
Рисунок 1: Передний view of the BlueBird A1390 Irrigation Programmer. The left dial controls irrigation frequency, and the right dial controls irrigation duration. A battery indicator light is located between the dials.
Компоненты:
- Frequency Dial (Frecuencia): Sets how often the irrigation occurs. Options include 0 (off), 1, 2, 3, 4, 6, 8, 12, 24, 48, 72 hours, and a '*' setting for manual or weekly operation.
- Duration Dial (Duración): Sets how long each irrigation cycle lasts. Options include 0 (off), 1, 3, 5, 10, 15, 20, 30, 60, 90, 120 minutes.
- Переключатель ВКЛ / ВЫКЛ: Located on the Duration Dial, allows for manual override or turning the unit off.
- Индикатор заряда батареи: A light that indicates battery status.
- Отсек для батареи: Located at the rear of the unit (not visible in Figure 1).
- Вход/выход воды: Standard tap and hose connections.
5. Настройка
5.1 Установка аккумулятора
- Найдите крышку батарейного отсека на задней панели устройства.
- Remove the cover by twisting or sliding it open.
- Insert two (2) new 1.5V AA alkaline batteries, ensuring correct polarity (+/-).
- Для обеспечения водонепроницаемости плотно закройте крышку батарейного отсека.
5.2 Connecting to the Tap
- Ensure your outdoor tap is turned off.
- Screw the BlueBird A1390 programmer onto your tap. Hand-tighten only to prevent damage.
- Connect your garden hose or irrigation system to the outlet of the programmer. Ensure a tight connection to prevent leaks.
- Slowly turn on your outdoor tap. Check for any leaks at the connections.
6. Инструкция по эксплуатации
The BlueBird A1390 is designed for simple, intuitive programming using its two rotary dials.
6.1 Setting Irrigation Frequency
- Поверните Частотный набор (left dial) to your desired irrigation interval.
- Доступные настройки:
- 0: No irrigation (off).
- 1, 2, 3, 4, 6, 8, 12, 24, 48, 72: Irrigation every X hours.
- *: This setting typically indicates a manual mode or a weekly cycle, depending on the specific model's internal logic. Refer to the example below for common usage.
6.2 Setting Irrigation Duration
- Поверните Duration Dial (right dial) to your desired watering time per cycle.
- Доступные настройки:
- OFF: No irrigation.
- НА: Continuous irrigation (use with caution).
- 1, 3, 5, 10, 15, 20, 30, 60, 90, 120: Irrigation for X minutes.
6.3 пр.ample Программирование
To water every 6 hours for 10 minutes:
- Установите Частотный набор к 6 (часы).
- Установите Duration Dial к 10 (minutes).
The programmer will automatically begin the cycle based on these settings. The first cycle will typically start shortly after programming, or after a short delay.
6.4 Ручное включение/выключение
To manually turn on the water, rotate the Duration Dial to the ON position. To stop manual watering, rotate the dial back to ВЫКЛЮЧЕННЫЙ or a timed setting.
7. Техническое обслуживание
7.1. Замена батареи
When the battery indicator light dims or the unit stops functioning, it's time to replace the batteries. Follow the steps in Section 5.1 for battery installation.
7.2 Очистка
Clean the exterior of the programmer with a damp cloth. Do not use abrasive cleaners or solvents. Ensure no water enters the battery compartment or internal electronics.
7.3 Зимнее хранение
Before the first frost, disconnect the programmer from the tap and hose. Remove the batteries. Store the unit indoors in a dry, frost-free location to prevent damage from freezing water.
8. Поиск Неисправностей
| Проблема | Возможная причина | Решение |
|---|---|---|
| Unit does not turn on/display. | Разряженные или неправильно установленные батареи. | Замените батареи, соблюдая правильную полярность. |
| Вода не течет. | Tap is off; programmer set to '0' or 'OFF'; low water pressure; clogged filter. | Ensure tap is fully open. Check frequency/duration settings. Verify water pressure. Clean any filters. |
| Unit leaks at connections. | Loose connections; missing or damaged washer. | Tighten connections. Check and replace washers if necessary. |
| Irrigation schedule is incorrect. | Incorrect frequency or duration settings. | Re-check and adjust the Frequency and Duration Dials according to your desired schedule. |
9. Технические характеристики
- Модель: А1390
- Бренд: BlueBird
- Производитель: Альтадекс
- Источник питания: 2 щелочные батарейки типа АА 1.5 В (в комплект не входят)
- Частота полива: 0, 1, 2, 3, 4, 6, 8, 12, 24, 48, 72 hours, or '*' (manual/weekly)
- Продолжительность полива: OFF, ON, 1, 3, 5, 10, 15, 20, 30, 60, 90, 120 minutes
- Размеры продукта: Приблизительно 19.4 х 10.6 х 10 см
- Вес продукта: Около 280 г.
- GTIN (UPC): 8426375113909
10. Гарантия и поддержка
This product is covered by a standard manufacturer's warranty. For specific warranty details, please refer to the documentation provided at the time of purchase or contact your retailer. For technical support or inquiries, please contact the seller or manufacturer directly.