1. Введение
This user manual provides comprehensive instructions for the installation, operation, and maintenance of your Audio System CO-600.5 High-Performance 5-Channel Class A/B Amplifier. To ensure optimal performance and safety, please read this manual thoroughly before using the product and retain it for future reference.
2. Информация по технике безопасности
General Product Safety according to EU Regulation 2023/2028:
- Observe the manufacturer's instructions and operating instructions for switching off the power supply to the vehicle and in the retrofit products.
- The supply line to the retrofit product must not be longer than 30cm from the operating battery.
- Fasten retrofit devices and accessories properly.
- It is recommended that the retrofit devices/accessories be installed by a specialist workshop. Otherwise, product or vehicle damage and fire can occur.
Always disconnect the vehicle's battery before performing any installation or maintenance work to prevent electrical shock or damage.
3. Продукт закончилсяview
The Audio System CO-600.5 is a high-performance 5-channel Class A/B amplifier designed for car audio systems. It features switchable High-Pass (HP) and Low-Pass (LP) filters, a full active mode, and includes a wired RTC remote control for convenient adjustments. The amplifier supports an input sensitivity range of 0.2V to 6V and includes a high-level RCA input with automatic turn-on capability.
Основные характеристики:
- 5-Channel Class A/B Ampпожизненнее
- Switchable High-Pass (HP) and Low-Pass (LP) Filters
- Full Active Mode
- Wired RTC Remote Control Included
- Чувствительность входного сигнала: 0.2–6 В
- High-Level RCA Input with Auto-On
- Power Output: 4 x 60W RMS (4 Ohm) / 4 x 85W RMS (2 Ohm) and 1 x 250W RMS (4 Ohm mono) / 1 x 350W RMS (2 Ohm mono)
Продукт Views

Рисунок 3.1: Вверху view of the CO-600.5 ampусилитель, подчеркивающий его элегантный дизайн и фирменный стиль.

Рисунок 3.2: Передняя часть view принадлежащий amplifier, displaying the cooling fins.
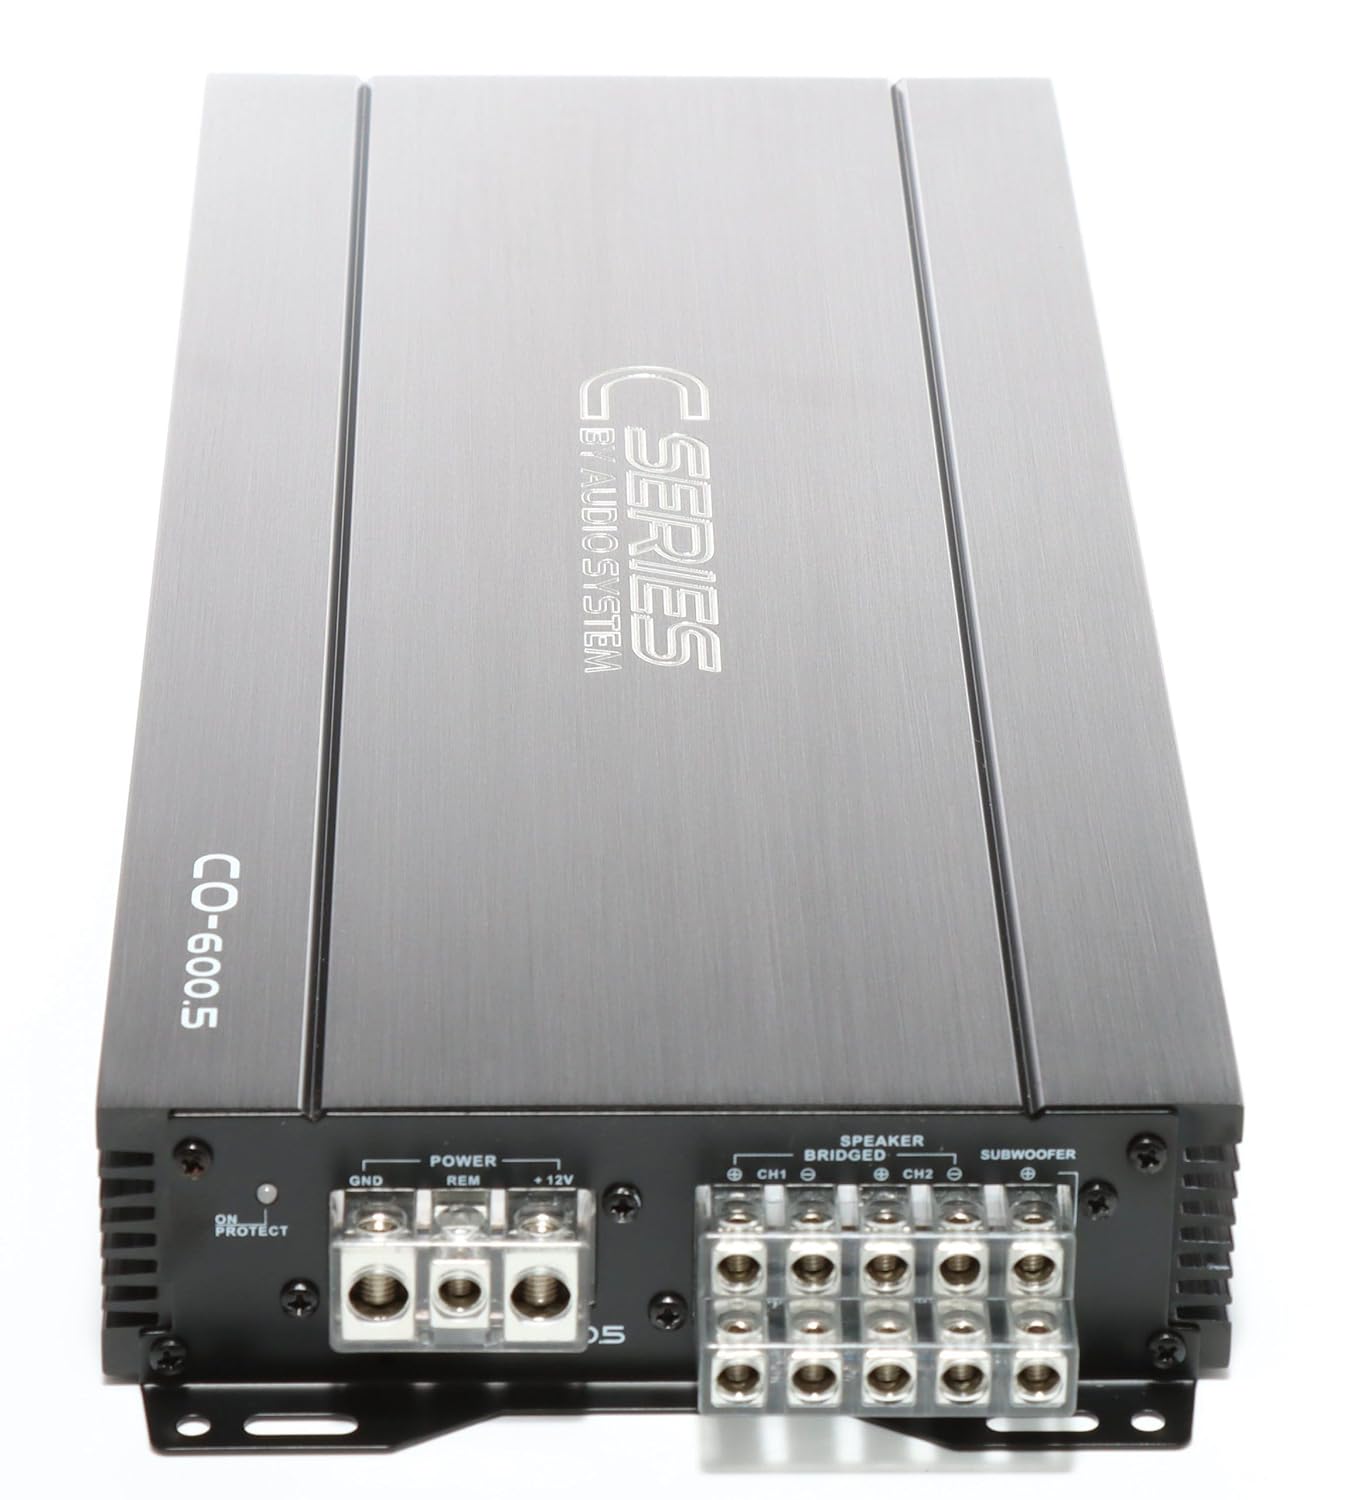
Рисунок 3.3: Сзади view принадлежащий amplifier, detailing the power input (GND, REM, +12V) and speaker output terminals.

Figure 3.4: Input and control panel, featuring RCA inputs, gain level adjustments, and crossover frequency controls.
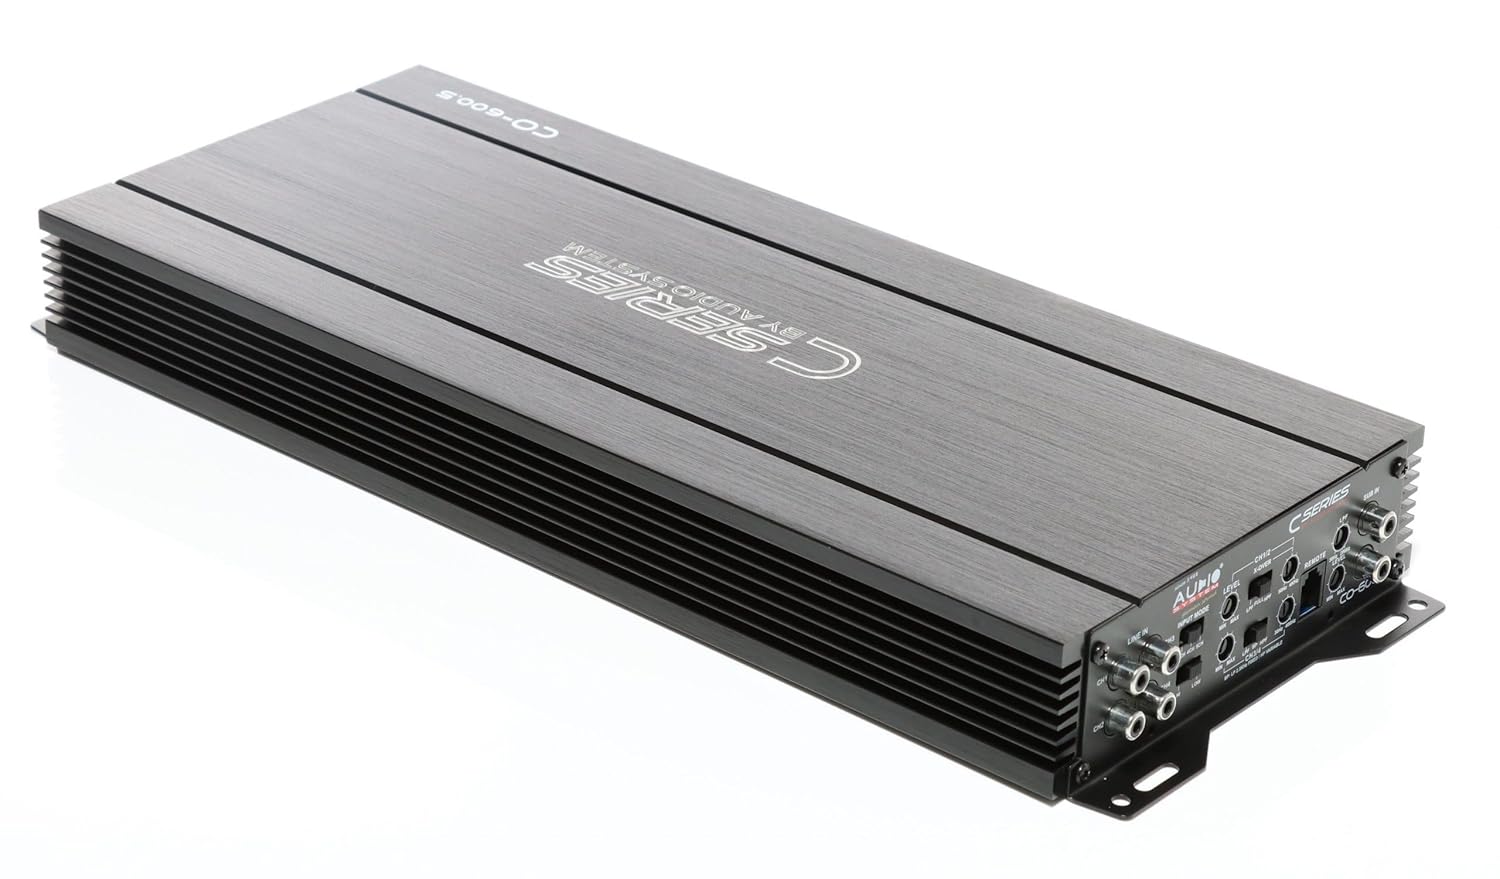
Рисунок 3.5: Наклонный view providing a comprehensive look at both connection sides of the ampпожизненнее.
4. Настройка и установка
Правильная установка имеет решающее значение для производительности и долговечности вашего ampУсилитель. Настоятельно рекомендуется, чтобы установку выполнял квалифицированный специалист.
4.1 Место установки
- Выберите сухое, хорошо проветриваемое место, вдали от прямых солнечных лучей и источников тепла.
- Обеспечьте достаточный приток воздуха вокруг ampУсилитель для надлежащего охлаждения.
- Смонтируйте ampНадежно закрепите фильтр на твердой поверхности с помощью соответствующих крепежных элементов, чтобы предотвратить его смещение во время движения транспортного средства.
4.2 Подключение проводки
Перед выполнением каких-либо подключений отсоедините отрицательную клемму аккумуляторной батареи автомобиля.
- Мощность (BATT+): Подключите кабель питания с предохранителем непосредственно от положительной клеммы аккумуляторной батареи автомобиля к клемме +12 В на... amplifier. Ensure the fuse is located within 30cm of the battery.
- Земля (земля): Connect a ground cable of the same gauge as the power cable to a clean, unpainted metal surface on the vehicle chassis. The connection point must be free of rust and paint.
- Удаленный (REM): Подключите провод дистанционного включения от выхода дистанционного управления головного устройства к клемме REM на ampусилитель. Это включит ampвключение и выключение Lifier с помощью головного устройства.
- Входы RCA: Подключите выходы RCA вашего головного устройства к amplifier's RCA inputs (CH1/2, CH3/4, SUB IN).
- Выходы на динамики: Connect your speakers to the corresponding speaker output terminals (CH1, CH2, CH3, CH4, SUBWOOFER). Observe correct polarity (+ to + and - to -).
5. Инструкция по эксплуатации
Как только amplifier is correctly installed and wired, you can proceed with initial setup and operation.
5.1 Первоначальное включение питания
- Подсоедините обратно отрицательную клемму аккумуляторной батареи автомобиля.
- Включите головное устройство. amplifier should power on automatically via the remote wire. The power indicator LED on the ampСветильник должен загореться.
5.2 Регулировка уровня усиления
Регулятор усиления (уровень) соответствует amplifier's input sensitivity to the output of your head unit. This is not a volume control.
- Установите amplifier's gain control to minimum (fully counter-clockwise).
- Установите громкость головного устройства примерно на 75-80% от максимальной.
- Медленно увеличивайте ampПоворачивайте регулятор усиления усилителя до тех пор, пока не услышите легкое искажение, затем немного уменьшите его, пока звук не станет чистым.
5.3 Настройки кроссовера (X-OVER)
The CO-600.5 features switchable HP (High-Pass) and LP (Low-Pass) filters for precise sound tuning.
- HPF (фильтр верхних частот): Allows frequencies above the set point to pass through. Use for full-range speakers to prevent low frequencies that can cause distortion.
- ФНЧ (фильтр нижних частот): Allows frequencies below the set point to pass through. Use for subwoofers to prevent high frequencies.
- Adjust the crossover frequencies (e.g., 50Hz-250Hz for HPF, 30Hz-250Hz for LPF) according to your speaker specifications and listening preferences.
5.4 RTC Remote Control
The included wired RTC remote control allows for convenient adjustment of the subwoofer level from the driver's seat.
6. Техническое обслуживание
The Audio System CO-600.5 ampУсилитель требует минимального технического обслуживания.
- Держите ampОчистите фильтр от пыли и загрязнений. Для чистки используйте мягкую сухую ткань.
- Убедитесь, что все соединения надёжны. Периодически проверяйте проводку на наличие признаков износа или коррозии.
- Не используйте едкие химикаты или абразивные чистящие средства для чистки. ampпожизненнее.
7. Поиск Неисправностей
Если у вас возникли проблемы с вашим amplifier, ознакомьтесь со следующими распространенными проблемами и решениями:
| Проблема | Возможная причина | Решение |
|---|---|---|
| Нет питания / Ampлифер не включается |
|
|
| Нет звука |
|
|
| Искаженный звук |
|
|
If the problem persists after attempting these solutions, please contact Audio System customer support or a qualified car audio technician.
8. Технические характеристики
| Особенность | Деталь |
|---|---|
| Номер модели | 02002CO6005 |
| Каналы | 5 (4 full-range + 1 mono/subwoofer) |
| Выходная мощность (RMS) |
|
| Входная чувствительность | 0.2 В - 6 В |
| Фильтры | Switchable High-Pass (HP) and Low-Pass (LP) |
| Размеры (продукт) | Приблизительно 420 x 47 x 171 мм |
| Размеры упаковки | 59.99 х 19.99 х 15.01 см |
| Вес упаковки | 1 килограмм |
| Томtage (рабочий) | 6 Volts (Note: Typically car audio operates at 12V. Please refer to product labeling for exact operating voltagе.) |
| Максимальный объем поставкиtage | 6 Вольт |
| Тип крепления | Поверхностный монтаж |
9. Гарантия и поддержка
For warranty information, please refer to the documentation provided with your purchase or contact your authorized Audio System dealer. Warranty terms and conditions may vary by region and retailer.
For technical support, service, or inquiries regarding spare parts, please contact Audio System customer service directly or visit their official webКонтактная информация обычно указана на упаковке продукта или на сайте производителя. webсайт.
Производитель: Аудиосистема
Адрес производителя: JRS Labs - The Art of Sound, Heinrich-Heine-Straße 13A, 63329 Rödermark


