Введение
This manual provides detailed instructions for the setup, operation, and maintenance of your Digoo DG-C3 Wireless Weather Station. This device integrates a hygrometer, thermometer, weather forecast station, and alarm clock functions, offering comprehensive environmental monitoring and timekeeping capabilities. Please read this manual thoroughly before using the product to ensure correct operation and to maximize its features.
Содержимое упаковки
- Digoo DG-C3 Wireless Weather Station Unit
- Кабель питания USB
- Руководство пользователя (этот документ)
Примечание: Батарейки (3 шт. типа AAA) в комплект не входят и приобретаются отдельно.
Продукт болееview
Familiarize yourself with the various components of your Digoo DG-C3 weather station.
Передний дисплей
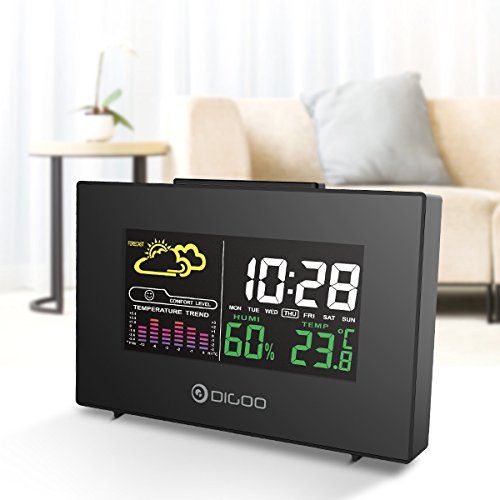
The front display features a color backlit screen showing the current time, day of the week, indoor humidity, indoor temperature, and a weather forecast icon. It also includes a comfort level indicator and a temperature trend graph.
- Время и дата: Digital display of current time and day.
- Прогноз погоды: Icons indicating predicted weather conditions (e.g., sunny, cloudy, rainy).
- Уровень комфорта: Indicates indoor comfort based on temperature and humidity.
- Temperature Trend: Bar graph showing recent temperature changes.
- Влажность: Проценtage display of indoor humidity.
- Температура: Digital display of indoor temperature (Celsius or Fahrenheit).
Задняя Панель
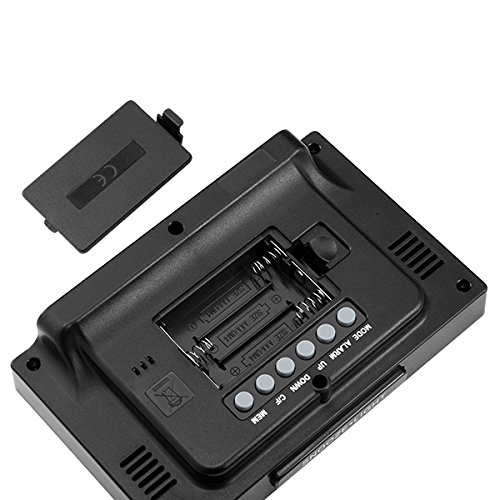
The back of the unit houses the battery compartment and various control buttons for setting the device.
- Отсек для батареи: Holds 3x AAA batteries for power backup.
- Кнопка РЕЖИМ: Used to switch between display modes and enter setting mode.
- Кнопка ТРЕВОГИ: Используется для установки и включения/выключения сигнализации.
- Кнопка ВВЕРХ: Used to increase values during settings or view maximum records.
- Кнопка ВНИЗ: Used to decrease values during settings or view minimum records.
- Кнопка °C/°F: Переключение между единицами измерения температуры по Цельсию и Фаренгейту.
- Кнопка памяти: Привыкший view memory records for temperature and humidity.
Верхняя панель
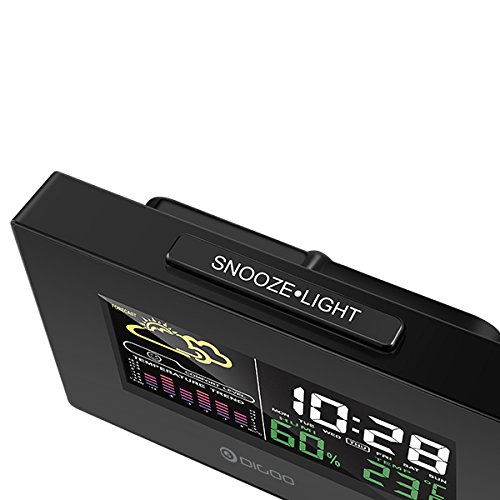
The top of the unit features a single button for snooze and backlight functions.
- SNOOZE·LIGHT Button: Press to activate the backlight or snooze the alarm.
Настраивать
1. Включение
- Установка аккумулятора: Open the battery compartment cover on the back of the unit. Insert 3x AAA batteries, ensuring correct polarity (+/-). Close the cover. Batteries provide backup power and allow for portability.
- Подключение питания через USB: For continuous power and backlight, connect the provided USB cable to the USB port on the unit and to a compatible USB power adapter (not included) or a computer USB port.
- The display will light up and show default settings.
2. Initial Settings (Time, Date, Unit)
- Установка времени:
- Нажмите и удерживайте РЕЖИМ button for approximately 3 seconds to enter time setting mode. The hour digit will flash.
- Используйте UP or ВНИЗ кнопки для настройки часов.
- Нажимать РЕЖИМ again to confirm the hour and move to minute setting. The minute digit will flash.
- Используйте UP or ВНИЗ кнопки для настройки минут.
- Нажимать РЕЖИМ again to confirm and move to 12/24 hour format selection.
- Используйте UP or ВНИЗ buttons to select 12-hour or 24-hour format.
- Нажимать РЕЖИМ для подтверждения и выхода из настройки времени.
- Установка даты:
- После установки времени нажмите РЕЖИМ again to enter date setting mode. The year will flash.
- Используйте UP or ВНИЗ кнопки для настройки года.
- Нажимать РЕЖИМ to confirm and move to month setting.
- Используйте UP or ВНИЗ кнопки для настройки месяца.
- Нажимать РЕЖИМ to confirm and move to day setting.
- Используйте UP or ВНИЗ кнопки для настройки дня.
- Нажимать РЕЖИМ to confirm and exit date setting.
- Выбор единицы измерения температуры:
- Нажмите ° C / ° F button on the back of the unit to switch between Celsius (°C) and Fahrenheit (°F) temperature display.
Инструкция по эксплуатации
1. Функция будильника
- Установка будильника:
- Нажмите ТРЕВОГА Нажмите кнопку один раз, чтобы отобразить текущее время будильника.
- Нажмите и удерживайте ТРЕВОГА button for approximately 3 seconds. The hour digit will flash.
- Используйте UP or ВНИЗ кнопки для настройки часа будильника.
- Нажимать ТРЕВОГА again to confirm the hour and move to minute setting. The minute digit will flash.
- Используйте UP or ВНИЗ кнопки для настройки минуты будильника.
- Нажимать ТРЕВОГА для подтверждения и выхода из настройки будильника.
- Активация/деактивация сигнализации:
- В обычном режиме отображения времени нажмите ТРЕВОГА button repeatedly to toggle the alarm ON or OFF. An alarm icon will appear on the display when the alarm is active.
- Функция повтора:
- Когда прозвучит сигнал будильника, нажмите кнопку ОТДЕРЖАТЬ·СВЕТ button on the top of the unit to activate the snooze function. The alarm will temporarily stop and sound again after a few minutes (typically 5-10 minutes).
- To stop the alarm completely, press any other button on the back panel.
2. Прогноз погоды
The weather station provides a weather forecast based on internal atmospheric pressure changes. The forecast icons (e.g., sunny, cloudy, rainy) are predictions for the next 12-24 hours and may not always match local weather services, which use more comprehensive data.
- The forecast icon is displayed on the upper left of the screen.
- The device requires a period of stable operation (typically 24 hours) to calibrate and provide accurate forecasts.
3. Отображение температуры и влажности
- The current indoor temperature and humidity are continuously displayed on the screen.
- Viewing Min/Max Records:
- Нажмите МЭМ button once to display the maximum recorded temperature and humidity.
- Нажимать МЭМ again to display the minimum recorded temperature and humidity.
- Нажимать МЭМ a third time to return to current readings.
- To clear the min/max records, press and hold the МЭМ кнопку в течение 3 секунд, пока viewзаписи.
4. Управление подсветкой
- When powered by USB, the backlight will remain on.
- When powered by batteries only, press the ОТДЕРЖАТЬ·СВЕТ button to temporarily activate the backlight for a few seconds.
Обслуживание
- Уборка: Wipe the unit with a soft, dry cloth. Do not use abrasive cleaners or solvents. Avoid getting moisture into the unit.
- Замена батареи: When the display becomes dim or functions irregularly, replace the 3x AAA batteries in the back compartment. Ensure correct polarity.
- Хранилище: If not using the device for an extended period, remove the batteries to prevent leakage. Store in a cool, dry place.
Поиск неисправностей
| Проблема | Возможная причина | Решение |
|---|---|---|
| Дисплей пустой или тусклый. | Low batteries or no power connection. | Replace batteries or connect the USB power cable. |
| Неверное время/дата. | Time/date not set correctly after power loss or initial setup. | Follow the "Initial Settings" section to reset time and date. |
| Прогноз погоды, похоже, неточен. | Device needs calibration time; local conditions may differ from pressure-based forecast. | Allow 24 hours for calibration. Understand that the forecast is based on internal pressure changes. |
| Сигнализация не срабатывает. | Сигнализация не сработала или громкость слишком низкая (если она регулируется). | Ensure the alarm icon is displayed. Check alarm settings. |
Технические характеристики
| Модель: | DG-C3 |
| Связь: | USB (для питания) |
| Источник питания: | 3x AAA Batteries (not included) or USB Power |
| Особые характеристики: | Hygrometer, Thermometer, Weather Forecast, Alarm Clock, Color Backlight, Portable |
| Отображать: | Color Backlit LCD |
| Единица измерения температуры: | °C / °F (выбираемый) |
Гарантия и поддержка
Информацию о гарантии или техническую поддержку можно получить в документации, предоставленной при покупке, или у продавца. Сохраните чек в качестве подтверждения покупки.


