1. Введение
This manual provides detailed instructions for the installation, operation, and maintenance of your Hunter 54-inch Contemporary Ceiling Fan. Please read all instructions carefully before beginning installation to ensure safe and proper operation. Retain this manual for future reference.

Figure 1.1: Hunter 54-inch Contemporary Ceiling Fan with remote control.

Figure 1.2: Key features of the Hunter 54-inch Contemporary Ceiling Fan.
2. Информация по технике безопасности
Чтобы снизить риск поражения электрическим током, возгорания или получения травм, всегда соблюдайте следующие основные меры предосторожности:
- Перед установкой вентилятора прочтите все инструкции.
- Вся электропроводка должна соответствовать национальным и местным электротехническим нормам. Если вы не знакомы с электромонтажными работами, обратитесь к квалифицированному электрику.
- Перед установкой отключите питание, выключив автоматические выключатели в распределительной коробке вентилятора.
- Ensure the outlet box is securely attached to the building structure and can support the fan's weight (approximately 18.1 lbs).
- Do not operate the fan with damaged blades. Replace all blades if one is damaged.
- Не размещайте предметы на пути лопастей вентилятора.
- Этот вентилятор предназначен только для использования внутри помещений.
3. Содержимое упаковки
Убедитесь, что все перечисленные ниже компоненты включены в ваш комплект:
- 1 x Fan Motor Assembly
- 3 x Fan Blades (Reversible: Light Gray Oak / Greyed Walnut)
- 1 комплект освещения
- 3 x LED Bulbs (E26 Medium Base)
- 1 x 4-inch Downrod
- 1 x 2-inch Downrod (for standard profile монтаж)
- 1 x Handheld Remote Control
- 2 батарейки типа ААА (для пульта дистанционного управления)
- Комплект крепежных элементов (винты, шайбы, клеммные гайки и т. д.)
4. Настройка и установка
Рекомендуется профессиональная установка. Перед началом работ убедитесь, что питание отключено на автоматическом выключателе.
4.1 Установка вентилятора
- Securely attach the mounting bracket to the ceiling outlet box. The outlet box must be listed for fan support.
- Select the appropriate downrod (4-inch or 2-inch) for your ceiling height. Insert the downrod through the canopy and connect it to the fan motor assembly.
- Осторожно поднимите вентиляторный блок и подвесьте его за монтажный кронштейн.
4.2 Подключение проводки
- Connect the fan's electrical wires to the household wiring according to local electrical codes. Typically, this involves connecting the black (hot) wire from the fan to the black (hot) wire from the ceiling, the white (neutral) wire from the fan to the white (neutral) wire from the ceiling, and the green (ground) wire from the fan to the bare copper (ground) wire from the ceiling.
- Ensure all wire connections are secure using the provided wire nuts.
- Аккуратно уложите все провода в розетку.
4.3 Крепление лезвий и комплекта освещения
- Attach the fan blades to the motor housing using the provided screws. Ensure the desired blade finish (Light Gray Oak or Greyed Walnut) is facing downwards.
- Install the light kit to the bottom of the fan motor assembly, following the specific instructions for your model.
- Screw the three E26 Medium Base LED bulbs into the light kit sockets.
- Attach the glass shade to the light kit.

Рисунок 4.1: С аннотациями view of fan components and features.

Рисунок 4.2: Example of the fan installed in a room.
5. Инструкция по эксплуатации
Your Hunter ceiling fan is operated using the included handheld remote control.
5.1 Функции дистанционного управления

Figure 5.1: Handheld Remote Control.
- Fan On/Off & Speed Control: Use the fan speed buttons (up/down arrows) to cycle through the three available fan speeds (low, medium, high) or turn the fan off.
- Light On/Off & Dimming: Press the light bulb button to turn the light on or off. To dim the light, press and hold the light bulb button. Release when the desired brightness is reached.
- Направление вращения вентилятора (реверсивный двигатель): The remote control includes a button to reverse the fan's blade direction. This feature allows for seasonal use:
- Downward Airflow (Summer): Создает охлаждающий эффект.
- Upward Airflow (Winter): Обеспечивает циркуляцию теплого воздуха, скопившегося у потолка.
5.2 реверсивных лезвий
The fan features reversible blades with Light Gray Oak on one side and Greyed Walnut on the other. You can choose the finish that best complements your room's decor during installation.
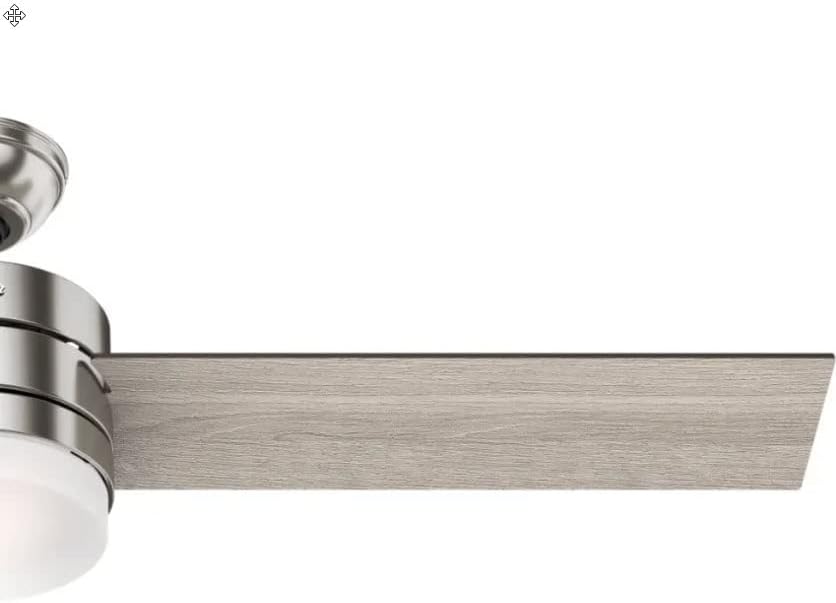
Рисунок 5.2: Example of the Light Gray Oak blade finish.
6. Техническое обслуживание
Регулярное техническое обслуживание обеспечит оптимальную производительность и долговечность вашего потолочного вентилятора.
6.1 Очистка
- Перед чисткой всегда отключайте питание вентилятора.
- Используйте мягкий, damp cloth to clean the fan blades and motor housing. Avoid abrasive cleaners that may scratch the finish.
- Clean the glass shade with a mild glass cleaner.
6.2 Замена лампочек
The fan uses E26 Medium Base LED bulbs. When replacing, ensure the power is off and allow bulbs to cool before handling.
- Unscrew the glass shade.
- Carefully unscrew the old LED bulb(s) and screw in new ones.
- Прикрепите стеклянный плафон обратно.
6.3 Балансировка лезвий
If the fan wobbles during operation, ensure all blade screws are tight. A balancing kit (often included with fans, though not explicitly listed here) can be used to correct persistent wobbling.
7. Поиск Неисправностей
Распространенные проблемы и способы их решения см. в следующей таблице.
| Проблема | Возможная причина | Решение |
|---|---|---|
| Вентилятор не запускается | Нет питания вентилятора; Неплотные соединения проводов; Низкий заряд батареи пульта дистанционного управления. | Проверьте автоматический выключатель; Убедитесь, что все проводные соединения надежны; Замените батареи пульта дистанционного управления. |
| Свет не работает | Loose wire connections; Faulty bulb(s); Light switch off. | Check wiring to light kit; Replace bulb(s); Ensure light is turned on via remote. |
| Покачивание вентилятора | Ослабленные винты лезвий; Несбалансированные лезвия; Ослабленный монтажный кронштейн. | Затяните все винты лезвия; Используйте комплект для балансировки лезвия; Убедитесь, что монтажный кронштейн надежно закреплен. |
| Пульт не отвечает | Разряженные или полностью разряженные батареи; пульт дистанционного управления не сопряжен с вентилятором. | Replace AAA batteries; Refer to remote pairing instructions (usually involves cycling power and pressing a button on the remote). |
8. Технические характеристики
| Особенность | Деталь |
|---|---|
| Бренд | Охотник |
| Номер модели | CC5C91C61 |
| Размер | 54 дюймов |
| Заканчивать | Матовый никель |
| Материал лезвия | Wood (Reversible: Light Gray Oak / Greyed Walnut) |
| Тип двигателя | AC Motor, Whisperwind |
| Источник света | Integrated Dimmable LED (3 bulbs) |
| Основание лампочки | E26 средний |
| Цветовая температура | 3000 Кельвинов |
| Световой поток | 800 люмен |
| Метод контроля | Дистанционное управление |
| Томtage | 120 Вольт |
| Ватtage | 44 watts (fan only) |
| Вес товара | 18.1 фунта |
| Размеры продукта | 54"Д x 54"Ш x 14.5"В |
| Использование внутри и снаружи помещений | В помещении |
| Расчетная годовая стоимость энергии | $12 (based on 6.4 hours/day, 12 cents/kWh, excluding lights) |
| Расход воздуха | 3,590 кубических футов в минуту |
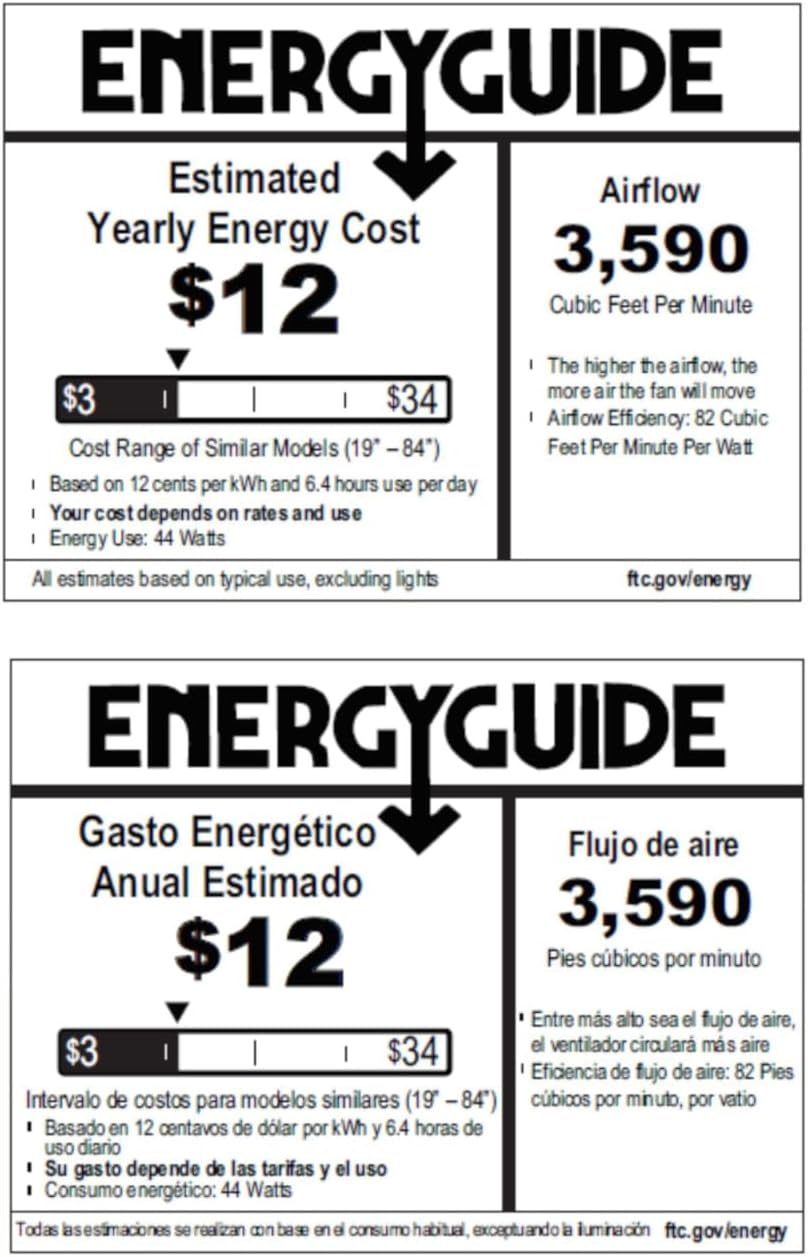
Figure 8.1: Energy Guide for the Hunter 54-inch Ceiling Fan.
9. Гарантия и поддержка
For warranty information or technical support, please refer to the official Hunter webили обратитесь в службу поддержки клиентов. Сохраните чек о покупке в качестве подтверждения покупки на случай предъявления гарантийных претензий.


