1. Введение
The COMPUTHERM Q7RF wireless room thermostat is designed for precise control of heating and air conditioning systems. This programmable device allows you to set individual temperature schedules for each day of the week, optimizing comfort and energy efficiency in your home or office. Its wireless design offers flexible placement of the thermostat unit, while the receiver unit connects directly to your boiler or air conditioning system, compatible with both 24V and 230V control circuits.
2. Содержимое упаковки
Убедитесь, что в упаковке присутствуют все компоненты:
- 4 x COMPUTHERM Q7RF Room Thermostat (Transmitter Unit)
- 4 x COMPUTHERM Q7RF Receiver Unit
- Руководство пользователя (этот документ)
- Крепежные винты и дюбели
3. Продукт закончилсяview
The COMPUTHERM Q7RF system consists of two main components: the thermostat unit (transmitter) and the receiver unit. The thermostat unit measures the room temperature and allows you to set desired temperatures and programs. The receiver unit connects to your heating or cooling system and switches it on or off based on signals from the thermostat unit.

Рисунок 1: Болееview of the COMPUTHERM Q7RF 4-piece set, showing multiple thermostat and receiver units.
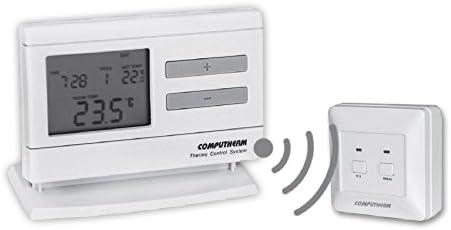
Figure 2: A single COMPUTHERM Q7RF thermostat unit communicating wirelessly with its receiver unit.
3.1 Thermostat Unit (Transmitter)
- ЖК-дисплей: Shows current temperature, set temperature, time, day, and program status.
- Кнопки управления: For setting temperature, time, and programming schedules.
- Отсек для батареи: Для электропитания.
3.2 Блок приемника
- Клеммы проводки: For connection to the heating/cooling system.
- Индикаторы состояния: LEDs to show power and relay status.
- Manual Override Buttons: For temporary manual control.
4. Технические характеристики
| Особенность | Спецификация |
|---|---|
| Бренд | КОМПЬЮТЕРМ |
| Модель | Q7RF |
| Переключение громкостиtage | 24V AC/DC, ... 250V AC, 50Hz |
| Потребляемая мощность | 6W |
| Диапазон измерения температуры | 3 – 45°C (in 0.1°C increments) |
| Регулируемый диапазон температур | 5 – 40°C (in 0.5°C increments) |
| Точность измерения температуры | ±0.5°С |
| Тип контроллера | Кнопка нажатия |
| Технология связи | Беспроводная связь (радиочастота) |
| Особые возможности | Programmable, Compatible with various system voltages |
5. Настройка и установка
5.1 Thermostat Unit Placement and Battery Installation
- Выберите местоположение: Place the thermostat unit in a central area of the room where it can accurately measure the ambient temperature, away from direct sunlight, drafts, or heat sources.
- Установите батареи: Open the battery compartment on the back of the thermostat unit. Insert the required batteries (typically AA or AAA, refer to the unit's markings) ensuring correct polarity. Close the compartment.
- Включение питания: The display should light up, indicating the unit is powered.
5.2 Подключение приемника
WARNING: Electrical installation should only be performed by a qualified electrician. Disconnect power to the heating/cooling system before proceeding.
- Установите приемник: Secure the receiver unit near your boiler or air conditioning system using the provided screws and wall plugs.
- Доступ к клеммам подключения: Open the cover of the receiver unit to expose the wiring terminals.
- Подключиться к системе: Connect the receiver unit to the two-wire room thermostat connection point of your boiler or AC system. Ensure connections are secure and follow the wiring diagram provided with your heating/cooling system and the receiver unit. The COMPUTHERM Q7RF is compatible with both 24V and 230V control circuits.
- Восстановить мощность: Once wiring is complete and verified, close the receiver unit cover and restore power to your heating/cooling system.
5.3 Pairing the Units (If not pre-paired)
Refer to the specific instructions provided with your Q7RF set for pairing procedures. Typically, this involves pressing a pairing button on the receiver unit and then initiating a pairing sequence on the thermostat unit within a short timeframe. A successful pairing will usually be indicated by an LED on the receiver or a message on the thermostat display.
6. Инструкция по эксплуатации
6.1 Понимание ЖК-дисплея
The LCD display provides all necessary information about the thermostat's current status and settings.

Рисунок 3: Подробная информация view of the COMPUTHERM Q7RF LCD display, illustrating various indicators such as program number, manual modification symbol, weekdays, time, set temperature, actual room temperature, low battery symbol, boiler ON state, and timed control symbol.
- Будние дни: Указывает текущий день недели.
- Exact Time / Time Left: Displays the current time or time remaining for a manual modification.
- Номер программы: Shows the active program segment.
- Установить температуру: The desired temperature set by the user.
- Actual Room Temperature: The current temperature measured by the thermostat.
- Symbol for Manual Modification: Indicates that the thermostat is currently operating under a temporary manual override.
- Temp. Modified until next manual intervention: Shows the duration of a temporary temperature change.
- Symbol for Low Battery Voltage: Появляется, когда требуется замена батареек.
- Symbol for Boiler ON State: Указывает на то, когда система отопления/охлаждения активна.
- Symbol for Timed Control: Indicates that a programmed schedule is active.
6.2 Установка текущего времени и дня
- Нажмите ВРЕМЯ кнопка.
- Используйте + or - кнопки, чтобы настроить час, затем нажмите ВРЕМЯ еще раз для подтверждения.
- Повторяйте в течение указанного количества минут и в зависимости от дня недели.
6.3 Ручная регулировка температуры
- В нормальном режиме работы нажмите кнопку + or - кнопки для регулировки желаемой температуры.
- The new temperature will be maintained until the next programmed time slot or until manually overridden again.
6.4 Programming Daily/Weekly Schedules
The Q7RF allows for independent programming for each day of the week. You can typically set multiple time periods with different temperatures for each day.
- Нажмите ПРОГ Кнопка входа в режим программирования.
- Используйте ДЕНЬ button to select the day you wish to program (e.g., MON, TUE, etc.).
- Используйте ВРЕМЯ и +/- buttons to set the start time for the first program period.
- Используйте ЗАДАННАЯ ТЕМПЕРАТУРА и +/- buttons to set the desired temperature for this period.
- Нажимать ПРОГ again to move to the next program period for the same day, or use ДЕНЬ перейти на следующий день.
- Repeat until all desired periods and days are programmed.
- Нажмите БЕГАТЬ or ВЫХОД button to save and exit programming mode.
7. Техническое обслуживание
7.1. Замена батареи
When the low battery symbol appears on the LCD display, replace the batteries immediately to ensure continuous operation. Use new, high-quality alkaline batteries of the specified type.
- Откройте крышку батарейного отсека на задней панели термостата.
- Извлеките старые батареи.
- Insert new batteries, observing correct polarity (+/-).
- Закройте крышку батарейного отсека.
7.2 Очистка
Clean the thermostat and receiver units with a soft, dry cloth. Do not use abrasive cleaners, solvents, or spray directly onto the units, as this may damage the electronics or finish.
8. Поиск Неисправностей
| Проблема | Возможная причина | Решение |
|---|---|---|
| Дисплей термостата пуст | Разряженные батареи | Замените батареи новыми. |
| Система отопления/кондиционирования не реагирует. | 1. Receiver unit not powered 2. Units not paired 3. Wiring issue 4. Вне диапазона | 1. Check power supply to receiver. 2. Perform pairing procedure (Section 5.3). 3. Verify wiring connections (Section 5.2). 4. Move thermostat closer to receiver or check for obstructions. |
| Неверное показание температуры | Thermostat placed in unsuitable location (direct sun, draft) | Relocate thermostat to a more central and stable temperature area. |
| Programmed schedule not active | Thermostat in manual override mode | Exit manual override mode (e.g., press RUN/AUTO button) to resume programmed operation. |
9. Гарантия и поддержка
COMPUTHERM products are manufactured to high-quality standards. For warranty information, please refer to the warranty card included with your product or contact your retailer. For technical support, please reach out to the COMPUTHERM customer service or your local distributor. Keep your purchase receipt as proof of purchase.


