1. Введение
Thank you for choosing the BECA BHT-2000GALTP Smart Floor Heating Thermostat. This device is designed to provide intelligent and efficient control over your electric floor heating system, ensuring optimal comfort and energy savings. Featuring a modern black screen display and intuitive touch controls, this thermostat offers 5+2 weekly programming capabilities to suit your lifestyle.

Рисунок 1: Передняя часть view of the BECA BHT-2000GALTP Smart Floor Heating Thermostat, displaying temperature, time, and mode indicators.
2. Информация по технике безопасности
Please read this section carefully before installation and operation to prevent personal injury or damage to the product.
- Installation must be carried out by a qualified electrician in accordance with local electrical codes and regulations.
- Always disconnect power at the circuit breaker before installing, cleaning, or servicing the thermostat.
- Не подвергайте термостат воздействию воды или чрезмерной влажности.
- Убедитесь, что все соединения проводов надежны и правильно изолированы.
- Этот термостат предназначен только для использования внутри помещений.
3. Содержимое упаковки
Проверьте наличие всех предметов в упаковке:
- BECA BHT-2000GALTP Thermostat Unit
- Монтажные винты (2)
- Руководство пользователя (этот документ)
4. Технические характеристики
| Особенность | Спецификация |
|---|---|
| Модель | BHT-2000GALTP |
| Источник питания | 95 ~ 240 В переменного тока, 50/60 Гц |
| Ток нагрузки | 3A |
| Размеры (Д x Ш x В) | 8.61 х 8.61 х 1.32 см |
| Цвет | Черный |
| Подсветка | Да |
| Рейтинг IP | IP20 |
| Датчик | НТК |
5. Установка (настройка)
The thermostat is designed for installation into a standard 86mm square or European 60mm round wall box. Ensure the power supply is disconnected before beginning installation.
- Turn off the main power supply to the heating system at the circuit breaker.
- Separate the mounting plate from the thermostat unit by gently prying the bottom clips.
- Connect the wiring according to the diagram in Section 6.
- Mount the back plate into the wall box using the provided screws.
- Совместите термостат с монтажной пластиной и защелкните его на место.
- Восстановите подачу электроэнергии в систему отопления.

Рисунок 2: Боковая проекцияfile of the thermostat, illustrating its compact design for wall mounting.
6. Схема подключения
Proper wiring is essential for the safe and correct operation of your thermostat. Refer to the diagrams below and ensure all connections are secure.

Рисунок 3: Сзади view of the thermostat with terminal labels for power, load, and NTC sensor.
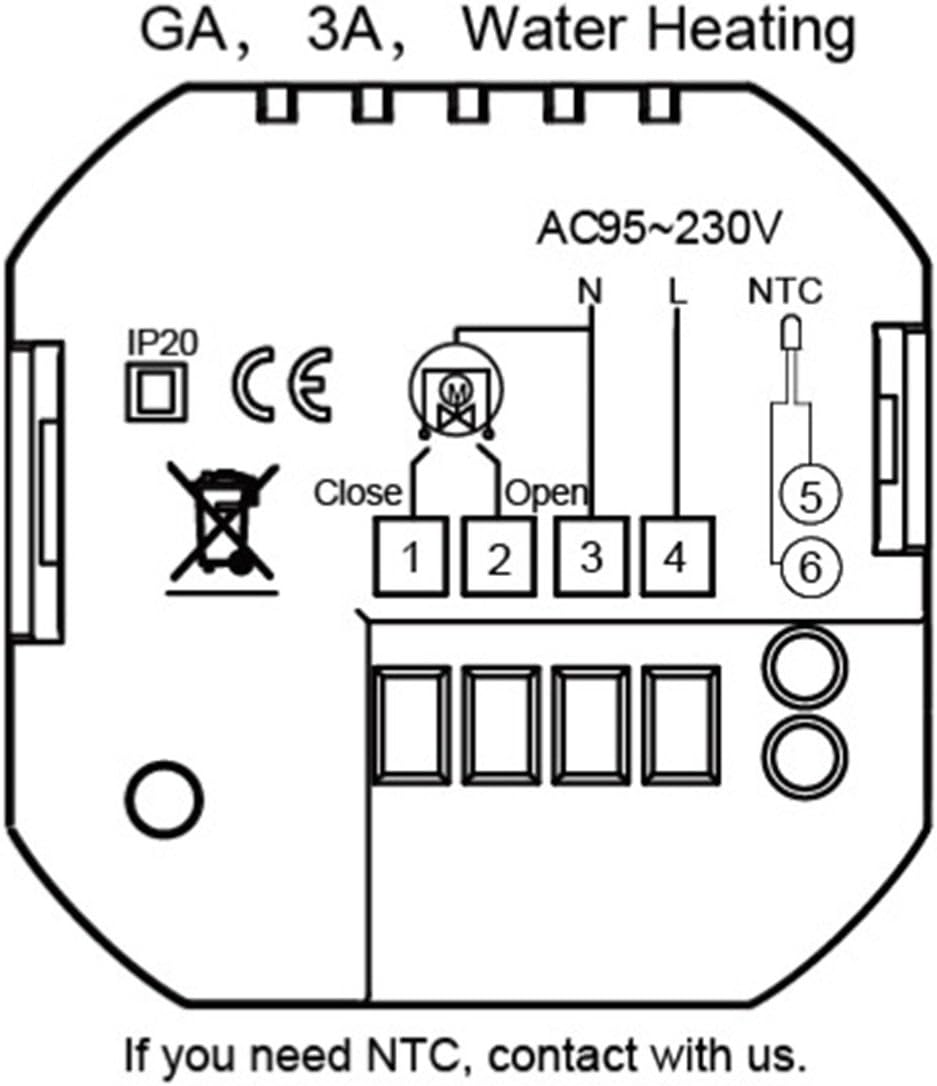
Figure 4: Detailed wiring schematic for GA, 3A, Water Heating models. Connect Live (L) and Neutral (N) to terminals 3 and 4 respectively. Connect the heating load to terminals 1 and 2. The NTC floor sensor connects to terminals 5 and 6.
Описание терминала:
- N: Neutral wire for power supply.
- L: Live wire for power supply.
- 1, 2: Load connections for the heating element.
- 5, 6: NTC sensor connections (for floor temperature sensing).
7. Операция
The thermostat features a clear display and touch buttons for easy operation.

Figure 5: Thermostat display and button function overview.
Функции кнопок:
- М (Режим): Press to switch between Manual mode and Program mode.
- ⏱ (Clock/Time): Press to set time and date. Hold to enter programming settings.
- ⏻ (Мощность): Нажмите, чтобы включить/выключить термостат.
- ▲ (Стрелка вверх): Повысьте температуру или отрегулируйте настройки.
- ▼ (Стрелка вниз): Снизьте температуру или отрегулируйте настройки.
Установка времени и даты:
- With the thermostat ON, press the ⏱ button once. The hour digit will flash.
- Использовать ▲ и ▼ настроить час.
- Нажимать ⏱ again to move to minutes, then use ▲ и ▼ для настройки.
- Нажимать ⏱ again to move to the day of the week (1-7, Monday-Sunday), then use ▲ и ▼ для настройки.
- Нажимать ⏱ again or wait 10 seconds to save and exit.
8. Programming (5+2 Weekly Schedule)
The thermostat supports 5+2 weekly programming, allowing you to set different temperatures for weekdays (Monday-Friday) and weekends (Saturday-Sunday) across six time periods each day.
- With the thermostat ON, hold the ⏱ button for 3-5 seconds to enter programming mode. The display will show "WEEK" and the first period (Period 1) for weekdays.
- Использовать ▲ и ▼ to adjust the start time for Period 1.
- Нажимать ⏱ to move to the temperature setting for Period 1. Use ▲ и ▼ для регулировки желаемой температуры.
- Repeat steps 2 and 3 for Period 2 through Period 6 for weekdays.
- After setting all 6 periods for weekdays, the display will switch to weekend programming (Saturday-Sunday). Repeat the process for Period 1 through Period 6 for weekends.
- Once all periods are set, press ⏱ again or wait 10 seconds to save the settings and exit programming mode.
Default Program Settings (Exampле):
| Период | Time (Mon-Fri) | Temp (Mon-Fri) | Time (Sat-Sun) | Temp (Sat-Sun) |
|---|---|---|---|---|
| 1 | 06:00 | 22℃ | 08:00 | 23℃ |
| 2 | 08:00 | 18℃ | 11:00 | 20℃ |
| 3 | 11:30 | 18℃ | 14:00 | 20℃ |
| 4 | 13:30 | 18℃ | 17:00 | 23℃ |
| 5 | 17:00 | 22℃ | 20:00 | 20℃ |
| 6 | 22:00 | 18℃ | 22:00 | 18℃ |
9. Техническое обслуживание
The BECA BHT-2000GALTP thermostat requires minimal maintenance.
- Уборка: Протрите дисплей и сasinг с мягким, дamp Ткань. Не используйте абразивные чистящие средства или растворители.
- Нет деталей, обслуживаемых пользователем: Do not attempt to open or repair the thermostat yourself. Refer all servicing to qualified personnel.
10. Поиск Неисправностей
Если у вас возникли проблемы с термостатом, ознакомьтесь со следующими распространенными проблемами и решениями:
| Проблема | Возможная причина | Решение |
|---|---|---|
| Thermostat has no power/display is off. | Отсутствует электропитание; сработал автоматический выключатель; плохо закреплена проводка. | Check power supply at the circuit breaker. Ensure wiring connections are secure (refer to Section 6). |
| Heating system not turning on/off as expected. | Incorrect temperature setting; thermostat in wrong mode (Manual/Program); wiring issue. | Verify desired temperature is set correctly. Check thermostat mode (M button). Inspect wiring. |
| Показания температуры кажутся неточными. | Проблема с датчиком; местоположение термостата. | Ensure the NTC sensor is properly connected and not damaged. Avoid placing thermostat near heat sources or drafts. |
| Cannot enter programming mode. | Кнопка удерживается недостаточно долго. | Держите ⏱ кнопку на 3-5 секунд. |
11. Гарантия и поддержка
Для получения информации о гарантии или технической поддержке обратитесь непосредственно в место покупки или к производителю. Сохраните чек в качестве подтверждения покупки.
Manufacturer: BECA


