1. Введение
This manual provides essential instructions for the safe and efficient operation of your Hytera PD365LF Digital Portable Radio. Please read this manual thoroughly before using the product to ensure proper functionality and to prevent damage.
2. Содержимое упаковки
Upon unpacking, please verify that all items listed below are present and in good condition. If any item is missing or damaged, contact your dealer immediately.
- Hytera PD365LF Digital Portable Radio
- Литий-ионный аккумулятор
- Адаптер питания
- Зажим для ремня
- Ремень
- Руководство пользователя (этот документ)
3. Продукт закончилсяview
The Hytera PD365LF is a compact and robust digital portable radio designed for reliable communication. Familiarize yourself with the radio's components.
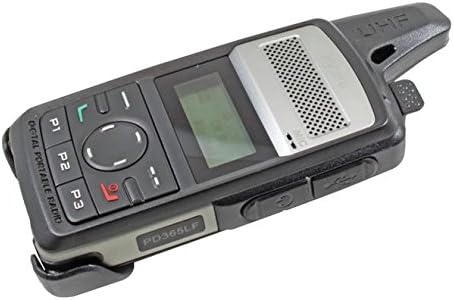
Figure 1: Hytera PD365LF Digital Portable Radio. This image displays the radio from an angled perspective, highlighting its compact form factor. Visible features include the speaker grille, LCD screen, navigation buttons (P1, P2, P3, and a central directional pad), and the UHF antenna. The model number "PD365LF" is clearly visible on the front casing.
Ключевые компоненты:
- Антенна: Для передачи и приема сигналов.
- Спикер: Выводит звук.
- Микрофон: Inputs audio.
- ЖК-дисплей: Shows channel information, battery status, and menu options.
- Navigation Buttons (P1, P2, P3, Directional Pad): For menu navigation and quick access functions.
- Кнопка «нажми и говори» (PTT): Активирует передачу.
- Ручка питания/громкости: Включает/выключает радио и регулирует громкость.
- Порт аксессуаров: Для подключения аудиоаксессуаров или кабеля программирования.
4. Настройка
4.1 Установка аккумулятора
- Убедитесь, что радио выключено.
- Совместите аккумулятор с отсеком для аккумулятора на задней панели радиоприемника.
- Аккуратно нажмите на аккумулятор, чтобы он надежно встал на место до щелчка.
- To remove, slide the battery release latch and lift the battery out.
4.2 Зарядка аккумулятора
Before initial use, fully charge the battery. A fully discharged battery typically takes approximately 3-4 hours to charge.
- Подключите адаптер питания к подходящей розетке.
- Connect the charging cable to the radio's accessory port.
- The charging indicator on the radio will illuminate (e.g., red for charging, green for fully charged).
- После полной зарядки отсоедините зарядное устройство.
5. Инструкция по эксплуатации
5.1 Включение/выключение питания
- Для включения: Поверните регулятор питания/громкости по часовой стрелке до щелчка и включения дисплея.
- Чтобы выключить: Поверните регулятор питания/громкости против часовой стрелки до щелчка и выключения дисплея.
5.2 Регулировка громкости
After powering on, rotate the Power/Volume knob clockwise to increase volume or counter-clockwise to decrease volume.
5.3 Выбор канала
Use the navigation buttons (e.g., up/down arrows on the directional pad) to scroll through available channels. The selected channel will be displayed on the LCD screen.
5.4 Передача и прием
- Для передачи: Press and hold the Push-to-Talk (PTT) button. Speak clearly into the microphone. Release the PTT button to stop transmitting.
- Получить: Убедитесь, что кнопка PTT не нажата. Радиостанция автоматически начнет принимать сигналы на выбранном канале.
5.5 Programmable Buttons (P1, P2, P3)
The P1, P2, and P3 buttons can be programmed for various functions (e.g., zone switch, scan, emergency call) by your dealer or through programming software. Refer to your dealer for specific configurations.
6. Техническое обслуживание
6.1 Общий уход
- Храните радио в сухом месте. Избегайте попадания дождя, влаги или жидкостей.
- Не подвергайте радиостанцию воздействию экстремальных температур.
- Handle the radio with care. Avoid dropping or subjecting it to strong impacts.
6.2 Очистка
Очистите поверхность радиоприемника мягкой тряпкой.amp cloth. Do not use harsh chemicals, cleaning solvents, or strong detergents, as these may damage the casinг или внутренние компоненты.
7. Поиск Неисправностей
| Проблема | Возможная причина | Решение |
|---|---|---|
| Радио не включается. | Battery is discharged or improperly installed. | Зарядите аккумулятор или правильно установите его на место. |
| Невозможно передавать или принимать. | Incorrect channel selected; out of range; antenna not properly attached. | Проверьте канал; подойдите ближе к другим радиостанциям; убедитесь, что антенна надежно закреплена. |
| Плохое качество звука. | Low battery; obstruction between radios; volume too low/high. | Charge battery; clear obstructions; adjust volume. |
If the problem persists after attempting these solutions, please contact your authorized Hytera dealer for assistance.
8. Технические характеристики
The following are general specifications for the Hytera PD365LF. Specific performance may vary based on environmental conditions and configuration.
- Модель: PD365LF
- Бренд: Hytera
- Размеры: Approximately 19 x 13.2 x 6.8 cm (Packaging)
- Масса: Approximately 439.99 grams (Packaging)
- Тип батареи: Литий-ионный аккумулятор (требуется 1 шт., входит в комплект)
- Количество каналов: 32
- Водостойкость: Водостойкий
9. Гарантия и поддержка
Your Hytera PD365LF radio is covered by a limited warranty. For detailed warranty terms and conditions, please refer to the warranty card included with your product or contact your authorized Hytera dealer. For technical support, service, or spare parts, please contact your point of purchase or visit the official Hytera webсайт.
Note: Unauthorized repairs or modifications will void the product warranty.


