1. Введение
The Mastech MS6612 is a digital luxmeter designed for measuring illuminance. It features a large LCD display with backlight and a bar graph for easy reading. This device offers automatic and manual range switching, data hold, peak value measurement, relative value measurement, and zero calibration functions. It is capable of measuring up to 200,000 Lux or 20,000 Foot-Candles (Fc).
2. Информация по технике безопасности
Перед использованием устройства, пожалуйста, внимательно ознакомьтесь со всеми инструкциями по технике безопасности. Несоблюдение этих инструкций может привести к травмам или повреждению счетчика.
- Do not operate the meter in environments with explosive gas, vapor, or dust.
- Избегайте воздействия на измерительный прибор экстремальных температур или высокой влажности.
- Если прибор не используется в течение длительного времени, извлеките батарейки, чтобы предотвратить их протечку.
- Не пытайтесь ремонтировать или модифицировать счетчик. Все работы по обслуживанию должны выполняться квалифицированным персоналом.
- Держите счетчик чистым и сухим.
3. Продукт закончилсяview
The Mastech MS6612 Digital Luxmeter consists of a main unit with an LCD display and control buttons, and a silicon photoelectric diode sensor for light detection.
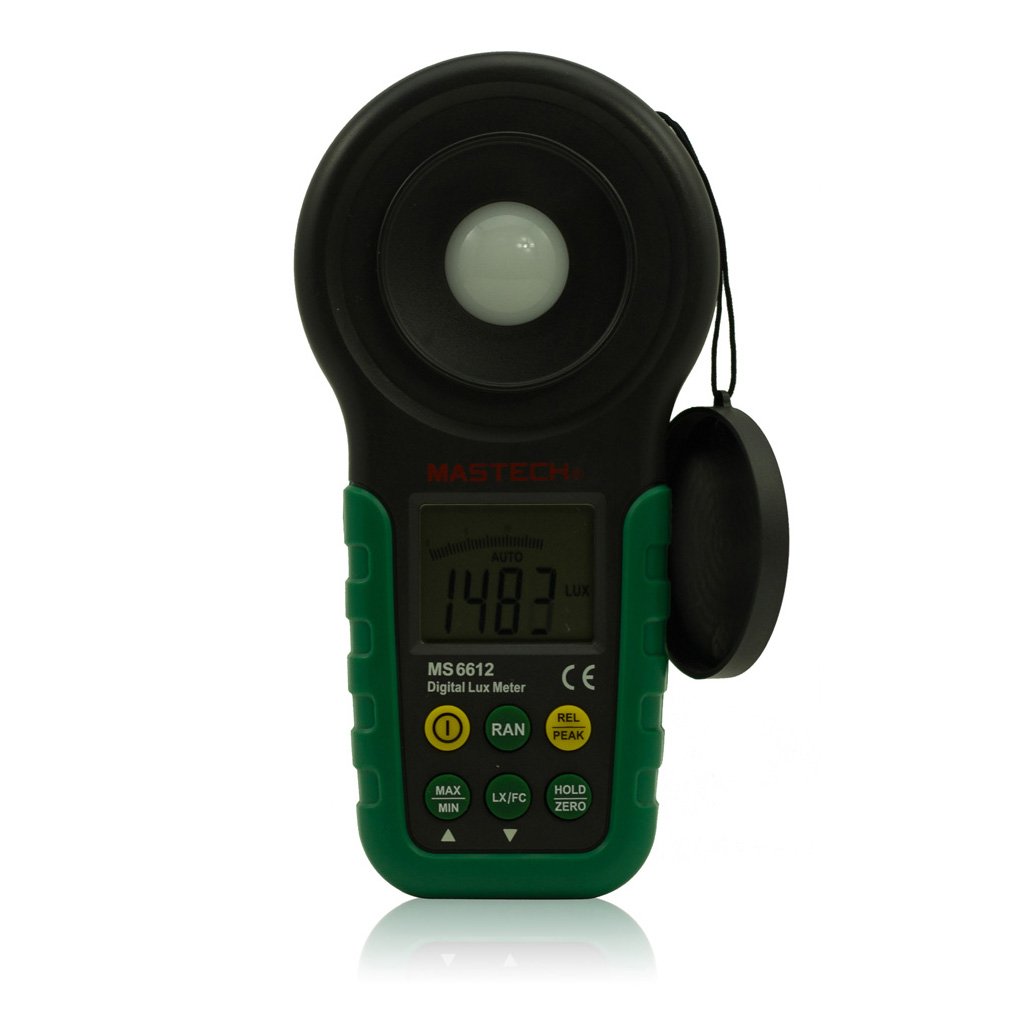
Рисунок 1: Передний view of the Mastech MS6612 Digital Luxmeter. This image shows the main body of the device, including the large LCD screen, control buttons, and the light sensor located at the top.
Ключевые компоненты:
- ЖК-дисплей: 3½ digits with analog bar display for clear readings.
- Кнопки управления: For various functions such as power, range, hold, peak, relative, zero, unit conversion, and mute.
- Датчик освещенности: Silicon photoelectric diode for accurate light measurement.
- Отсек для батареи: Located at the rear for a 9V battery.
4. Настройка
4.1 Установка аккумулятора
- Найдите крышку отсека для батареек на задней панели счетчика.
- При необходимости воспользуйтесь отвёрткой, чтобы открыть батарейный отсек.
- Insert one 9V (IEC 6LR61) battery, observing the correct polarity (+/-).
- Установите на место крышку батарейного отсека и закрепите ее.
Note: A low battery indicator will appear on the display when the battery needs replacement.
5. Инструкция по эксплуатации
5.1 Включение/выключение питания
- Нажмите ВЛАСТЬ кнопку, чтобы включить глюкометр.
- Нажмите ВЛАСТЬ button again to turn the meter off.
- The meter features an automatic power-off function, which will turn off the device if no keys are operated for more than 10 minutes.
5.2 Основные измерения
- Включите счетчик.
- Point the light sensor towards the light source to be measured.
- The illuminance value will be displayed on the LCD. The meter automatically selects the appropriate range.
5.3 Range Switching (Auto/Manual)
The MS6612 supports both automatic and manual range switching.
- In auto-ranging mode, the meter automatically selects the best measurement range.
- Нажмите RANGE button to switch between auto and manual ranging modes. In manual mode, you can cycle through available ranges.
- If the measured value exceeds the current range in manual mode, the LCD will display "OL" (Overload).
5.4 Функция хранения данных
Чтобы зафиксировать текущее значение на дисплее:
- Нажмите ДЕРЖАТЬ кнопка. На дисплее появится индикатор "HOLD".
- Нажмите ДЕРЖАТЬ Нажмите кнопку еще раз, чтобы снять блокировку данных и возобновить измерение в реальном времени.
5.5 Maximum/Minimum Value Measurement
К view the maximum or minimum illuminance recorded during a measurement session:
- Нажмите МАКС/МИН button. The display will show the maximum recorded value.
- Нажимать МАКС/МИН again to cycle to the minimum recorded value.
- Нажимать МАКС/МИН a third time to exit this mode and return to live measurement.
5.6 Peak Value Measurement
This function captures the highest instantaneous illuminance value.
- Нажмите ПИК button to activate peak measurement. The "PEAK" indicator will appear.
- The display will show the highest illuminance detected since activating the function.
- Нажимать ПИК еще раз, чтобы выйти из этого режима.
5.7 Измерение относительной стоимости
This function allows you to set a reference point and measure the difference from that point.
- In a stable light environment, press the ОТН button. The current reading becomes the reference, and the display will show "0".
- Subsequent measurements will show the difference (positive or negative) from this reference value.
- Нажимать ОТН Чтобы снова выйти из режима относительных измерений, сделайте это еще раз.
5.8 Zero Calibration Function
To ensure accuracy, especially in low light conditions, perform a zero calibration.
- Place the light sensor in a completely dark environment (e.g., cover it with an opaque cap).
- Нажмите НОЛЬ button. The display should read "0.00".
- This calibrates the meter to account for any residual sensor output in darkness.
5.9 Unit Conversion (Fc/Lux)
The meter can display measurements in Lux or Foot-Candles (Fc).
- Нажмите ЕДИНИЦА button to toggle between Lux and Fc units.
- The selected unit will be indicated on the LCD.
- Конверсия: 1 Fc = 10.764 Lux; 1 Lux = 0.09290 Fc.
5.10 Touch Tone and Mute Function
The meter may emit a touch tone when buttons are pressed. This can be muted.
- Refer to the specific button on your device for muting the touch tone.
6. Техническое обслуживание
6.1 Очистка
- Протрите счетчикasinг с мягким, дamp Ткань. Не используйте абразивные чистящие средства или растворители.
- Keep the light sensor clean and free from dust or smudges to ensure accurate readings. Use a soft, lint-free cloth.
6.2. Замена батареи
Replace the 9V battery when the low battery indicator appears on the display. Follow the steps in Section 4.1 for battery installation.
6.3 Хранение
- If storing the meter for an extended period, remove the battery to prevent leakage and potential damage.
- Храните глюкометр в прохладном, сухом месте, вдали от прямых солнечных лучей и экстремальных температур.
7. Поиск Неисправностей
| Проблема | Возможная причина | Решение |
|---|---|---|
| Счетчик не включается. | Разряженная или неправильно установленная батарея. | Проверьте полярность батареи, замените батарею. |
| На экране отобразилось "OL". | Measurement value exceeds current range (manual mode). | Switch to a higher range or enable auto-ranging. |
| Неточные показания. | Dirty sensor, uncalibrated zero, or incorrect range. | Clean sensor, perform zero calibration, ensure correct range. |
| Индикатор низкого заряда батареи. | Низкий заряд батареи. | Заменить батарею 9 В. |
8. Технические характеристики
| Параметр | Ценить |
|---|---|
| Диапазоны измерений | 20, 200, 2000, 20000, 200000 Lux 20, 200, 2000, 20000 Фк |
| Отображать | 3½ digits, max reading of 1999, with analog bar display |
| Датчик | Silicon photoelectric diode |
| Measured Spectral Range | 320~730 нм |
| Sampскорость | ≥2 times/s |
| Рабочая температура | -10~50 °C, max 80% RH (Non-Condensed) |
| Температура хранения | -10~50 °C, max 80% RH (Non-Condensed, removing batteries) |
| Операционная среда | Использование внутри помещений |
| Высота | 2000m highest |
| Источник питания | 1 x 9V, IEC 6LR61 battery |
| Срок службы батареи | Приблизительно 200 часов |
| Размеры (ВxШxГ) | 190 мм x 89 мм x 42.5 мм (7.48 x 3.50 x 1.67 дюйма) |
| Вес (без батарей) | Прибл. 360 г (12.7 унция) |
| Вес (с батареями) | Прибл. 420 г (14.8 унция) |
Illuminance Unit Conversion:
- 1 Foot-Candle (Fc) = 10.764 Lux
- 1 Lux = 0.09290 Foot-Candle (Fc)
9. Гарантия и поддержка
Mastech products are designed for reliability and performance. For specific warranty information, please refer to the warranty card included with your purchase or visit the official Mastech website. For technical support or service inquiries, please contact Mastech customer service through their official channels.
Сохраните чек о покупке в качестве подтверждения покупки для предъявления гарантийных претензий.


