Введение
This instruction manual provides detailed guidance for the safe installation, operation, and maintenance of your new Progress Lighting Outdoor Wall Lantern. Please read all instructions carefully before beginning installation and retain this manual for future reference. Proper installation and care will ensure optimal performance and longevity of your lighting fixture.

Изображение: Спереди view of the 1-Light Clear Flat Glass Traditional Outdoor Wall Lantern Light in Antique Bronze finish.
Информация по безопасности
- ПРЕДУПРЕЖДЕНИЕ: Риск поражения электрическим током. Перед установкой или обслуживанием отключите питание от автоматического выключателя или предохранительного щитка.
- All electrical connections must be in accordance with local codes, ordinances, or the National Electric Code (NEC). Contact a qualified electrician if you are unfamiliar with proper electrical wiring installations.
- Используйте только соединители проводов, имеющие сертификаты UL/cUL.
- This fixture is designed for outdoor use and is suitable for wet locations.
- Не превышайте максимальную мощность.tage указано для лампочки.
- При выполнении монтажных работ обязательно надевайте защитные очки и перчатки.
Содержимое упаковки
Убедитесь, что все перечисленные ниже детали входят в комплект поставки:
- A. Fixture Body (1)
- B. Mounting Plate (1)
- C. Mounting Screws (2)
- D. Wire Connectors (3)
- E. Decorative Nuts (2)
- F. Glass Panels (4, pre-installed)
Технические характеристики
| Особенность | Деталь |
|---|---|
| Номер модели | П5607-20 |
| Размеры (Ш x В) | 4-1/2 inches x 8 inches |
| Заканчивать | Античная бронза |
| Тип стекла | Clear Flat Glass |
| Тип лампы | Средняя база (E26) |
| Макс Ватtage | 100 Watts (Incandescent equivalent) |
| Место Рейтинг | Перечислено влажное место |
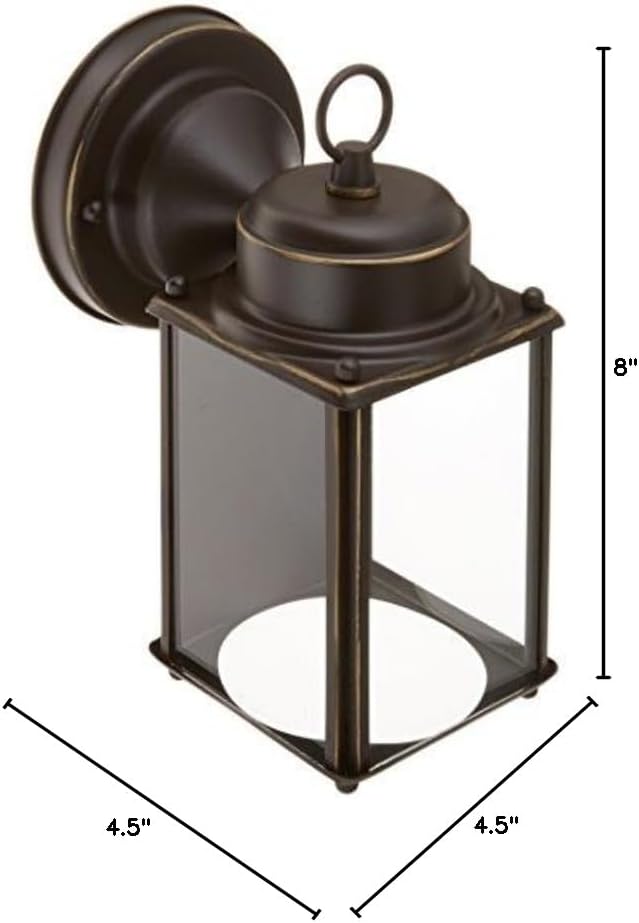
Image: Diagram showing the width (4.5 inches) and height (8 inches) of the wall lantern.
Руководство по установке
Follow these steps for proper installation of your outdoor wall lantern. It is recommended to watch the accompanying video for visual guidance on sizing and placement.
Необходимые инструменты:
- Отвертка с крестообразным шлицем
- Плоская отвертка
- Инструменты для зачистки проводов
- Изолента (опционально)
- Защитные очки
Предварительная установка:
- Отключить питание: Locate the circuit breaker or fuse box that supplies power to the light fixture location. Turn off the main power switch.
- Распакуйте содержимое: Carefully remove all components from the packaging. Keep the packaging materials until installation is complete to ensure no small parts are lost.
- Review existing wiring: Ensure the existing electrical box is securely mounted and capable of supporting the fixture's weight.
Монтаж приспособления:
- Attach the mounting plate (B) to the electrical box using the mounting screws (C). Ensure the plate is level and secure.
- Pull the electrical wires from the electrical box through the center hole of the mounting plate.
Соединения проводки:
- Connect the bare copper ground wire from the fixture to the bare copper ground wire from the electrical box using a wire connector (D). If your electrical box has a ground screw, wrap the fixture's ground wire around it before connecting to the supply ground wire.
- Connect the white (neutral) wire from the fixture to the white (neutral) wire from the electrical box using a wire connector (D).
- Connect the black (hot) wire from the fixture to the black (hot) wire from the electrical box using a wire connector (D).
- Ensure all wire connections are secure. Wrap electrical tape around the wire connectors for added insulation if desired.
Закрепление приспособления:
- Carefully push all excess wiring into the electrical box.
- Align the holes on the fixture body (A) with the threaded posts on the mounting plate (B).
- Secure the fixture body to the mounting plate using the decorative nuts (E). Tighten firmly but do not overtighten.
Установка лампы:
- Insert one medium base (E26) bulb (not included) into the socket. Do not exceed the maximum recommended wattagе 100 Вт.

Изображение: сбоку view of the wall lantern with a clear incandescent bulb installed, showing the internal socket.
Sizing and Selection Guidance Video:
For additional guidance on selecting the appropriate size and mounting height for outdoor lighting fixtures, please watch the official Progress Lighting video below:
Video: An official Progress Lighting guide on sizing and selecting outdoor lighting fixtures, covering optimal placement for entryways, garages, and other outdoor areas.
Инструкция по эксплуатации
Once the fixture is securely installed and wired, restore power at the circuit breaker. The light fixture can then be operated using your wall switch or external control system (if applicable).
Обслуживание
- Уборка: Для очистки светильника выключите питание и дайте ему остыть. Протрите мягкой тряпкой.amp Ткань. Не используйте абразивные чистящие средства или растворители, так как они могут повредить покрытие или стекло.
- Замена лампы: Ensure power is off before replacing the bulb. Allow the bulb to cool completely before touching. Replace with a new medium base (E26) bulb, not exceeding 100 Watts.
- Периодическая проверка: Периодически проверяйте надежность затяжки всех соединений и крепежных элементов.
Поиск неисправностей
| Проблема | Возможная причина | Решение |
|---|---|---|
| Свет не включается. | Нет питания на приспособлении. | Проверьте автоматический выключатель или предохранитель. Убедитесь, что настенный выключатель включён. |
| Ослабленные соединения проводов. | Выключите питание и проверьте все проводные соединения. | |
| Неисправная лампочка. | Заменить лампочку. | |
| Свет мерцает. | Расшатанная лампочка. | Затяните лампочку в патроне. |
| Неправильный тип лампы или мощностьtage. | Ensure bulb meets specifications. | |
| Ослабленная проводка. | Выключите питание и проверьте все проводные соединения. |
Гарантия и поддержка
Progress Lighting products are manufactured to the highest standards and are backed by a limited warranty. For specific warranty details, technical support, or replacement parts, please visit the official Progress Lighting webили обратитесь в службу поддержки клиентов. Сохраните чек в качестве подтверждения покупки.
Для получения более подробной информации посетите: Магазин Progress Lighting на Amazon


