1. Введение
The Nektar Panorama P6 is a 61-key USB MIDI Controller Keyboard designed for deep integration with various Digital Audio Workstations (DAWs). It offers extensive control over your music production environment with its comprehensive set of controls, including a motorized fader, velocity-sensitive keys, and aftertouch.
Основные характеристики:
- 61 semi-weighted, full-size, velocity-sensitive keys with aftertouch.
- 100mm ALPS motorized touch-sensitive high-resolution fader.
- Deep DAW integration for Cubase, Logic, Studio One, Bitwig Studio, Nuendo, Mainstage, Reason, and Reaper.
- Comprehensive MIDI functionality, compatible with all MIDI music software applications.
- Mac and PC compatible.
- Includes PreSonus Studio One Artist DAW license.
2. Что в коробке
Upon unpacking your Nektar Panorama P6, please ensure all the following items are present:
- Nektar Panorama P6 Keyboard
- USB-кабель
- Руководство пользователя (этот документ)
- PreSonus Studio One Artist License
3. Настройка
3.1 Connecting the Panorama P6
The Panorama P6 connects to your computer via a standard USB cable. It can also utilize MIDI ports for external hardware. For optimal performance and to enable the motorized fader, an external power supply (not included) may be required, though the unit can be USB bus-powered for basic functionality.
- Connect one end of the supplied USB cable to the USB port on the Panorama P6.
- Подключите другой конец USB-кабеля к свободному USB-порту вашего компьютера.
- If using an external power supply for the motorized fader, connect it to the DC input on the Panorama P6 and then to a power outlet.
- For MIDI hardware connections, use standard MIDI cables to connect the MIDI OUT port on the Panorama P6 to the MIDI IN port of your external device.

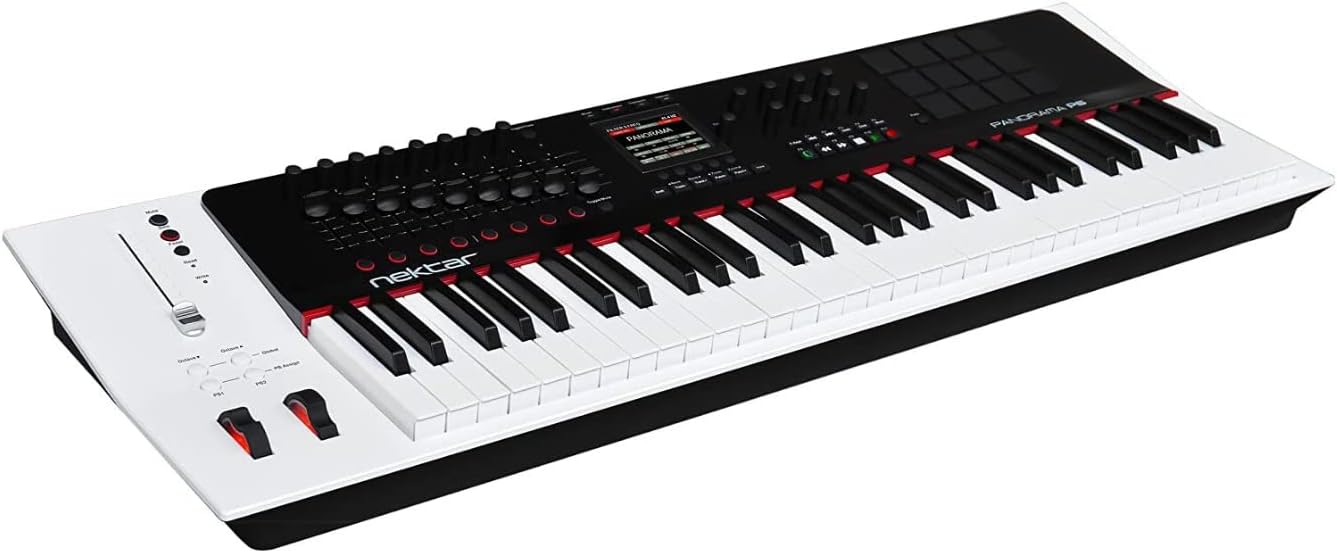
Изображение: Спереди view of the Nektar Panorama P6, showcasing the 61 keys, control surface, and display.
3.2 Driver Installation and DAW Integration
The Panorama P6 is class-compliant on most operating systems (Mac and PC), meaning no specific drivers are usually required for basic MIDI functionality. However, for deep DAW integration, you will need to download and install the appropriate integration files from the Nektar webсайт.
- Visit the official Nektar Technology webсайт (www.nektartech.com) and navigate to the support section for the Panorama P6.
- Download the latest DAW integration files specific to your operating system and preferred DAW (e.g., Cubase, Logic, Reason, Studio One).
- Follow the installation instructions provided with the downloaded files. These typically involve running an installer and then configuring your DAW to recognize the Panorama P6 as a control surface.
- Refer to your DAW's user manual for specific instructions on setting up MIDI controllers and control surfaces.
4. Operating the Panorama P6
4.1 Основные элементы управления
The Panorama P6 features a comprehensive control surface designed for intuitive interaction with your DAW and virtual instruments.
- Клавиатура: The 61 semi-weighted keys provide a responsive playing experience with velocity sensitivity and aftertouch for expressive control.
- колодки: The 12 velocity-sensitive pads are ideal for drumming, triggering sampлесы или пусковые клипы.
- Фейдеры и ручки: A bank of faders and rotary knobs allows for precise control over mixer channels, instrument parameters, and effects. The 100mm motorized fader provides tactile feedback and automatically updates its position to match your DAW's mixer.
- Кнопки: Dedicated buttons for transport control (Play, Stop, Record, etc.), navigation, and various functions streamline your workflow.
- Отображать: The integrated display provides visual feedback on parameters, settings, and DAW status.

Изображение: Крупный план view of the Nektar Panorama P6's control surface, highlighting the pads, rotary knobs, and faders for detailed parameter manipulation.
4.2 Интеграция с DAW
Once properly set up, the Panorama P6 offers deep integration with supported DAWs, allowing you to control various aspects of your software directly from the hardware.
- Управление миксером: Adjust volume, pan, sends, and other mixer parameters. The motorized fader will reflect the selected track's volume.
- Инструментальное управление: Map controls to virtual instrument parameters for hands-on sound design and performance.
- Транспортный контроль: Start, stop, record, fast forward, and rewind your projects without touching your mouse or keyboard.
- Навигация: Browse presets, tracks, and projects directly from the controller.
Изображение: под углом view of the Nektar Panorama P6, providing a perspective of the entire keyboard and its integrated control panel.
5. Техническое обслуживание
5.1 Очистка
To maintain the appearance and functionality of your Panorama P6, follow these cleaning guidelines:
- Always disconnect the power and USB cable before cleaning.
- Use a soft, dry, lint-free cloth to wipe down the surface of the unit.
- Для удаления стойких загрязнений слегкаampПромокните ткань водой. Избегайте использования агрессивных химикатов, абразивных чистящих средств или растворителей, так как они могут повредить покрытие и электронные компоненты.
- Не допускайте попадания жидкостей в отверстия.
5.2 Хранение
When not in use, store the Panorama P6 in a clean, dry environment away from direct sunlight, extreme temperatures, and excessive dust. Consider using a dust cover to protect the keys and control surface.
5.3 обновлений прошивки
Nektar periodically releases firmware updates to improve performance, add features, or address issues. Check the official Nektar Technology website regularly for the latest firmware and installation instructions.
6. Поиск Неисправностей
If you encounter issues with your Nektar Panorama P6, try the following troubleshooting steps:
- Нет питания/Устройство не отвечает:
- Ensure the USB cable is securely connected to both the Panorama P6 and your computer.
- If using an external power supply, verify it is correctly connected and plugged into a working power outlet.
- Попробуйте подключиться к другому USB-порту на вашем компьютере.
- DAW Not Recognizing Panorama P6:
- Confirm that the correct DAW integration files have been installed from the Nektar webсайт.
- Check your DAW's preferences or settings to ensure the Panorama P6 is selected as a MIDI input device and control surface.
- Restart your DAW and/or computer.
- Motorized Fader Not Moving:
- The motorized fader requires an external power supply for full functionality. Ensure an appropriate power supply is connected.
- Verify that the DAW integration is correctly configured and communicating with the Panorama P6.
- Клавиши/панели не реагируют:
- Проверьте настройки MIDI-входа в вашей DAW.
- Ensure the Panorama P6 is in the correct mode for sending MIDI notes (e.g., not in a control-only mode).
If these steps do not resolve your issue, please refer to the Nektar Technology support webсайте или обратитесь в их службу поддержки для получения дополнительной помощи.
7. Технические характеристики
| Особенность | Спецификация |
|---|---|
| Номер модели | P6 |
| Вес товара | 17 фунта |
| Размеры продукта | 39.76 x 12.99 x 3.78 дюйма |
| Цвет | Белый |
| Тип материала | Металл |
| Количество клавиш клавиатуры | 61 |
| Тип ключа | Semi-weighted, Velocity Sensitive, Aftertouch |
| Технология связи | MIDI, USB |
| Тип разъема | USB |
| аппаратный интерфейс | USB |
| Совместимые устройства | Devices with USB and MIDI ports |
| Поддерживаемое программное обеспечение | Cubase, Logic, Studio One, Bitwig Studio, Nuendo, Mainstage, Reason, Reaper |
| Специальная характеристика | Keyboard Controller, Velocity Sensitive Key, Motorized Fader |
8. Гарантия и поддержка
8.1 Информация о гарантии
Nektar products are covered by a limited warranty against defects in materials and workmanship. The specific terms and duration of the warranty may vary by region and product. Please retain your proof of purchase. For detailed warranty information, including coverage and how to make a claim, visit the official Nektar Technology webсайт.
8.2 Поддержка клиентов
For technical assistance, product inquiries, or support, please visit the Nektar Technology support page:
- Webсайт: www.nektartech.com/support
The website provides FAQs, troubleshooting guides, driver downloads, and contact information for direct support.


