1. Важные инструкции по технике безопасности
Please read these instructions carefully before operating the unit and retain them for future reference. Following these guidelines will ensure safe and proper use of your GPX R602B radio.
- Вода и влага: Do not use this apparatus near water. Avoid exposure to rain or moisture.
- Источники тепла: Не устанавливайте вблизи источников тепла, таких как радиаторы, обогреватели, печи или другие приборы (включая amp(жирообразующие вещества), которые вырабатывают тепло.
- Вентиляция: Обеспечьте надлежащую вентиляцию. Не закрывайте вентиляционные отверстия.
- Источники питания: Operate only from the type of power source indicated on the marking label.
- Уборка: Чистить только сухой тканью.
- Вложения: Используйте только те насадки/аксессуары, которые указаны производителем.
- Обслуживание: По всем вопросам обслуживания обращайтесь к квалифицированному обслуживающему персоналу. Обслуживание необходимо, если устройство было каким-либо образом повреждено, например, поврежден шнур питания или вилка, пролита жидкость или в устройство попали предметы, устройство подверглось воздействию дождя или влаги, не работает нормально или его уронили.
Безопасность аккумулятора
- Не смешивайте старые и новые батареи.
- Не смешивайте щелочные, стандартные (угольно-цинковые) и перезаряжаемые (никель-кадмиевые) батареи.
- Insert batteries correctly, observing the + and - polarities.
- Немедленно извлеките разряженные батареи.
- Утилизируйте батарейки надлежащим образом. Не сжигать.
2. Особенности
The GPX R602B Portable AM/FM Radio offers a range of features designed for convenience and versatility:
- Portable AM/FM radio with a built-in handle for easy transport.
- Integrated speakers with analog volume control and durable metal grills.
- Digital clock with user-friendly setting buttons.
- Operates using the built-in AC power cable.
- Can also be powered by 3 C batteries (sold separately) for portable use.
- 3.5mm audio line input jack for connecting external audio devices.
- Telescopic antenna for improved FM reception.
- Stereo headphone jack for private listening.

Figure 2.1: Key features and connection points of the GPX R602B radio.
3. Содержимое упаковки
Upon unpacking your GPX R602B radio, please ensure all the following items are present:
- GPX R602B Portable AM/FM Radio Unit
- Руководство пользователя
- Built-in AC Power Adapter
4. Элементы управления и индикаторы
Familiarize yourself with the controls and indicators on your radio for optimal operation.
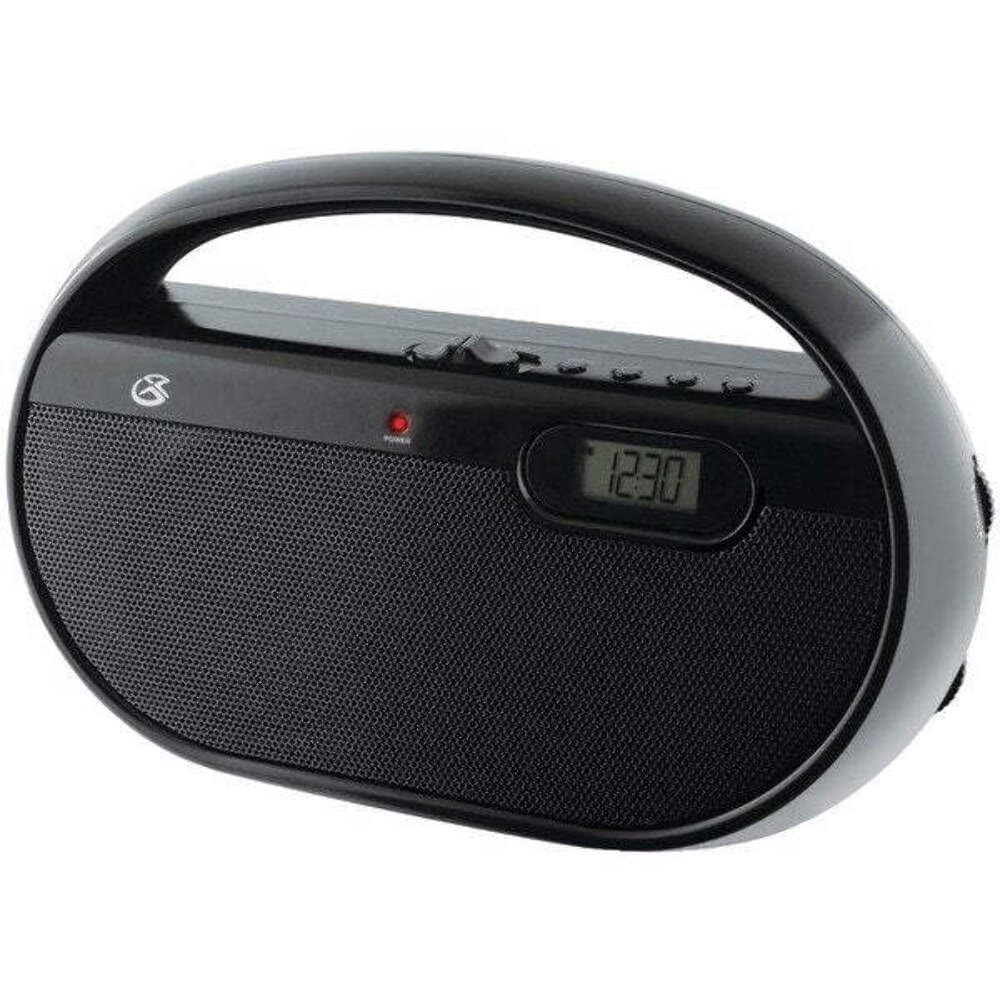
Рисунок 4.1: Передняя часть view of the GPX R602B radio.
Control Layout (Refer to Figure 4.1)
- Ручка питания/громкости: Rotates to turn the unit ON/OFF and adjust the volume level.
- Ручка настройки: Rotates to select AM or FM radio stations.
- Переключатель выбора диапазона: Slides to select between AM and FM radio bands.
- Цифровой дисплей: Shows the current time or radio frequency.
- Кнопка установки времени: Used in conjunction with H/M buttons to set the clock.
- H/M Buttons: Used to adjust hours and minutes when setting the clock.
- Display Time Button: Briefly shows the time when the radio is playing.
- Aux In Jack (3.5mm): Подключите внешние аудиоустройства.
- Разъем для наушников (3.5 мм): Подключите наушники для индивидуального прослушивания.
- Telescopic FM Antenna: Extend and adjust for optimal FM reception.
5. Питание устройства
The GPX R602B radio can be powered by either AC power or batteries.
Работа от сети переменного тока
- Locate the built-in AC power cord. This cord is typically stored in the battery compartment when not in use.
- Plug the AC power cord into a standard wall outlet (120V AC, 60Hz).
- Теперь установка готова к работе.
Питание от батареи
For portable use, the radio requires 3 'C' size batteries (not included).
- Откройте крышку батарейного отсека, расположенную на задней панели устройства.
- Insert 3 'C' size batteries, ensuring the correct polarity (+ and -) as indicated inside the compartment.
- Плотно закройте крышку батарейного отсека.
- The unit is now ready for battery-powered operation.

Figure 5.1: Power options for the GPX R602B radio.
6. Настройка и основные операции
Начальная настройка
- Подключение питания: Connect the radio to AC power or insert batteries as described in Section 5.
- Регулировка антенны: For FM reception, extend the telescopic antenna fully. For AM reception, the unit has a built-in antenna, so no external adjustment is needed. Position the unit for best AM reception.
Управление радио
- Включать: Rotate the Power/Volume knob clockwise until it clicks and the unit powers on.
- Выберите группу: Slide the Band Selector switch to either AM or FM.
- Настройте станцию: Rotate the Tuning knob to find your desired radio station. The frequency will be displayed on the digital screen.
- Отрегулируйте громкость: Rotate the Power/Volume knob to adjust the sound level.
- Выключать: Rotate the Power/Volume knob counter-clockwise until it clicks and the unit powers off.
Using the Line Input (Aux In)
You can connect external audio devices, such as smartphones or MP3 players, to play audio through the radio's speakers.
- Connect a 3.5mm audio cable (not included) from the headphone jack or line-out jack of your external device to the Aux In jack on the radio.
- Turn on the radio and your external device.
- Adjust the volume on both the radio and your external device for optimal sound.

Figure 6.1: Devices compatible with the Aux In feature.
Использование наушников
For private listening, plug standard 3.5mm headphones (not included) into the Headphone Jack. The internal speakers will automatically mute.
Установка цифровых часов
The digital clock can be set when the radio is turned off.
- Ensure the radio is turned OFF using the Power/Volume knob.
- Нажмите и удерживайте обе кнопки Установить время кнопка и В/М кнопку одновременно.
- Удерживая Установить время button, repeatedly press the В/М button to adjust the hour and then the minutes.
- Выпустите Установить время button once the desired time is set.
- К view the time while the radio is playing, press the Время отображения button. The time will appear briefly on the digital display.
7. Техническое обслуживание
Proper care and maintenance will ensure the longevity of your GPX R602B radio.
- Уборка: Протирайте внешнюю поверхность устройства мягкой сухой тканью. Не используйте абразивные чистящие средства, воск или растворители.
- Замена батареи: If using batteries, replace all three 'C' batteries when the unit's performance diminishes. Always replace with new batteries of the same type.
- Хранилище: If storing the unit for an extended period, remove the batteries to prevent leakage and corrosion.
8. Поиск Неисправностей
If you encounter issues with your GPX R602B radio, refer to the following common problems and solutions:
| Проблема | Возможная причина | Решение |
|---|---|---|
| Нет электричества | AC cord not plugged in; Batteries exhausted or incorrectly inserted. | Ensure AC cord is securely plugged into a live outlet. Replace batteries with new ones, checking polarity. |
| Плохой прием радиосигнала | Antenna not extended (FM); Unit poorly positioned (AM); Weak signal. | Extend and adjust the telescopic FM antenna. For AM, rotate the unit for better reception. Try moving the radio to a different location. |
| Нет звука от динамиков | Слишком низкая громкость. Подключены наушники. | Increase the volume using the Power/Volume knob. Disconnect headphones if not desired. |
| Clock not setting correctly | Неправильная последовательность нажатия кнопок. | Ensure the radio is OFF. Press and hold both 'Set Time' and 'H/M' buttons simultaneously, then repeatedly press 'H/M' to adjust. Release 'Set Time' when done. |
| Звук искажен или нечеток | Volume too high; Poor reception; External device volume too high. | Lower the volume. Adjust antenna or unit position for better reception. If using Aux In, adjust volume on the external device. |
9. Технические характеристики
Detailed technical specifications for the GPX R602B Portable AM/FM Radio:
- Номер модели: Р602Б
- Размеры продукта (Д x Ш x В): 9.62 x 3.74 x 6.3 дюйма (24.43 x 9.50 x 16.00 см)
- Вес товара: 1.76 фунта (0.80 кг)
- Источник питания: AC 120V, 60Hz or 3 x 'C' size batteries (not included)
- Технология тюнера: АМ/ФМ
- Поддерживаемые радиодиапазоны: 2-Band (AM/FM)
- Технологии подключения: Radio, 3.5mm Aux In
- Особые характеристики: Built-In AM Antenna, Built-In Clock, Portable, Telescopic FM Antenna, 3.5mm Headphone Jack
- Цвет: Черный
- Производитель: Цифровые продукты International, Inc.
- Дата первой доступности: 5 июня 2012 г.
10. Гарантия и поддержка
For warranty information and customer support regarding your GPX R602B radio, please refer to the warranty card included with your purchase or visit the official GPX webСохраните чек о покупке в качестве подтверждения покупки на случай предъявления гарантийных претензий.
If you require technical assistance or have questions not covered in this manual, please contact GPX customer service directly. Contact details are typically available on the manufacturer's webсайте или в упаковке продукта.


