1. Введение
This manual provides comprehensive instructions for the setup, operation, and maintenance of your Geemarc CL100 Amplified Big Button Corded Phone. Please read this manual carefully to ensure proper use and to maximize the benefits of your new telephone.
The Geemarc CL100 is designed for ease of use, featuring large buttons, adjustable amplification, and visual indicators, making it suitable for individuals with hearing or visual impairments. This telephone is line-powered and does not require an external power source.
Важное примечание: This telephone does not include a built-in answering machine, speakerphone, caller display, talking caller ID, talking keypad, or voice assist functionality.
2. Продукт закончилсяview
2.1 Содержимое упаковки
- Geemarc CL100 Corded Telephone Base
- Трубка
- Спиральный телефонный шнур
- Телефонный шнур
- Руководство пользователя (этот документ)
2.2 Telephone Layout
Familiarize yourself with the key components and controls of your Geemarc CL100 phone.

Рисунок 1: Нисходящий view of the Geemarc CL100 phone, illustrating the large numeric keypad, function buttons, and memory slots.
- Телефон: For speaking and listening during calls.
- Цифровая клавиатура: Large, easy-to-read buttons for dialing numbers.
- P1, P2, P3 Buttons: Priority memory buttons for frequently called numbers.
- Кнопки M1-M9: One-touch memory buttons for storing additional numbers.
- Кнопка повторного набора: Набирает последний набранный номер.
- Кнопка вспышки: Используется для сетевых служб (например, ожидания вызова).
- Кнопка магазина: Used for programming memory numbers.
- Кнопка выключения звука: Временно отключает микрофон во время звонка.
- Переключатель регулировки тембра: Adjusts the audio tone for clearer conversations.
- Переключатель громкости: Adjusts the receiving volume during a call.
- Visual Ringer Indicator: Flashes when an incoming call is received.
- Memory Index Card: Pull-out card for noting stored memory numbers.

Рисунок 2: Сторона view of the phone, illustrating the ringer ON/OFF switch and the telephone line connection port.
3. Настройка
3.1 Подключение телефона
- Подключите трубку: Plug one end of the coiled handset cord into the handset and the other end into the handset jack on the side of the telephone base.
- Подключите телефонную линию: Plug one end of the telephone line cord into the jack labeled with a telephone icon on the back or side of the phone base. Plug the other end into your wall telephone jack.
- Источник питания: The Geemarc CL100 is powered by the telephone line and does not require an external power adapter.
- Переключатель звонка: Ensure the ringer switch (located on the side) is set to "Low" or "High" for audible ringing.
3.2 Первоначальные проверки
- Поднимите трубку и дождитесь гудка. Если гудка нет, проверьте все соединения.
- Make a test call to ensure proper functionality.
4. Инструкция по эксплуатации
4.1 Совершение звонка
- Поднимите трубку.
- Дождитесь гудка.
- Dial the required number using the numeric keypad.
- Upon completion of the call, carefully replace the handset in the cradle to disconnect.
4.2 Ответ на вызов
When an incoming call is received, the phone will ring and the visual indicator will flash.
- Поднимите трубку, чтобы ответить на вызов.
- Upon completion of the call, carefully replace the handset in the cradle.
4.3 Повторный набор последнего номера
- Поднимите трубку.
- Дождитесь гудка.
- Нажмите Повторный набор button. The previously dialed number will be automatically redialed.
- Note: This function does not apply to numbers dialed from memory buttons.
4.4 Функция отключения звука
The Mute button allows you to speak privately without your caller overhearing.
- Во время разговора нажмите кнопку Немой button. You will still hear the caller, but they will not hear you.
- Нажмите Немой button again to resume normal conversation.
4.5 Storing Telephone Numbers (Memory Dialing)
Your telephone can store 12 direct memory numbers: 3 priority numbers (P1, P2, P3) and 9 standard memory numbers (M1-M9). Priority memories can store up to 24 digits, and M1-M9 can store up to 32 digits.
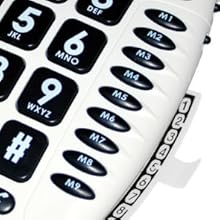
Рисунок 3: Detail of the memory buttons (M1-M9) and the integrated memory index card.
- Поднимите трубку.
- Нажмите Магазин кнопка.
- Наберите номер телефона, который хотите сохранить.
- Нажмите Магазин кнопку еще раз.
- Press the desired memory button (P1, P2, P3, or M1-M9) where you want to save the number.
- Замените трубку.
- Note: Use the index card located under the base to record your stored numbers for easy reference. Stored memories are protected even if the phone line is unplugged.
4.6 Dialing Stored Numbers
- Поднимите трубку.
- Дождитесь гудка.
- Press the appropriate memory button (P1, P2, P3, or M1-M9). The stored number will be dialed automatically.
4.7 Recall (R), * & # Buttons
These buttons are used in conjunction with new services provided on digital exchanges. For specific details on their use, please contact your network operator.
4.8 Совместимость со слуховыми аппаратами
If you are using this telephone with a hearing aid, set your hearing aid to the "T" (Telecoil) setting for optimal audio quality.
5. Техническое обслуживание
- Уборка: Протрите телефон мягкой тряпкой.amp Ткань. Не используйте абразивные чистящие средства или растворители.
- Хранилище: Храните телефон в прохладном, сухом месте, вдали от прямых солнечных лучей и экстремальных температур.
- Избегайте жидкостей: Do not expose the telephone to water or other liquids.
- Уход за шнуром: Ensure the handset and line cords are not tangled or pinched to prevent damage.
6. Поиск Неисправностей
| Проблема | Возможная причина | Решение |
|---|---|---|
| Нет гудка | Телефонный шнур подключен неправильно. | Check that both ends of the telephone line cord are securely plugged in. |
| Не слышу звонящего / Звонящий меня не слышит | Volume settings are too low or Mute is active. | Adjust the Volume control. Ensure the Mute button is not pressed. |
| Телефон не звонит | Ringer switch is set to "Off". | Set the ringer switch (on the side) to "Low" or "High". |
| Stored memory numbers are lost | This phone protects stored memories even if the phone line is unplugged. If numbers are lost, they may not have been stored correctly. | Re-store the numbers following the instructions in Section 4.5. |
| Difficulty dialing quickly | Some older phone systems may require a slower dialing pace. | Try dialing at a slightly slower pace. Consider using the memory dial function for frequently called numbers. |
7. Технические характеристики
- Модель: Geemarc CL100
- Тип: Проводной телефон
- Ampлификация: Up to 30 dB receiving volume
- Громкость звонка: Adjustable up to 85 dB
- Память: 3 Priority (P1-P3), 9 One-touch (M1-M9)
- Источник питания: Line-powered (no external adapter required)
- Совместимость со слуховым аппаратом: Yes (T-coil setting)
- Размеры: Примерно 7.5 х 8 х 3 дюйма (19 х 20.3 х 7.6 см)
- Масса: Примерно 2.25 фунта (1.02 кг)
- Цвет: Белый
8. Гарантия и поддержка
8.1 Информация о гарантии
For information regarding the warranty period and terms for your Geemarc CL100 telephone, please refer to the warranty card included with your purchase or visit the official Geemarc webСохраните чек о покупке для предъявления гарантийных претензий.
8.2 Поддержка клиентов
If you encounter any issues not covered in the troubleshooting section or require further assistance, please contact Geemarc customer support. Contact details can typically be found on the Geemarc webсайте или на упаковке продукта.
Для получения онлайн-ресурсов посетите: www.geemarc.com