Введение
This manual provides comprehensive instructions for the safe and effective operation, maintenance, and troubleshooting of the Testo 400563 4354 IAQ Kit. This device is designed for simple and intuitive operation for reading, saving, and analyzing ventilation and indoor air quality parameters, including Relative Humidity (RH), Temperature, Carbon Dioxide (CO2), and Barometric Pressure.
Информация по безопасности
Please read this section carefully before operating the device. Failure to comply with these instructions may result in injury or damage to the instrument.
- Always operate the device within its specified operating temperature and humidity ranges.
- Не подвергайте устройство воздействию экстремальных температур, прямых солнечных лучей или агрессивных сред.
- Не роняйте устройство и не подвергайте его сильным ударам.
- Only use specified batteries and dispose of them properly.
- Не пытайтесь вскрывать или ремонтировать устройство самостоятельно. По всем вопросам обслуживания обращайтесь к квалифицированному персоналу.
- Содержите устройство в чистоте, не допускайте попадания пыли и мусора.
Продукт болееview
The Testo 400563 4354 IAQ Kit is a versatile instrument for environmental measurements. Familiarize yourself with its components:
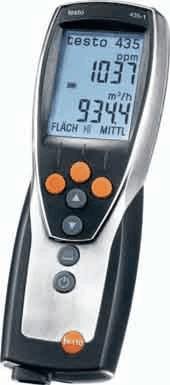
Рисунок 1: Testo 435-4 IAQ Meter. This image displays the handheld meter, featuring a large digital display at the top showing readings like "1037 ppm" and "934.4 m³/h". Below the screen are several control buttons: three orange circular buttons at the top, followed by two grey arrow buttons (up and down), another grey circular button, and finally a power button with a power symbol. The device has a sleek, ergonomic design with a black body and silver-colored accents.
Ключевые компоненты:
- Отображать: Large LCD for clear reading of measurement values and menu navigation.
- Кнопки управления: Intuitive buttons for power, navigation, selection, and function activation.
- Вход датчика: Port for connecting various probes (e.g., CO2, humidity, temperature).
- Отсек для батареи: Located at the rear for power supply.
Настраивать
1. Установка батареи:
- Найдите крышку батарейного отсека на задней панели устройства.
- Open the cover by sliding or unscrewing it (refer to specific model instructions if screws are present).
- Insert the required batteries (e.g., AA or AAA, typically 3 or 4) ensuring correct polarity (+/-).
- Плотно закройте крышку батарейного отсека.
2. Подключение зонда:
- Connect the desired measurement probe (e.g., CO2 probe, humidity/temperature probe) to the designated input port on the device.
- Ensure the connection is firm and secure to prevent inaccurate readings.
Инструкция по эксплуатации
1. Включение/выключение:
- Чтобы включить, нажмите и удерживайте Власть button (usually marked with Ⓢ) до тех пор, пока не загорится дисплей.
- Чтобы выключить, нажмите и удерживайте Власть кнопку еще раз, пока дисплей не погаснет.
2. Проведение измерений:
- Once powered on and a probe is connected, the device will typically display real-time measurements for the connected parameters (e.g., CO2 in ppm, Temperature in °C/°F, RH in %).
- Position the probe in the environment you wish to measure. Ensure proper air circulation around the sensor for accurate readings.
- Allow a few moments for readings to stabilize, especially for CO2 and humidity.
3. Navigating Menus and Saving Data:
- Используйте Вверх/Вниз arrow buttons to navigate through different measurement modes or menu options.
- Нажмите Enter / ОК button (often a central circular button) to select an option or confirm a setting.
- To save a measurement, look for a Сохранять or Память button/option. Follow the on-screen prompts to store data.
- To recall saved data, navigate to the Память or Отзывать опция меню.
Обслуживание
1. Очистка:
- Протрите устройство casinг с мягким, дamp Ткань. Не используйте абразивные чистящие средства или растворители.
- Ensure no liquid enters the sensor openings or electrical connections.
- For probes, follow specific cleaning instructions provided with the probe itself.
2. Замена батареи:
- Заменяйте батареи, когда на дисплее появляется индикатор низкого заряда батареи.
- Всегда используйте новые батарейки указанного типа.
- Утилизируйте старые батареи в соответствии с местными правилами.
3. Калибровка:
- Regular calibration is essential for maintaining measurement accuracy.
- Refer to the device's on-screen calibration menu or consult Testo's official support for recommended calibration intervals and procedures.
- Some probes may require specific calibration gases or humidity standards.
Поиск неисправностей
| Проблема | Возможная причина | Решение |
|---|---|---|
| Устройство не включается. | Разряженные или неправильно установленные батареи. | Проверьте полярность батареек; замените их новыми. |
| Неточные показания. | Sensor dirty, damaged, or out of calibration; improper probe connection. | Clean sensor; ensure probe is securely connected; perform calibration. |
| Display shows "Error" or "---". | Sensor malfunction; out of measurement range; internal error. | Check probe connection; move to an environment within measurement range; restart device; contact support if persistent. |
| Не удаётся сохранить данные. | Memory full; incorrect save procedure. | Delete old data; refer to operating instructions for saving data. |
Технические характеристики
The following specifications are for the Testo 400563 4354 IAQ Kit:
- Тип продукта: CO2/Temp/RH/Barometric Meter
- Модель: 400563 4354
- Бренд: Тесто
- Номер детали: АО-10382-23
- Количество в упаковке: КАЖДЫЙ
- Размеры упаковки: 16.3 x 13 x 4.3 дюймов; 8.2 фунта
- ASIN: B00481RUUA
- Первая доступная версия: 18 июля 2012 г.
Note: Specific measurement ranges and accuracies depend on the probes used with the device. Refer to individual probe documentation for detailed specifications.
Гарантия и поддержка
For warranty information, technical support, or service inquiries, please contact Testo customer service or visit their official webсайт.
Более подробную информацию и контактные данные вы можете найти на Магазин Testo на Amazon.


