1. Введение и окончаниеview
This manual provides essential instructions for the setup, operation, and maintenance of your Prechen HD-173 16.2-inch 2K Touchscreen Portable Monitor. Please read this manual thoroughly before using the device to ensure proper functionality and longevity.
Основные характеристики:
- 16.2" 2K QHD IPS Panel: Features an 800 nits brightness, 178° viewing angle, and 1000:1 contrast ratio for vivid colors and sharp details.
- 10-точечное мультитач-управление: Responsive touch functionality, optimized for interactive monitoring with Aida64 on Windows. (Note: iOS devices support single touch only).
- Dedicated Aida64 Monitoring: Designed as a secondary display for real-time CPU/GPU usage, temperatures, fan speeds, and custom sensor panels.
- Двойное подключение: Equipped with HDMI and USB-C ports for easy connection to laptops, PCs, and gaming consoles.
- Премиум-металлоконструкции: Durable full-metal casing suitable for PC case integration, portability, or DIY projects.
Important Note on Power and Touchscreen Configuration:
Due to its higher power consumption, always connect the monitor to a power source before plugging in the HDMI or USB-C signal cable. This ensures full touchscreen functionality and stable operation, especially with high brightness settings.

Image 1.1: The Prechen HD-173 16.2-inch 2K Touchscreen Portable Monitor, showcasing его элегантный дизайн и яркий дисплей.

Image 1.2: Multiple Prechen monitors arranged to display vibrant graphics, highlighting the visual quality.
2. Настройка
Follow these steps to connect your Prechen HD-173 monitor to your device.
2.1 Порт Оверview
Familiarize yourself with the available ports on your monitor:
- Аудиоразъем: Для подключения внешних наушников или динамиков.
- Type-C (Full-featured USB-C): Supports power, video, and touch signal transmission.
- HDMI: Для ввода видеосигнала.
- Мощность постоянного тока: Для внешнего источника питания.
- USB 2.0: For connecting peripherals or additional power.
- Luminance + / Volume - / Menu / ON / OFF buttons: For monitor control.

Изображение 2.1: Подробно view портов и кнопок управления монитора.
2.2 Способы подключения
Always connect the power adapter to the monitor first to ensure stable power before connecting any signal cables.
Method 1: Full-featured USB-C Connection (USB-C 3.1 or higher)
This method requires a single USB-C to USB-C cable and a power adapter (required).
- Connect the power adapter to the monitor's DC Power or Type-C port.
- Connect one end of the USB-C to USB-C cable to the monitor's Type-C port.
- Connect the other end of the USB-C to USB-C cable to your device's full-featured USB-C port.
This connection provides video, touch, and power (if your device supports power delivery through USB-C).
Method 2: HDMI and USB Connection
This method requires an HDMI cable, a USB-A to USB-C cable (for touch functionality), and a power adapter (required).
- Connect the power adapter to the monitor's DC Power or Type-C port.
- Подключите один конец кабеля HDMI к порту HDMI монитора.
- Connect the other end of the HDMI cable to your device's HDMI port.
- Connect one end of the USB-A to USB-C cable to the monitor's Type-C port.
- Connect the USB-A end of the cable to your device's USB-A port for touch signal.
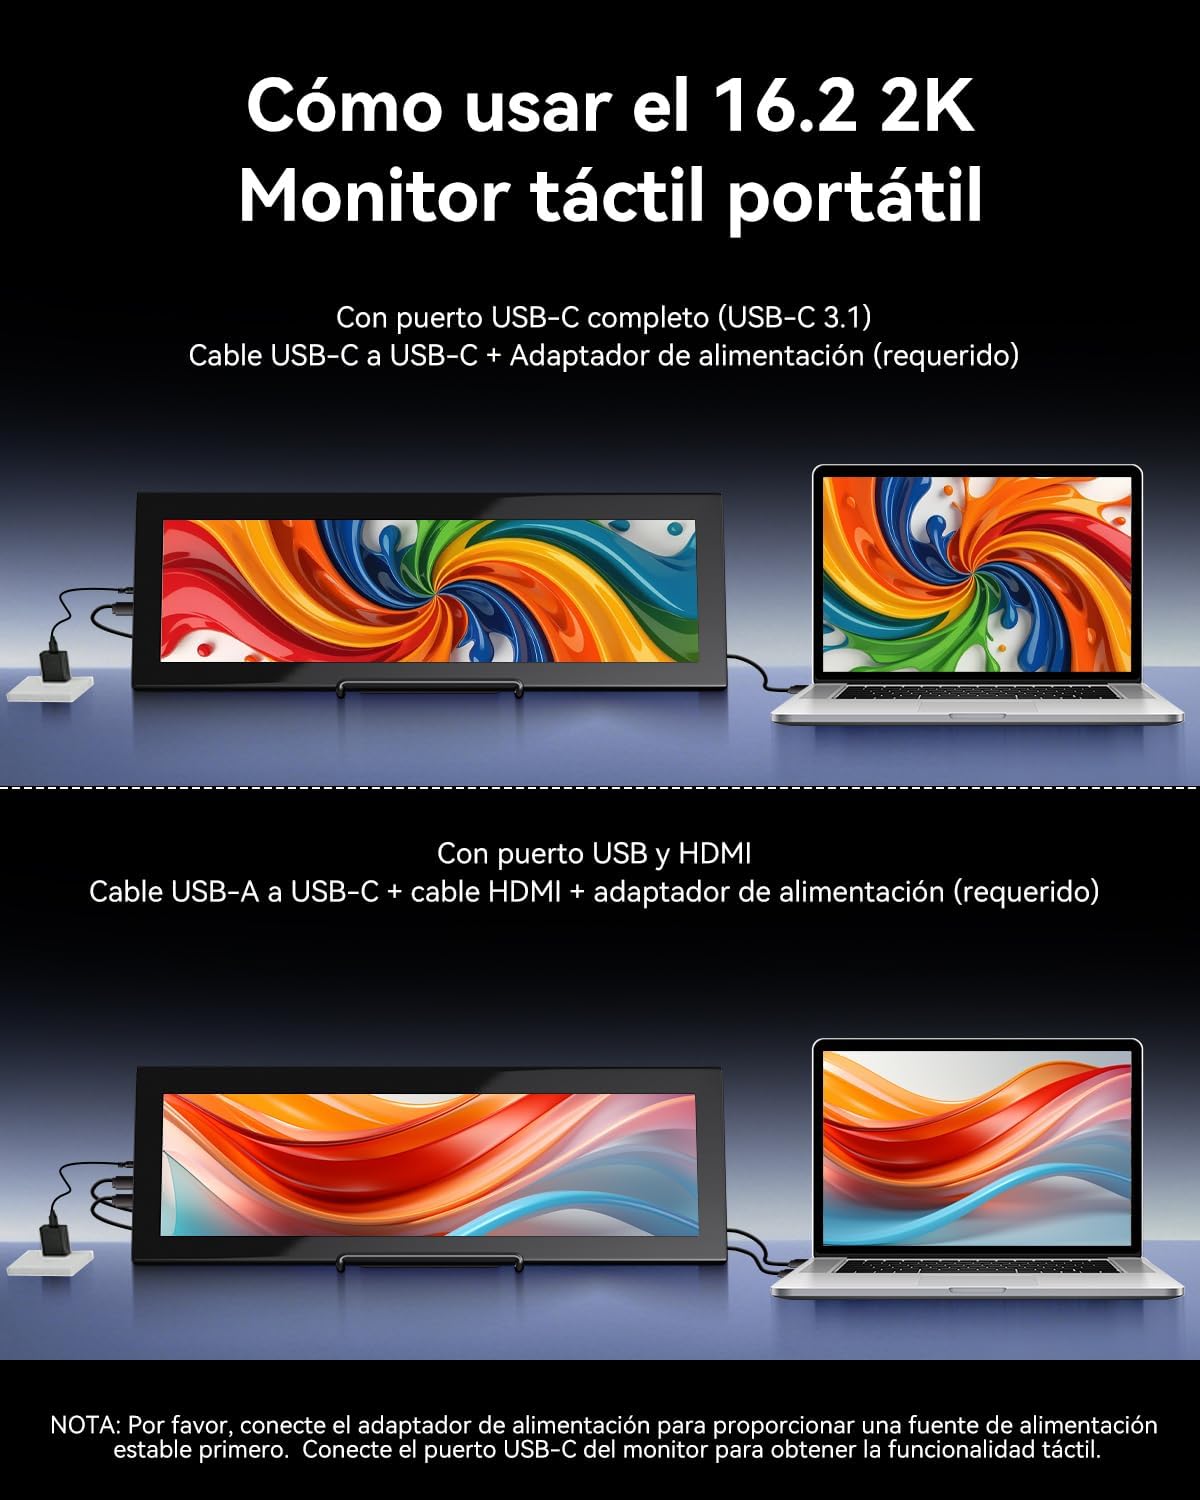
Image 2.2: Visual guide for connecting the monitor using either a single USB-C cable or HDMI with a USB-A cable for touch.

Image 2.3: Illustration of the monitor's broad compatibility with devices like cameras, PCs, Xbox, PS4/5 via HDMI, and Switch, MacBooks, phones, tablets via USB-C.
3. Инструкция по эксплуатации
3.1 Включение/выключение и основные элементы управления
Use the buttons on the side of the monitor to control its functions:
- ВКЛ/ВЫКЛ: Press and hold to power the monitor on or off.
- Меню: Press to access the On-Screen Display (OSD) menu.
- Luminance +: Increases brightness. Also used for navigation in the OSD menu.
- Объем -: Decreases volume. Also used for navigation in the OSD menu.
3.2 Функциональность сенсорного экрана
The monitor supports 10-point multi-touch for interactive use.
- Устройства Windows: Fully plug-and-play; no drivers required for touch functionality.
- Apple Devices (iOS/macOS): Only supports single-touch input. Multi-touch gestures are not supported.
- Linux Devices: Not compatible with touch functionality.

Image 3.1: Illustration of various 10-point multi-touch gestures supported by the monitor.

Image 3.2: A compatibility chart indicating which devices support multi-touch, single-touch, or no touch functionality.
3.3 Aida64 Monitoring
This monitor is specifically designed as a secondary display for Aida64 on Windows. It allows you to view real-time hardware statistics without cluttering your primary screen.
- Connect the monitor to your Windows PC as described in the Setup section.
- Install and configure Aida64 software on your PC.
- Utilize Aida64's sensor panel feature to display CPU/GPU usage, temperatures, fan speeds, and other custom data on the Prechen monitor.

Image 3.3: The monitor displaying Aida64 hardware monitoring data, showing CPU and GPU statistics.

Image 3.4: The monitor seamlessly integrated into a PC case, demonstrating its use for Aida64 hardware monitoring.
4. Техническое обслуживание
Правильный уход и обслуживание продлят срок службы вашего монитора.
4.1 Очистка экрана
- Перед чисткой всегда выключайте монитор и отключайте его от сети.
- Используйте мягкую безворсовую ткань (рекомендуется микрофибра).
- Для удаления стойких пятен слегка потритеampПротрите ткань водой или специальным средством для чистки экранов. Не распыляйте жидкость непосредственно на экран.
- Avoid using harsh chemicals, alcohol, or abrasive cleaners, as these can damage the screen coating.
4.2 Общий уход
- Держите монитор вдали от прямых солнечных лучей, чрезмерного тепла и влажности.
- Не кладите тяжелые предметы на монитор.
- Не закрывайте вентиляционные отверстия.
- If transporting the monitor, use appropriate protective packaging.
5. Поиск Неисправностей
Если у вас возникли проблемы с монитором, ознакомьтесь со следующими распространенными проблемами и решениями:
| Проблема | Возможная причина | Решение |
|---|---|---|
| Мерцание экрана или нестабильное изображение | Недостаточное электропитание. | Ensure the monitor is connected to a dedicated power adapter (PD20W or higher recommended). Always connect power before signal cables. Use a high-quality Type-C to Type-C cable if using USB-C for power. |
| Сенсорный экран не отвечает | Incorrect connection order or insufficient power. Incompatible device. | 1. Ensure the power adapter is connected to the monitor first, then the signal cable (HDMI or USB-C). 2. Verify your device's USB-C port supports video and touch (full-featured USB 3.1). 3. If using HDMI, ensure the USB-A to USB-C cable is connected for touch. 4. Note: iOS devices only support single touch. Linux devices are not supported for touch. |
| Не обнаружен сигнал | Incorrect cable connection or input source. | 1. Check all cable connections (HDMI, USB-C) are secure. 2. Ensure the correct input source is selected on the monitor (if applicable via OSD menu). 3. Test with another device or cable if possible. |
| Монитор не включается | No power or faulty power adapter. | 1. Ensure the power adapter is securely connected to a working power outlet and the monitor. 2. Try a different power adapter if available. |
| Apple device touch is single-point only | This is a known compatibility limitation. | Apple devices (iOS/macOS) are designed to support only single-touch input with this monitor. Multi-touch gestures are not available. |
| No support for Linux devices | Несовместимость операционных систем. | This monitor is not compatible with Linux-based devices or consoles. |
6. Технические характеристики
Detailed technical specifications for the Prechen HD-173 monitor:
| Особенность | Спецификация |
|---|---|
| Бренд | Прехен |
| Номер модели | HD-173 |
| Размер экрана | 16.2 дюйма |
| Максимальное разрешение | 2608x720 Pixels (2K QHD) |
| Тип панели | ИПС |
| Технология отображения | ВЕЛ |
| Частота обновления | 60 Гц |
| Время отклика | 3 миллисекунды |
| Коэффициент контрастности | 1000:1 |
| Описание поверхности экрана | Глянцевый |
| Технология связи | USB Type-C, HDMI, USB |
| аппаратный интерфейс | HDMI |
| Цвет | Черный |
| Размеры товара (Д x Ш x В) | 3 х 15 х 44.3 см |
| Вес товара | 2.3 кг |
| Производитель | Shenzhen Kenowa Electronics Co., LTD |
| Страна происхождения | Китай |
| СКП | 753018887476 |

Image 6.1: Visual comparison highlighting the superior detail of 2K (2608x720) resolution compared to 1080P.

Изображение 6.2: Монитор отображаетasing its 800 nits brightness for clear and brilliant images.
7. Гарантия и поддержка
7.1 Гарантия на продукт
This product comes with a 1-year limited warranty from the date of purchase. Please retain your proof of purchase for warranty claims. The warranty covers manufacturing defects but does not cover damage caused by misuse, accidents, unauthorized modifications, or normal wear and tear.
7.2 Поддержка клиентов
For technical assistance, warranty claims, or any questions regarding your Prechen HD-173 monitor, please contact the seller or manufacturer through the platform where you purchased the product. Provide your model number (HD-173) and a detailed description of the issue for faster service.