Введение
This manual provides detailed instructions for the installation, operation, and maintenance of your MekedeTech Android 13 Car Touch Screen Head Unit. This unit is specifically designed for Toyota RAV4 models from 2020 to 2022, offering advanced features such as wireless CarPlay/Android Auto, 4G LTE connectivity, and a high-resolution 12.3-inch QLED display. Please read this manual thoroughly before use to ensure proper functionality and safety.
Информация по безопасности
- Перед началом любых работ по установке или подключению проводов всегда убедитесь, что автомобиль припаркован и двигатель выключен.
- Professional installation is recommended to avoid damage to the unit or vehicle's electrical system.
- Не используйте устройство таким образом, чтобы это отвлекало вас от вождения. Всегда ставьте безопасность дорожного движения на первое место.
- Беречь устройство от воды, влаги и экстремальных температур.
- Во избежание повреждений используйте только предоставленные кабели и аксессуары.
Содержимое упаковки
Убедитесь, что все перечисленные ниже предметы включены в ваш пакет:
- Главный блок (машина)
- Кабель питания + Canbus-коробка
- RCA кабель
- Кабель для камеры заднего вида
- Кабель аудиовыхода
- USB Plugs (various types)
- 4G Антенна
- GPS-антенна
- Микрофон (микрофон)
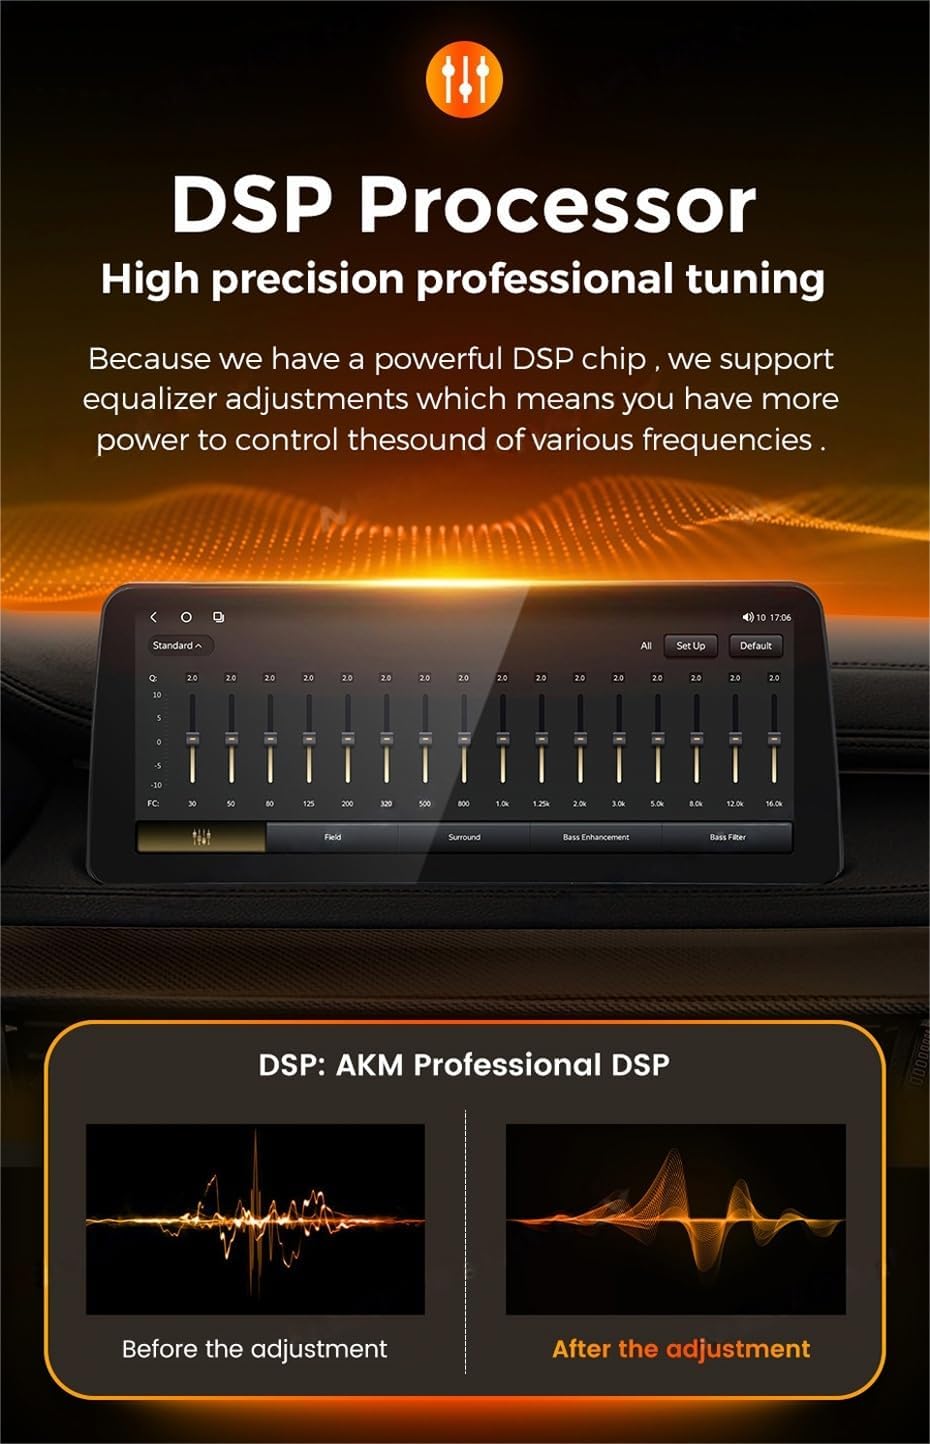
Figure 1: Contents of the product package, including the main unit and all necessary cables and antennas.
Настраивать
1. Проверки перед установкой
- Ensure your vehicle is a Toyota RAV4 model from 2020, 2021, or 2022.
- Gather all necessary tools for installation (e.g., screwdrivers, trim removal tools).
- Перед началом любых электромонтажных работ отсоедините аккумулятор автомобиля.
2. Этапы установки
The installation process is largely plug-and-play, minimizing the need for splicing wires. However, specific steps may vary slightly depending on your vehicle's trim level. Refer to your vehicle's service manual for detailed dashboard disassembly instructions.
- Аккуратно снимите оригинальную автомобильную магнитолу и декоративную накладку приборной панели.
- Подключите прилагаемый кабель питания и блок Canbus к жгуту проводов автомобиля.
- Connect the GPS antenna and 4G antenna to their respective ports on the new head unit. Position the antennas in a location with clear signal reception.
- Connect any additional cables such as RCA, reversing camera, USB, and microphone as needed.
- Надежно закрепите новое головное устройство в отверстии на приборной панели.
- Reconnect the vehicle's battery and test the unit's functionality before reassembling the dashboard trim.

Figure 2: Visual comparison of the car's interior before and after the head unit installation.
Инструкция по эксплуатации
1. Основные операции
- Включение/выключение питания: Press and hold the power button (if available) or turn on the vehicle'ignition.
- Регулятор громкости: Adjust volume using the on-screen controls, steering wheel controls, or physical buttons if present.
- Сенсорный экран: Navigate the interface by tapping, swiping, and pinching on the 12.3-inch QLED display.
2. Беспроводная поддержка CarPlay и Android Auto
The unit supports wireless CarPlay for iOS devices and wireless Android Auto for Android devices.
- Убедитесь, что Bluetooth включен на вашем смартфоне.
- On the head unit, navigate to the 'Car Link' application.
- Connect your phone via Bluetooth to the head unit.
- Следуйте инструкциям на экране, чтобы установить беспроводное соединение CarPlay или Android Auto.
- Примечание: Wired connections are also supported via USB cable.

Figure 3: Steps for connecting Wireless CarPlay and Android Auto.
3. Подключение 4G LTE
Insert a compatible SIM card into the designated 4G LTE card slot to enable internet access directly from the head unit. This allows for online navigation, app downloads, and streaming services.
4. GPS-навигация
The unit comes with built-in GPS navigation and supports various online map applications. Ensure the GPS antenna is properly installed for optimal signal reception.
5. Radio (AM/FM with RDS)
Access the radio function to listen to AM and FM stations. The unit supports RDS (Radio Data System) for displaying station information. You can perform automatic or manual station searches and customize your channel list.

Figure 4: Radio interface with AM/FM and RDS functionality.
6. Управление рулевым колесом (SWC)
The head unit integrates with your vehicle's existing steering wheel controls, allowing you to manage music playback, answer calls, and adjust volume without taking your hands off the wheel. This feature enhances driving safety.

Figure 5: Using steering wheel controls with the head unit.
7. Процессор DSP
Equipped with a powerful DSP (Digital Signal Processor) chip, the unit allows for high-precision professional audio tuning. You can adjust a 36-band equalizer to customize the sound output to your preferences, enhancing the audio experience.
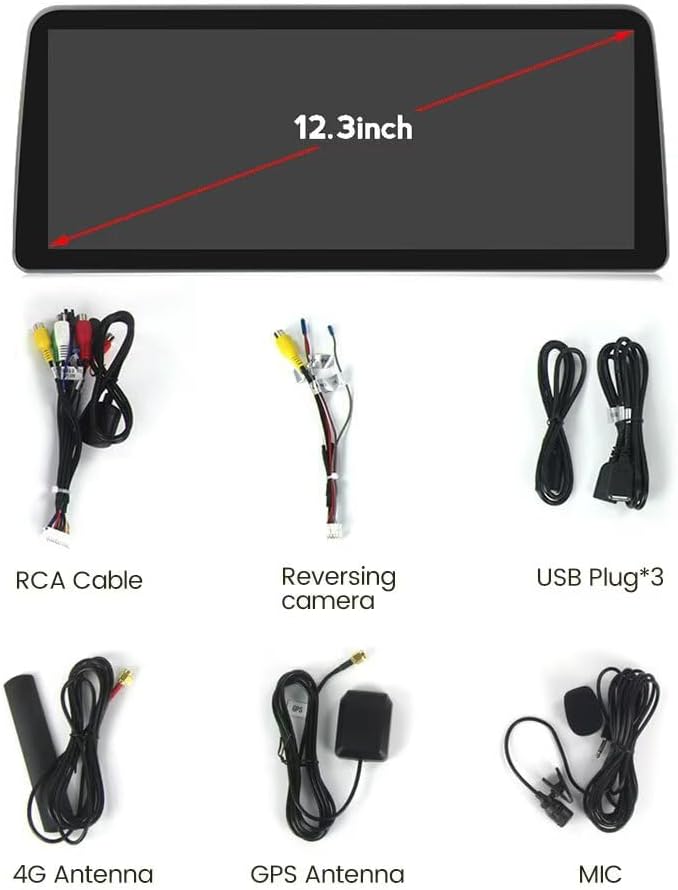
Figure 6: DSP equalizer interface for audio customization.
8. Door and Light Switch Status Display
For vehicles with Canbus support, the head unit can display the status of your car's doors (open/closed) and light switches (on/off) directly on the screen, providing convenient visual feedback.

Figure 7: Display of door and light switch status.
Обслуживание
- Уборка: Для очистки экрана и корпуса используйте мягкую сухую ткань. Избегайте использования абразивных чистящих средств и растворителей.
- Обновления программного обеспечения: Periodically check for software updates via the unit's settings menu when connected to the internet (WiFi or 4G LTE) to ensure optimal performance and access to new features.
- Температура: Избегайте воздействия на устройство экстремальных температур, так как это может сократить срок его службы и ухудшить его производительность.
Поиск неисправностей
- Устройство не включается: Проверьте все силовые соединения и убедитесь, что аккумулятор автомобиля правильно подключен. Проверьте предохранитель.
- Нет звука: Check speaker connections, volume levels, and audio settings (e.g., DSP equalizer). Ensure the correct audio source is selected.
- Потерян сигнал GPS: Убедитесь, что GPS-антенна надежно подключена и размещена в безопасном месте. view неба.
- CarPlay/Android Auto не подключается: Ensure Bluetooth is on, the 'Car Link' app is open, and your phone is compatible. Try restarting both the phone and the head unit.
- Сенсорный экран не отвечает: Попробуйте перезагрузить устройство. Если проблема не исчезнет, обратитесь в службу поддержки.
- Плохой радиоприем: Check the antenna connection. Ensure you are in an area with good signal coverage.
Технические характеристики
| Особенность | Спецификация |
|---|---|
| Бренд | MekedeTech |
| Операционная система | Андроид 13 |
| Процессор | 8-Core A53 2.0GHz |
| Память (ОЗУ + ПЗУ) | 4GB RAM + 32GB ROM (Model: 4+32G) |
| Размер экрана | 12.3 дюйма |
| Тип дисплея | Сенсорный QLED-экран |
| Разрешение экрана | 1920 * 720 |
| Выходная мощность | 4*50 Вт |
| Особые возможности | Bluetooth, Touchscreen, Wired Android Auto, Wireless CarPlay, Built-in DSP (36 EQ band) |
| Технология связи | Wireless (WiFi, 4G LTE), Bluetooth |
| Supported Navigation | GPS (Worldwide Map Type) |
| Ввод данных через интерфейс пользователя | Кнопки, микрофон, сенсорный экран |
| Метод контроля | Прикосновение, Голос |
| Совместимый тип автомобиля | Тойота РАВ4 2020-2022 |
Гарантия
This MekedeTech product comes with a Гарантия 1 года from the date of purchase. Please retain your proof of purchase for any warranty claims. The warranty covers manufacturing defects and malfunctions under normal use. It does not cover damage caused by improper installation, misuse, accidents, or unauthorized modifications.
Поддерживать
For technical assistance, troubleshooting beyond this manual, or warranty inquiries, please contact MekedeTech customer support through the retailer where you purchased the product or visit the official MekedeTech webКонтактная информация указана на сайте. Пожалуйста, подготовьте модель вашего продукта и данные о покупке, прежде чем обращаться в службу поддержки.