1. Введение
This manual provides essential instructions for the installation, operation, and maintenance of your Renogy Rover 20A MPPT Charge Controller. Please read this manual thoroughly before installation and use to ensure optimal performance and safety. Keep this manual for future reference.

Figure 1.1: Renogy Rover 20A MPPT Charge Controller
The Renogy Rover 20A MPPT Charge Controller is designed to optimize the charging process from your solar panels to your battery bank. It features Maximum Power Point Tracking (MPPT) technology, ensuring high efficiency even under varying light conditions. This controller is compatible with 12V and 24V battery systems and supports various battery types, including Gel, Sealed, Flooded, and Lithium.
2. Информация по технике безопасности
При установке и эксплуатации соблюдайте следующие меры предосторожности:
- Всегда сначала подключайте аккумулятор к контроллеру заряда, затем солнечную панель и, наконец, нагрузку. Отключение производится в обратном порядке.
- Ensure all wiring is correctly sized and connections are secure to prevent loose connections that can cause excessive heating.
- Install the charge controller in a well-ventilated area, away from flammable materials and direct sunlight.
- Do not disassemble or attempt to repair the charge controller. Contact Renogy support for assistance.
- При работе с батареями и электрическими системами используйте соответствующие средства индивидуальной защиты, включая защиту для глаз.
- Обеспечьте громкость системыtagе не превышает максимальный входной объемtage of the controller (100V).
3. Содержимое упаковки
Убедитесь, что все предметы включены в ваш пакет:
- Контроллер заряда солнечных батарей Renogy Rover 20A MPPT
- Кабель датчика температуры
- Руководство пользователя (этот документ)
4. Особенности продукта
The Renogy Rover 20A MPPT Charge Controller offers advanced features for efficient solar power management:
- Dual-Peak MPPT Technology: Achieves up to 99.9% tracking efficiency and 98% conversion efficiency, optimizing solar harvest even in partial shading or cloudy conditions.
- Широкая совместимость с аккумуляторами: Supports Gel, Sealed, Flooded, and Lithium battery types.
- Температурная компенсация: Operates effectively across a wide temperature range (-40°F to 149°F) with automatic charging adjustments to protect batteries.
- Комплексная защита: Includes TVS surge protection against lightning strikes, reverse polarity, overcharging, over-discharging, overload, and short-circuit protection.
- 4-Сtagе Зарядка: Provides precise Bulk, Absorption, Float, and Equalization charging for lead-acid batteries, extending their lifespan.
- Возобновление работы литиевой батареи: Safely revives deeply discharged lithium batteries.
- LCD Display & Data Logging: Backlit LCD displays real-time voltage, current, and error information. Stores up to one year of performance data.
- Поддержка Modbus: Integrates Modbus protocol for smart home solar kits and remote monitoring.
- Direct DC Load Output: Can directly power DC appliances and handle capacitive load surges. Features load scheduling via timer.
- App Monitoring (Optional): Compatible with the BT-2 module (sold separately) for monitoring via the Renogy DC Home App.
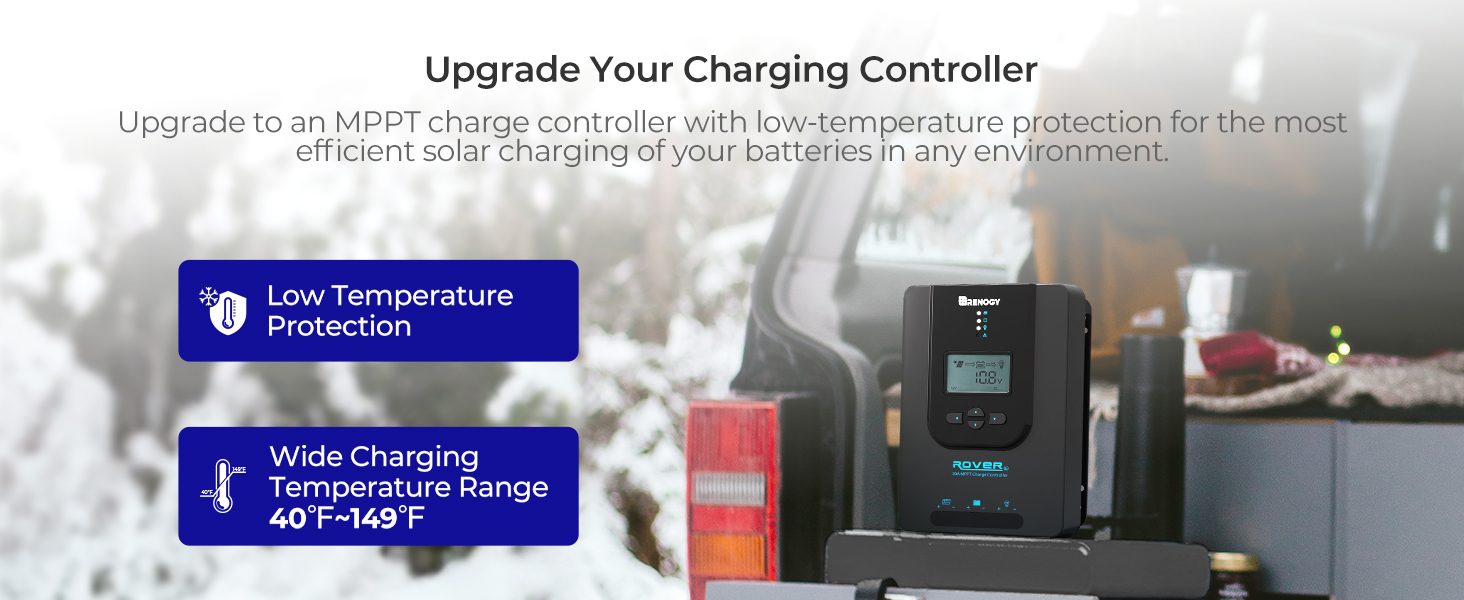
Figure 4.1: Maximizing Solar Harvest with 99% Tracking Efficiency

Figure 4.2: Charge Controller with Wide Temperature Adaptability (-40°F to 149°F)
5. Настройка и установка
Follow these steps for proper installation of your charge controller:
- Монтаж: Choose a dry, well-ventilated location for mounting the controller. Ensure there is sufficient clearance around the unit for heat dissipation. Mount vertically on a non-flammable surface.
- Последовательность проводки:
- Connect the battery cables to the battery terminals on the charge controller. Ensure correct polarity (+ to + and - to -).
- Connect the solar panel cables to the PV terminals on the charge controller. Ensure correct polarity.
- Connect the load cables to the load terminals on the charge controller (optional). Ensure correct polarity.
- Датчик температуры: Connect the included temperature sensor cable to the designated port on the controller. Place the sensor near the battery to enable accurate temperature compensation for charging.
- Начальное включение: Once all connections are secure, the controller will power on and display system information on the LCD.
Важно: Во избежание повреждения контроллера всегда сначала подключайте батарею, а затем отключайте её.
6. Инструкция по эксплуатации
The LCD display and buttons allow you to monitor and configure the charge controller.
6.1. Навигация по ЖК-дисплею
Use the buttons on the front panel to navigate through the display screens and adjust settings. Refer to the on-screen prompts for specific actions like 'Select' or 'Enter'.
6.2 Выбор типа аккумулятора
Контроллер автоматически определяет напряжение системы 12 В/24 В.tages for non-lithium batteries. For lithium batteries, you must manually adjust the battery voltage setting through the controller's menu to ensure proper charging parameters.
6.3. Lithium Battery Activation
The controller includes a lithium battery activation function. This feature allows charging of deeply discharged lithium batteries that might otherwise be unresponsive.

Figure 6.1: Lithium Activation ON
To prevent over-activation and unnecessary activation, you can turn OFF the lithium activation function. This helps avoid potential damage to the battery if it is not intended for activation.

Figure 6.2: Lithium Activation OFF
6.4. Monitoring and Load Control
The LCD provides real-time data on solar input, battery status, and load output. You can also configure load settings, including timers for scheduled operation of connected DC appliances.
7. Техническое обслуживание
Регулярное техническое обслуживание обеспечивает долговечность и оптимальную работу вашего контроллера заряда:
- Проверьте соединения: Periodically check all wiring connections for tightness and corrosion. Ensure no wires are frayed or damaged.
- Очистите контроллер: Содержите контроллер в чистоте, не допускайте попадания на него пыли и мусора. Протирайте поверхность сухой тканью. Не используйте жидкости или растворители.
- Вентиляция: Для предотвращения перегрева необходимо обеспечить хорошую вентиляцию в месте установки.
- Проверка батареи: Regularly inspect your batteries for any signs of damage, swelling, or leaks.
8. Поиск Неисправностей
Если у вас возникли проблемы с контроллером заряда, ознакомьтесь со следующими распространенными проблемами и решениями:
| Проблема | Возможная причина | Решение |
|---|---|---|
| Контроллер не включается | Loose battery connection, battery voltagе слишком низко | Check battery wiring and voltage. Ensure battery is connected first. |
| Нет солнечной зарядки | Solar panel not connected, insufficient sunlight, incorrect polarity | Verify solar panel connections and polarity. Check for shading. |
| Загрузка не работает | Load disconnected, overload, load timer active | Check load connections. Reduce load. Adjust load timer settings. |
| Неправильный объемtagэлектронные показания | Loose connections, faulty sensor | Check all wiring. Ensure temperature sensor is properly connected. |
For persistent issues or error codes not listed, please contact Renogy customer support.
9. Технические характеристики
| Спецификация | Ценить |
|---|---|
| Бренд | Реноги |
| Модель | Rover 20A MPPT |
| Максимальный ток заряда | 20А |
| Том системыtage | 12V/24V Auto-Detect (DC) |
| Максимальный входной объем PVtage | 100В |
| Эффективность отслеживания | 99.9% |
| Эффективность преобразования | 98% |
| Тип дисплея | ЖК-дисплей |
| Диапазон рабочих температур | от -40°F до 149°F (от -40°C до 65°C) |
| Материал | Акрилонитрил-бутадиен-стирол (АБС), пластик |
| Вес товара | 1.59 Килограмма |
| UPC/GTIN | 840315237445 |
10. Гарантия и поддержка
The Renogy Rover 20A MPPT Charge Controller comes with a 3-летняя гарантия на материалы и качество изготовления. This warranty covers defects in materials and manufacturing under normal use.

Figure 10.1: 3-Year Material and Workmanship Warranty
For warranty claims, technical assistance, or any questions regarding your product, please contact Renogy customer support. Keep your purchase receipt as proof of purchase for warranty services.
You can find more information and contact details on the official Renogy webсайт: www.renogy.com