1. Введение
Thank you for choosing the Generic 8X12 Ft Metal Outdoor Storage Shed. This manual provides essential information for the safe assembly, proper operation, and effective maintenance of your new storage shed. Please read all instructions carefully before beginning assembly and retain this manual for future reference.
This robust and reliable storage solution is constructed from high-quality steel, offering exceptional weather resistance and durability. Its spacious 8 ft x 12 ft interior provides ample room for tools, lawn equipment, gardening supplies, bicycles, and other items. Features include four well-placed air vents for ventilation, a cottage-style window for natural light, and a double-hinged door with a secure latch for easy access and peace of mind.
2. Информация по технике безопасности
При сборке и использовании всегда уделяйте первостепенное внимание безопасности. Несоблюдение этих правил техники безопасности может привести к травмам или повреждению изделия.
- Прочитайте все инструкции: Ensure you understand all assembly steps before starting.
- Используйте защитную одежду: Always wear gloves, eye protection, and appropriate footwear during assembly.
- Ассамблея из двух человек: Assembly typically requires two or more people for safety and ease.
- Подготовка места: Choose a level, solid surface for installation. Ensure adequate drainage.
- Надежный фундамент: The shed must be anchored to the ground to prevent wind damage. Anchoring hardware may be sold separately or included.
- Острые края: Металлические детали могут иметь острые края. Обращайтесь с ними осторожно.
- Дети и домашние животные: Держите детей и домашних животных подальше от места сбора. Не позволяйте им играть внутри или вокруг сарая без присмотра.
- Вентиляция: При хранении предметов, которые могут выделять пары, обеспечьте надлежащую вентиляцию.
- Распределение веса: Для обеспечения стабильности размещения хранимых предметов необходимо равномерно распределить их по складу.
3. Содержимое упаковки
Before beginning assembly, verify that all parts are present and undamaged. Refer to the detailed parts list provided in your specific assembly guide (not included in this general manual). Typical components include:
- Wall Panels (front, back, side)
- Панели крыши
- Door Panels and Hardware
- Window Frame and Pane
- Frame Components (beams, supports, base rails)
- Fasteners (screws, bolts, nuts, washers)
- Вентиляционные решетки
Если какие-либо детали отсутствуют или повреждены, не продолжайте сборку. Обратитесь в службу поддержки клиентов за помощью.
4. Инструкции по установке и сборке
Assembly of this metal shed requires careful attention to detail. It is highly recommended to have at least two people for assembly. Always refer to the specific step-by-step assembly manual included with your product for detailed diagrams and instructions.
4.1 Подготовка места
- Выберите местоположение: Select a flat, level area free from obstructions and with good drainage. Avoid areas prone to standing water.
- Очистить область: Remove any debris, rocks, or vegetation from the chosen site.
- Фундамент: A solid, level foundation (e.g., concrete slab, treated timber frame, or gravel base) is strongly recommended for stability and longevity.
4.2 Необходимые инструменты (не входят в комплект)
- Рабочие перчатки
- Защитные очки
- Отвертка с крестообразным шлицем
- Разводной ключ или набор торцевых головок
- Измерительная лента
- Уровень
- Step Ladder (optional, but recommended)
- Drill (for anchoring, if applicable)
4.3 Этапы Генеральной Ассамблеи
While specific steps vary, the general sequence for shed assembly is:
- Сборка базовой рамы: Assemble the base frame on your prepared foundation. Ensure it is square and level.
- Монтаж стеновых панелей: Attach the wall panels to the base frame, following the designated order. Secure them with the provided fasteners.
- Сборка каркаса крыши: Construct the roof frame on the ground or as instructed, then lift and secure it to the top of the wall panels.
- Монтаж кровельных панелей: Attach the roof panels to the roof frame, ensuring proper overlap and sealing to prevent leaks.
- Сборка и установка дверей: Assemble the double doors and attach them to the designated opening. Install hinges, handles, and the secure latch mechanism.
- Установка окна: Install the window frame and pane into the designated opening.
- Ventilation Grille Installation: Attach the air vents as specified.
- Якорная стоянка: Securely anchor the shed to your foundation using appropriate hardware. This is crucial for stability.
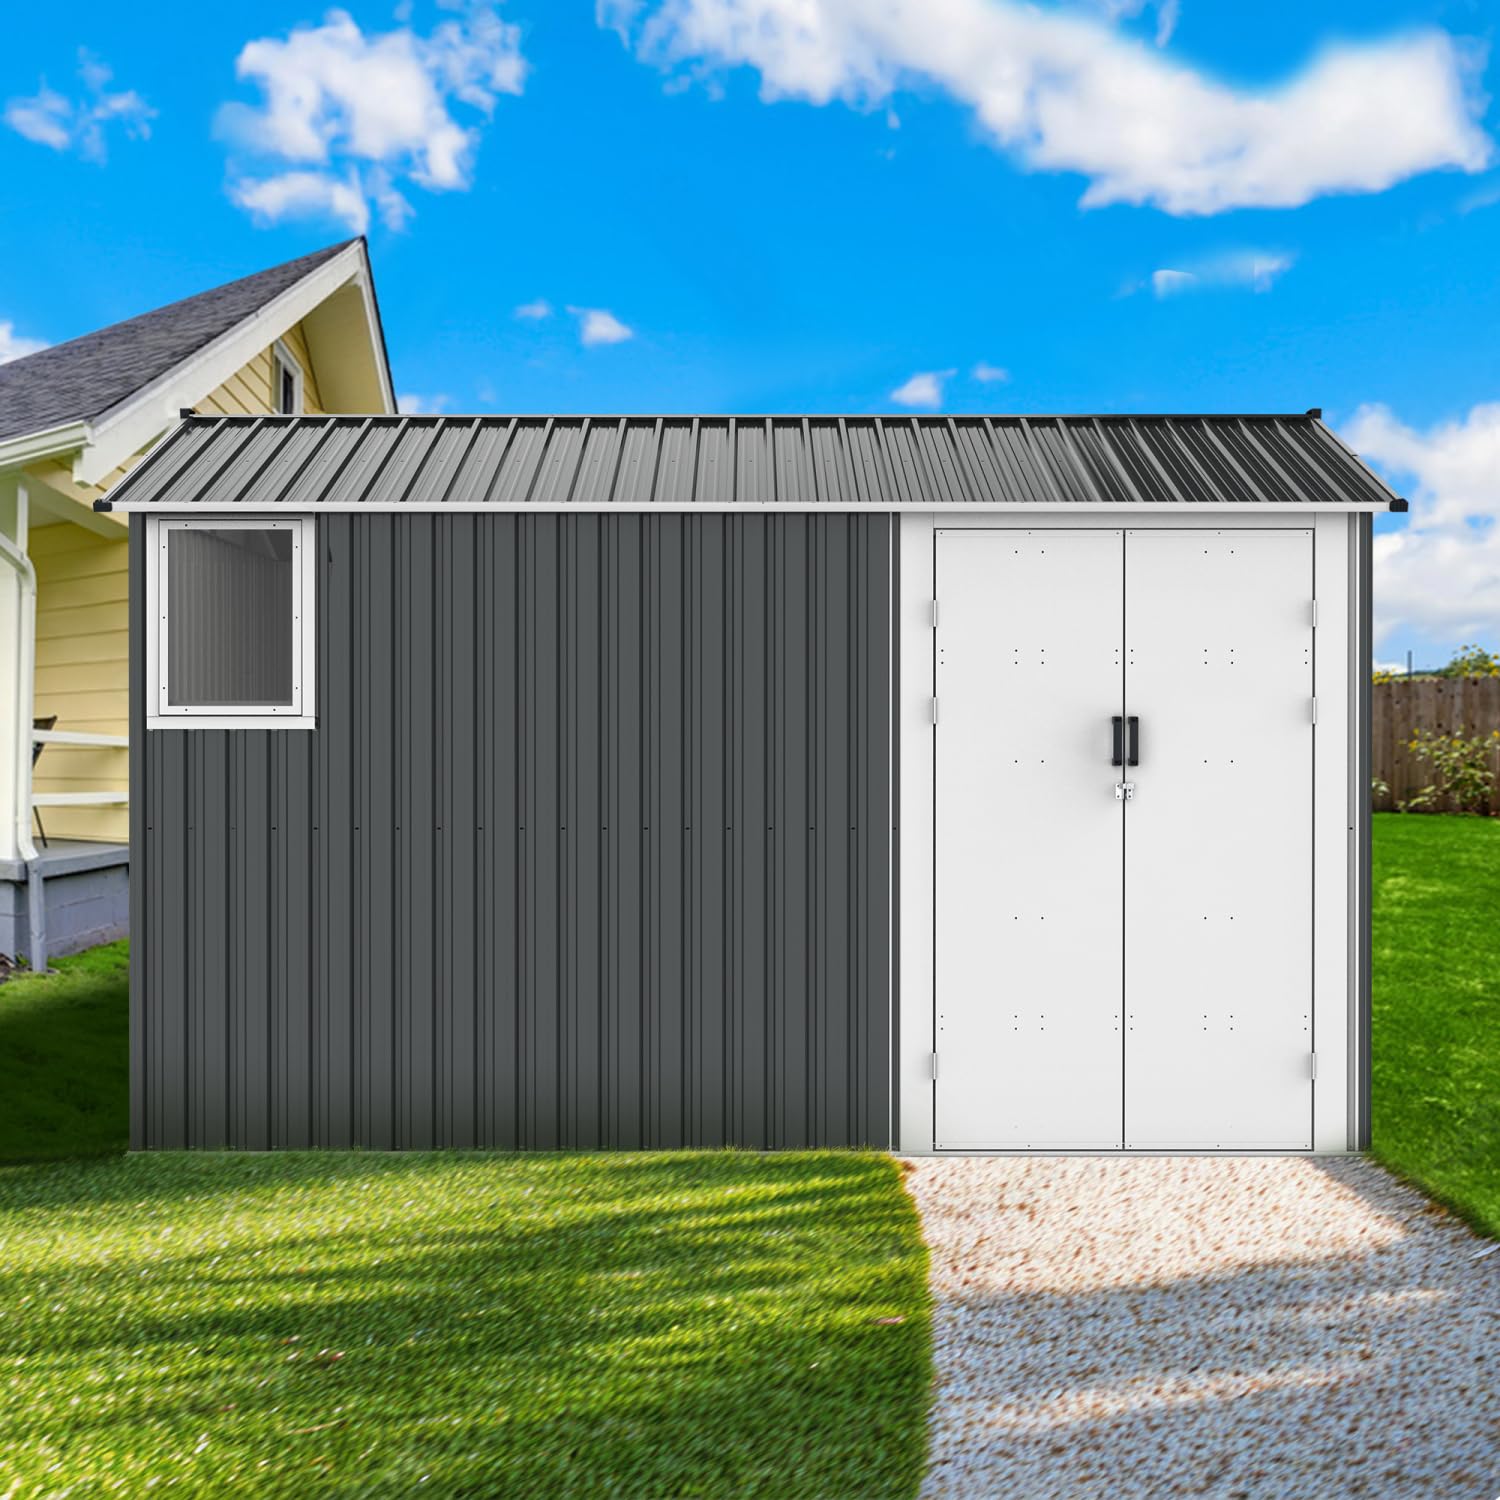
Image: Fully assembled 8x12 ft metal outdoor storage shed with a window and double doors, situated in a backyard.

Изображение: подробное view of shed features, highlighting the tall door with a secure latch, the solid structural components, and the transparent glass window for natural light.
5. Инструкция по эксплуатации
5.1 Управление дверью
The shed features double-hinged doors for wide access. To open, disengage the latch mechanism and pull the handles. To close, push the doors firmly together and engage the latch to secure them. Ensure the doors are fully closed and latched to protect contents from weather and unauthorized access.
5.2 Window Usage
Детская кроваткаtage-style window provides natural light. It is typically fixed and not designed for opening. Keep the window clean for maximum light transmission.
5.3 Вентиляция
The shed is equipped with four air vents to promote airflow and reduce moisture buildup. Ensure these vents are not blocked by stored items or debris to maintain optimal air circulation.

Image: Interior perspective of the shed, demonstrating its spacious capacity with shelving units and a bicycle stored inside.
6. Техническое обслуживание
Regular maintenance will extend the life of your storage shed and ensure its continued performance.
- Уборка: Periodically clean the exterior and interior of the shed with mild soap and water. Rinse thoroughly and allow to air dry. Avoid abrasive cleaners or harsh chemicals.
- Осмотр на предмет повреждений: Regularly check for any signs of rust, loose fasteners, or damage to panels, doors, or the roof. Address any issues promptly.
- Lubricate Hinges: Apply a silicone-based lubricant to door hinges and latch mechanisms annually to ensure smooth operation.
- Очистить мусор: Keep the roof and surrounding area clear of leaves, snow, and other debris to prevent water accumulation and potential damage.
- Check Anchoring: Periodically inspect the ground anchors to ensure they remain secure, especially after strong winds.
7. Поиск Неисправностей
Вот решения распространенных проблем, с которыми вы можете столкнуться:
- Утечка воды:
- Проверьте все крепления, чтобы убедиться, что они затянуты.
- Inspect roof and wall panel overlaps for proper sealing. Apply silicone sealant if necessary.
- Ensure the shed is on a level foundation with adequate drainage.
- Door Sticking or Not Closing Properly:
- Check if the shed is level. An unlevel foundation can cause door misalignment.
- Lubricate hinges and latch mechanism.
- Inspect for any obstructions in the door track or frame.
- Конденсация внутри сарая:
- Ensure ventilation grilles are clear and unobstructed.
- Avoid storing wet items inside.
- Consider adding a moisture absorber if the problem persists in humid climates.
8. Технические характеристики
The following specifications apply to the 8X12 Ft Metal Outdoor Storage Shed:
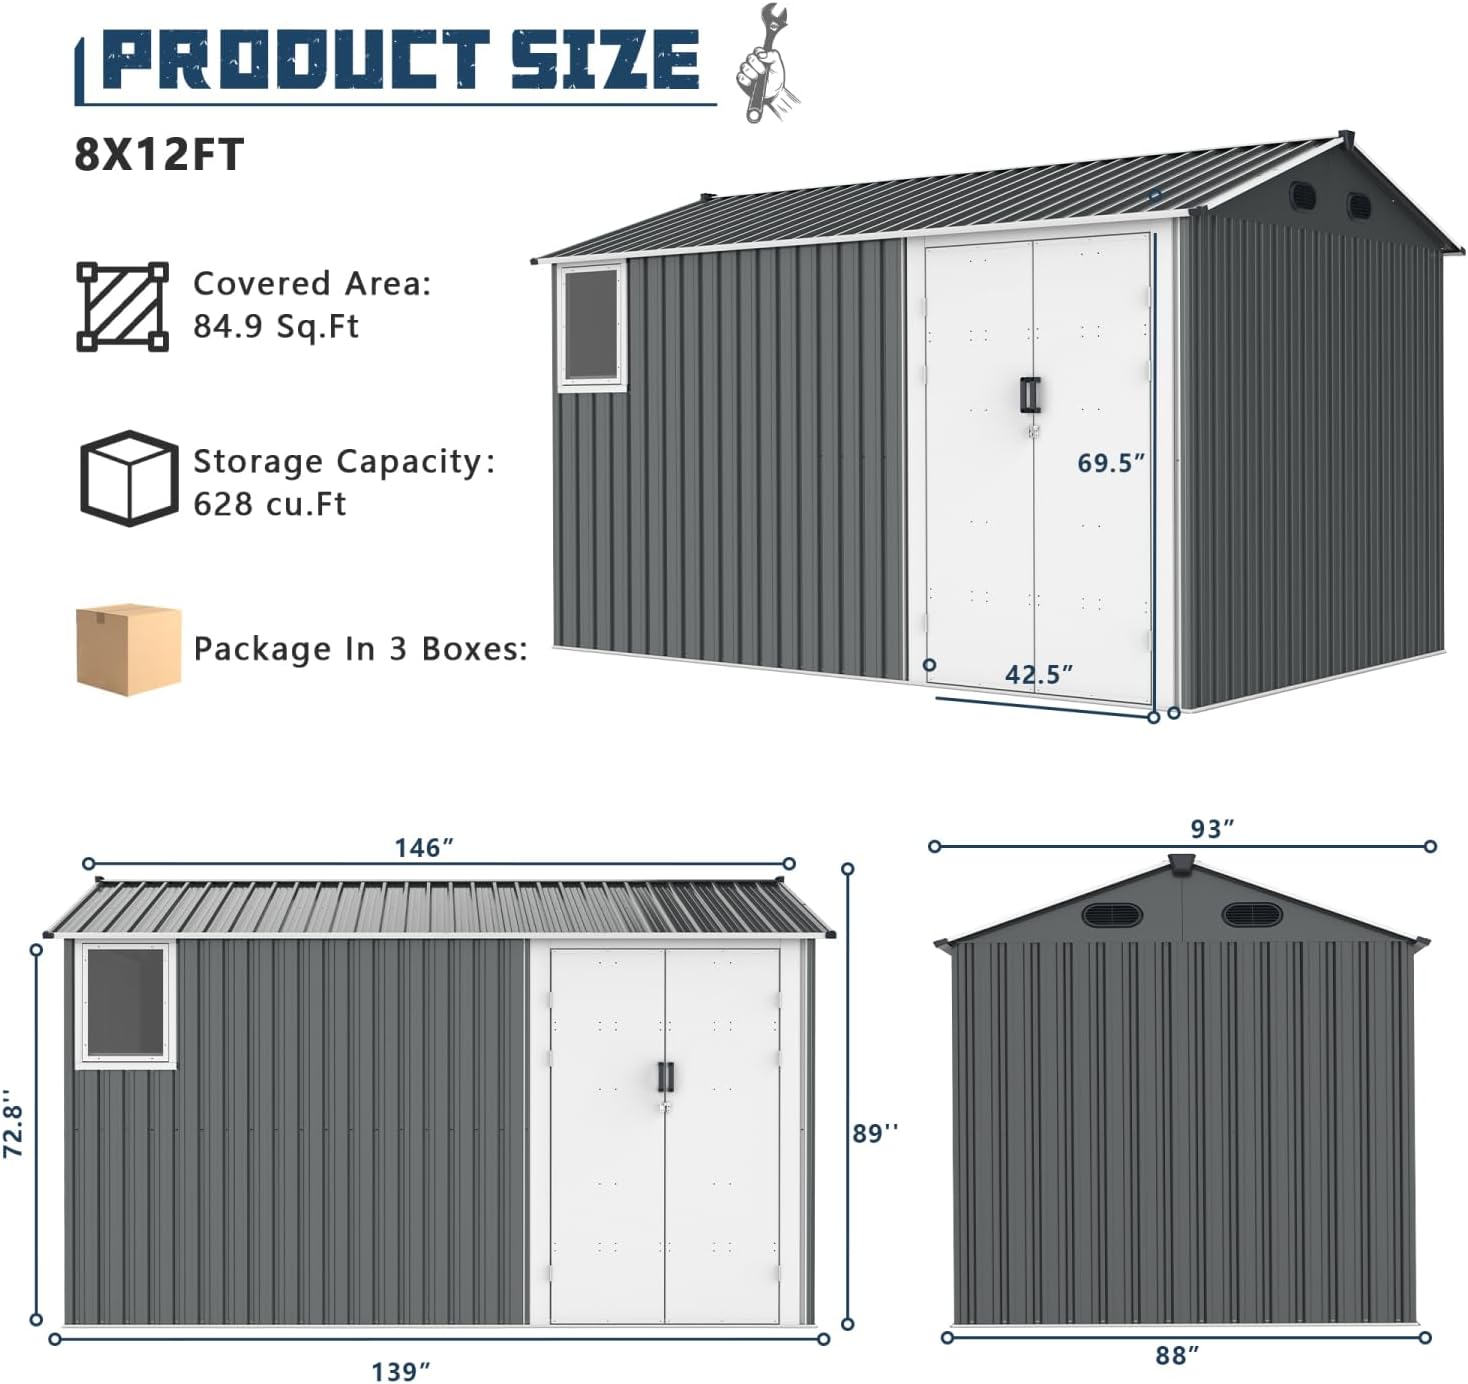
Image: Technical diagram illustrating the overall dimensions and key measurements of the 8x12 ft metal outdoor storage shed.
| Особенность | Деталь |
|---|---|
| Размеры продукта | 146 x 93 x 89 дюйма |
| Вес товара | 132.3 фунта |
| Бренд | Общий |
| Цвет | Темно-серый |
| Материал | Легированная сталь |
| Производитель | Общий |
9. Информация о гарантии
This product is covered by a manufacturer's warranty. Please refer to the warranty card or documentation included with your purchase for specific terms, conditions, and duration. Keep your proof of purchase for any warranty claims.
10. Поддержка клиентов
If you have any questions, require assistance with assembly, or need to report missing/damaged parts, please contact the seller or manufacturer directly. Refer to your purchase documentation for contact details.


