1. Введение
This manual provides detailed instructions for the installation, operation, and maintenance of your SOGTICPS BL912-60A-02US MPPT Solar Charge Controller. This device is designed to manage power flow from your solar panels to your battery bank, ensuring efficient charging and protecting your batteries from overcharge and over-discharge.
Примечание: This controller utilizes MPPT technology to detect the maximum charging current, which can increase efficiency by 10%-30% compared to standard controllers. It is important to note that this is a compatible MPPT charge controller with PWM intelligent features, not a "true MPPT" controller with a large transformer coil inside.
Основные характеристики:
- Автоматическая система регулировки напряжения 12 В/24 Вtagе признание.
- Advanced MPPT (Maximum Power Point Tracking) technology for optimized charging.
- Multi-function LCD display for system status monitoring.
- Dual USB ports (DC 5V 2A output) for charging external devices.
- Comprehensive protection features: over-charging, over-discharging, reverse polarity, short circuit, and open circuit protection.
- Температурная компенсация для точной зарядки.

Рисунок 1: Передний view of the SOGTICPS BL912-60A-02US MPPT Solar Charge Controller, showing the LCD display, control buttons, and dual USB ports.
2. Настройка и установка
Правильная установка имеет решающее значение для безопасной и эффективной работы вашего контроллера заряда солнечной батареи. Пожалуйста, внимательно следуйте этим инструкциям.
2.1 Порядок подключения
Важный: Always connect components in the following sequence to prevent damage to the controller or other system components.
- Подключите аккумулятор: First, connect the battery to the charge controller. Ensure the battery has sufficient voltage for the controller to recognize the correct battery type (12V or 24V).
- Подключите солнечную панель: Next, connect the solar panel(s) to the charge controller.
- Подключите нагрузку (опционально): Finally, connect your DC load to the charge controller's load terminals.
Disassembly Order: When disconnecting, reverse the order: first disconnect the solar panel, then the battery, and finally the load.
2.2 Схема электропроводки
Refer to the diagrams below for correct wiring connections.

Рисунок 2: Labeled components of the SOGTICPS BL912-60A-02US controller, indicating LCD display, control buttons (Menu, Page Up, Page Down/Manual), and dual USB ports. Connection terminals for solar panel, battery, and load are also shown.

Рисунок 3: Basic wiring diagram showing connections from a solar panel to the controller and from the controller to a DC load. Note the positive (+) and negative (-) terminals.
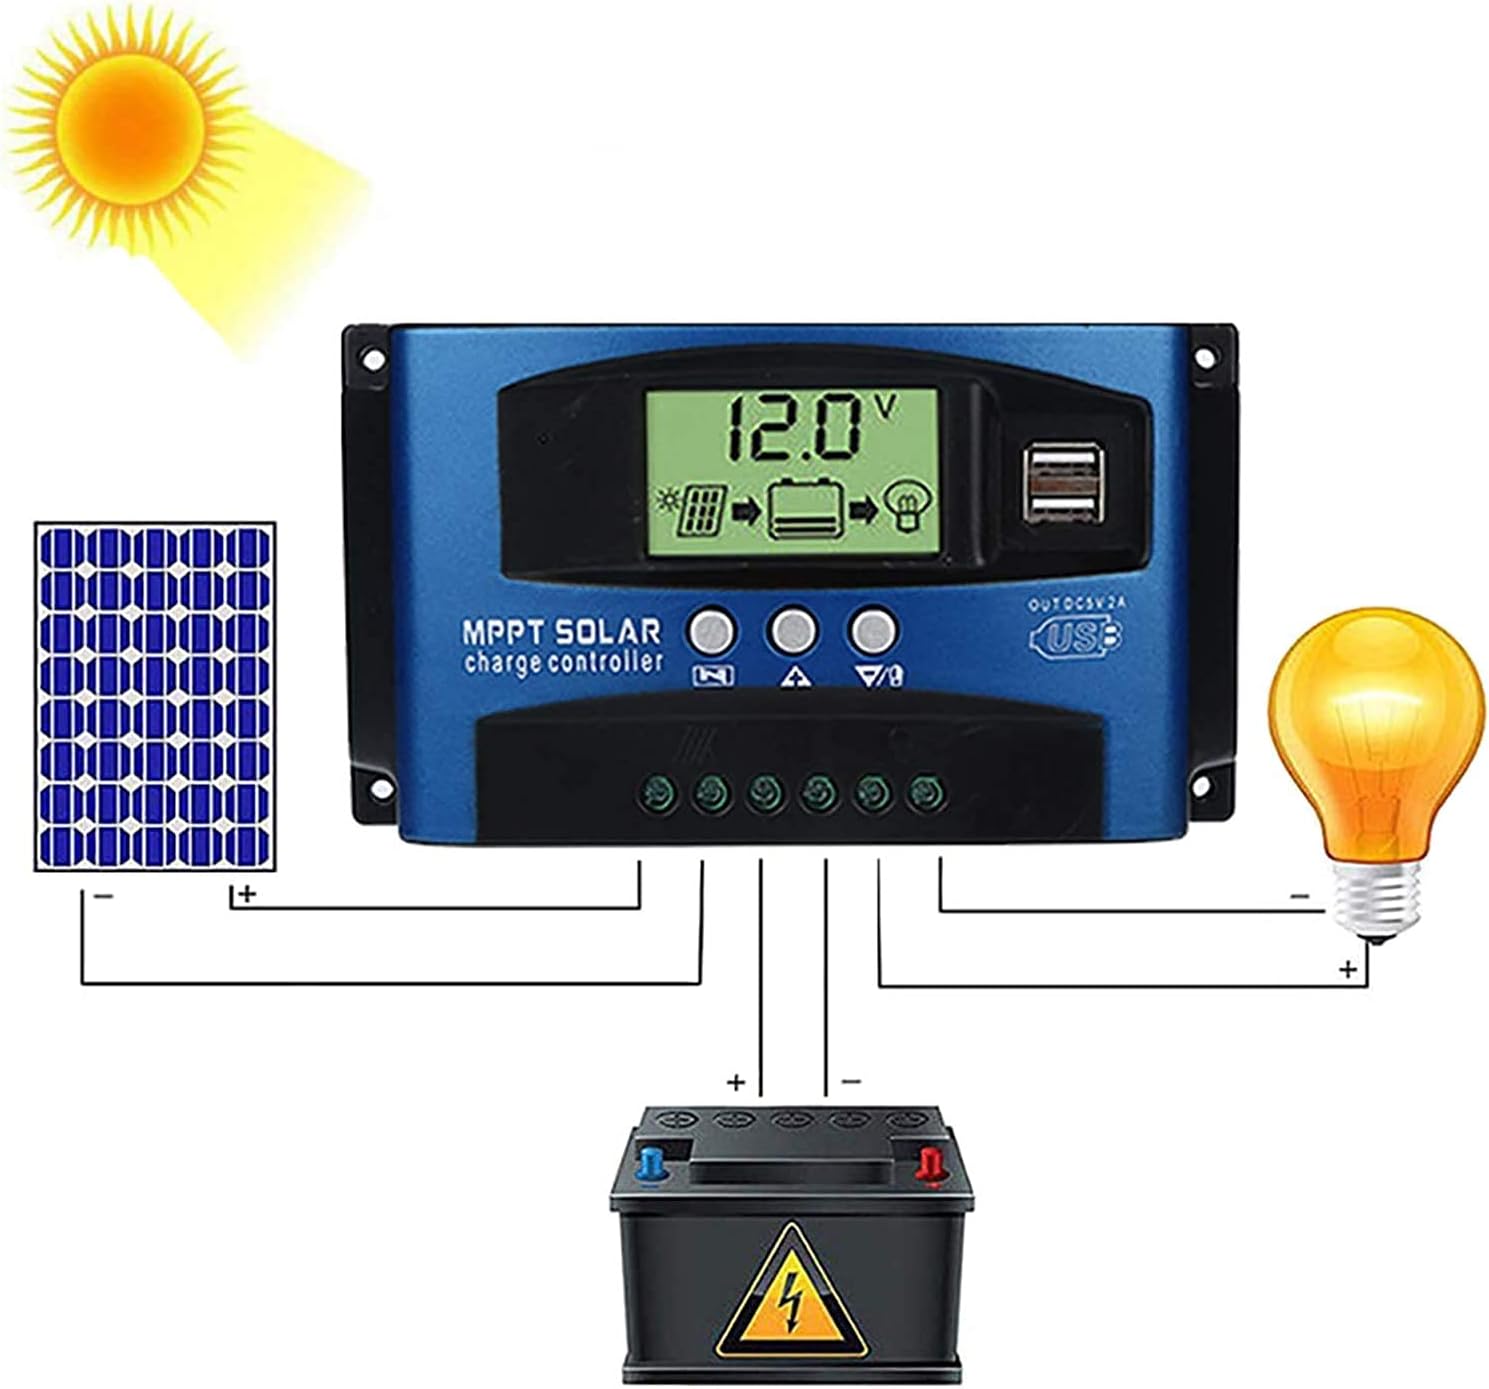
Рисунок 4: Comprehensive wiring diagram illustrating the connection of a solar panel, the SOGTICPS charge controller, a battery, and a DC load. This diagram shows the correct sequence and polarity for all connections.
2.3 Solar Panel and Battery Voltage Совместимость
- For a 12V battery system, the working voltage (Voc) of the solar panel should be between 17V and 23V.
- For a 24V battery system, the working voltage (Voc) of the solar panel should be between 36V and 46V.
- Убедитесь, что солнечная панель vol.tage is within these ranges to prevent damage to the controller.
2.4 Подключение инвертора
If using an inverter, connect it directly to the battery terminals, not to the load terminals of the charge controller.
3. Операция
3.1 ЖК-дисплей и кнопки
The LCD display provides real-time information about your system's status. The three buttons below the display are used for navigation and settings adjustment.
- Кнопка меню: Press to cycle through display screens and enter/exit settings menus.
- Кнопка «Наверх»: Используется для увеличения значений или навигации вверх по меню.
- Кнопка «Прокрутка вниз/Ручной режим»: Used to decrease values, navigate downwards in menus, or manually control the load output.
3.2 Battery Type Recognition
The controller automatically detects 12V or 24V battery systems. Ensure the battery is connected first and has sufficient voltage for proper detection.
3.3 выхода USB
The dual USB ports provide a DC 5V 2A output for charging compatible electronic devices.
4. Техническое обслуживание
Регулярное техническое обслуживание обеспечивает долговечность и оптимальную производительность вашего контроллера заряда солнечной батареи.
- Уборка: Содержите контроллер в чистоте, не допуская попадания на него пыли и мусора. Используйте для чистки сухую ткань.
- Соединения: Периодически проверяйте все соединения проводки, чтобы убедиться в их надежности и отсутствии коррозии.
- Вентиляция: Чтобы предотвратить перегрев, убедитесь, что контроллер установлен в хорошо проветриваемом помещении.
- Условия окружающей среды: Avoid exposing the controller to direct sunlight, rain, or excessive humidity.
5. Поиск Неисправностей
В этом разделе рассматриваются часто задаваемые вопросы и проблемы, с которыми вы можете столкнуться.
- Q: How many watts of solar panels can be connected?
A: For a 12V battery system, the maximum recommended solar panel wattage is 720W. For a 24V battery system, the maximum recommended wattagе 1440Вт.
- Q: Does this controller support lithium batteries?
A: Yes, the controller is compatible with both lead-acid and lithium batteries.
- Q: My solar panel is 36V 200W, can I charge a 12V battery?
A: To charge a 12V battery, the solar panel's working voltage (Voc) should be between 17V and 23V. For a 24V battery, the Voc should be between 36V and 46V. If your 36V panel is used with a 12V battery, the voltage is too high and could damage the controller. Ensure your panel's voltage matches the battery system voltagэлектронные требования.
- Q: Can an inverter be connected to the load side of the controller?
A: No, please connect the inverter directly to the battery terminals, not to the load terminals of the controller.
- Q: Does the controller have a requirement for battery capacity?
A: While there's no strict minimum, it's recommended that the battery capacity corresponds to the solar panel current. For example, if your solar panel current is 5A, a 50AH battery is preferable. Using a very large solar panel with a very small battery can be dangerous.
- Q: The controller is not turning on or displaying anything.
A: Убедитесь, что аккумулятор подключен первым и имеет достаточный уровень заряда.tage. Check all battery connections for proper polarity and secure contact. If the battery voltage is too low, the controller may not power on.
6. Технические характеристики
| Особенность | Спецификация |
|---|---|
| Номер модели | BL912-60A-02US |
| Бренд | SOGTICPS |
| Том системыtage | 12 В / 24 В Авто |
| Максимальный ток заряда | 60А |
| Max Solar Panel Wattagе (12 В) | 720 Вт |
| Max Solar Panel Wattagе (24 В) | 1440 Вт |
| Solar Panel Working Voltagе (система 12 В) | 17V-23V (Voc) |
| Solar Panel Working Voltagе (система 24 В) | 36V-46V (Voc) |
| Тип дисплея | ЖК-дисплей |
| USB-выход | Dual DC 5V 2A |
| Размеры продукта | 6.69 x 3.94 x 1.97 дюйма (17 x 10 x 5 см) |
| Вес товара | 10.6 унций (0.3 кг) |
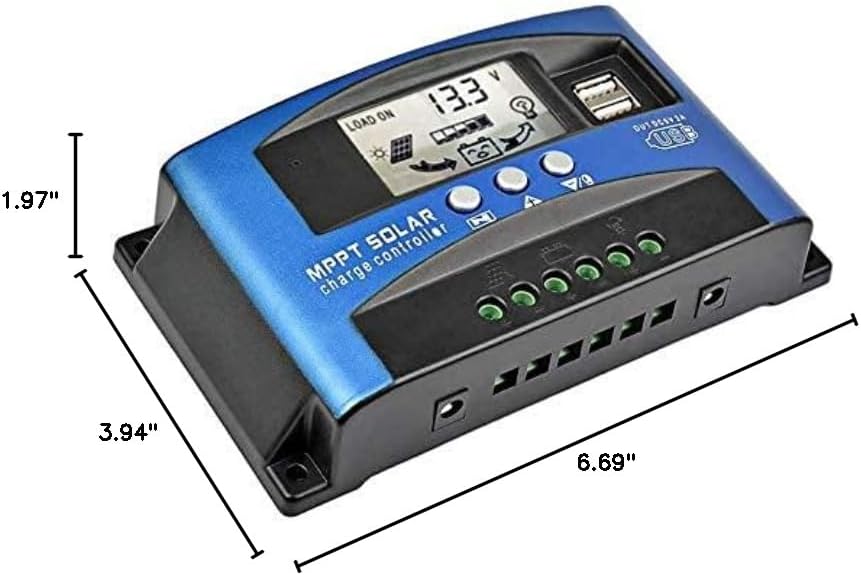
Рисунок 5: Dimensional drawing of the SOGTICPS BL912-60A-02US solar charge controller, showing its length (6.69"), width (3.94"), and height (1.97").

Рисунок 6: Examples of typical applications for the solar charge controller, including residential solar systems, garden lighting, street lighting, and integration with wind power systems.
7. Гарантия и поддержка
7.1 Информация о гарантии
This SOGTICPS product comes with a 30-дневная гарантия возврата денег и а Гарантия 12 месяца По вопросам, связанным с качеством. Пожалуйста, сохраните чек о покупке для предъявления гарантийных претензий.
7.2 Поддержка клиентов
For any questions, technical assistance, or warranty claims, please contact SOGTICPS customer support. Our professional technicians are available to assist you.
Contact information is typically found on the product packaging or the seller's official webсайт.