SAMA V60
SAMA V60 Mid Tower PC Case User Manual
Comprehensive guide for installation, operation, and maintenance of your SAMA V60 PC Case.
1. Введение
This manual provides detailed instructions for setting up, operating, and maintaining your SAMA V60 Mid Tower PC Case. Please read this guide carefully before beginning your PC build to ensure proper installation and optimal performance.
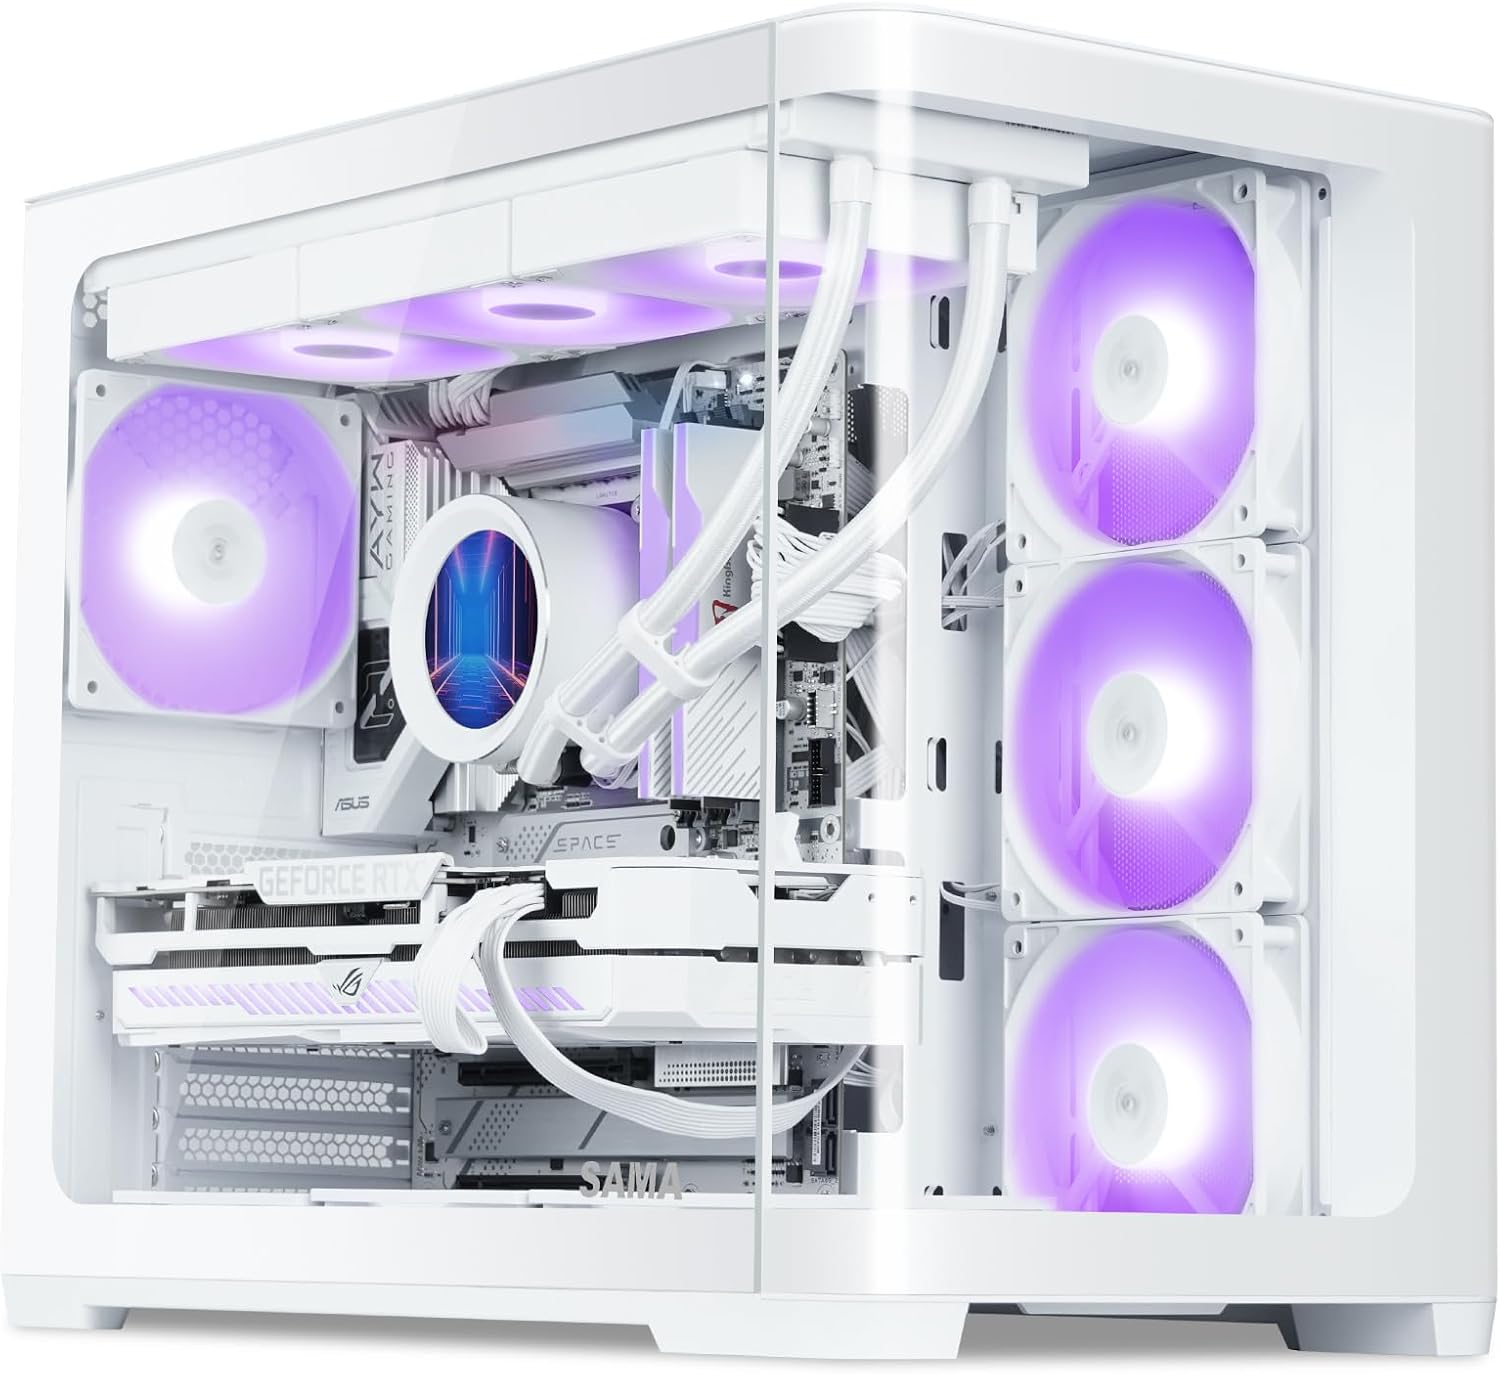
Figure 1: SAMA V60 Mid Tower PC Case showcasing its internal layout and RGB lighting.
2. Продукт закончилсяview и ключевые особенности
The SAMA V60 is a mid-tower PC case designed for high-performance builds, offering excellent cooling, wide compatibility, and a panoramic aesthetic.
- Exceptional Cooling with 7 ARGB Fans: This case comes pre-installed with seven 120mm ARGB PWM fans (3 bottom intake, 3 side intake, 1 rear exhaust) and includes a fan hub for centralized control. It supports 360mm radiators on the top, bottom, and side for advanced liquid cooling solutions.
- Широкая совместимость: Supports ATX, Micro-ATX, ITX, and back-connect motherboards. Offers generous clearance for GPUs up to 445mm, CPU coolers up to 160mm, and PSUs up to 210mm.
- Современный интерфейс ввода/вывода: Features a USB 3.1 Type-C port, two USB 3.0 ports, HD audio jacks, and a dedicated ARGB control button for convenient connectivity and lighting management.
- Durable Build with Clean Interior: Constructed from SPCC steel and tempered glass, ensuring durability and a premium feel. Magnetic dust filters are included for easy maintenance, and smart cable routing options simplify installation.
- Panoramic Glass Showcase: Dual tempered glass panels provide an unobstructed view of your components and RGB lighting, ideal for showcasing вашей сборки.

Figure 2: The SAMA V60 features dual curved tempered glass panels for a panoramic view.
3. Технические характеристики
| Особенность | Деталь |
|---|---|
| Бренд | САМА |
| Название модели | SAMA V60 |
| Тип корпуса | Средняя башня |
| Совместимость с материнской платой | ATX, Micro ATX, Mini ITX |
| Размеры (ДxШxВ) | 18.7 x 11.22 x 15.67 дюйма (475 x 285 x 398 мм) |
| Вес товара | 18.04 фунта |
| Материал | Сталь SPCC, закаленное стекло |
| Зазор графического процессора | До 445 мм |
| Высота процессорного кулера | До 160 мм |
| Поддержка блока питания | Up to 210mm (Bottom Mount) |
| Предустановленные вентиляторы | 7x 120mm ARGB PWM Fans (3 bottom, 3 side, 1 rear) |
| Поддержка фанатов | Up to 10x 120mm fans or 4x 140mm fans |
| Поддержка радиатора | Up to 360mm (Top, Bottom, Side) |
| Отсеки для дисков | 2x 3.5-дюймовых жестких диска, 2x 2.5-дюймовых твердотельных накопителя |
| Передний ввод/вывод | 1x USB 3.1 Type-C, 2x USB 3.0, HD Audio, ARGB Control Button, Power, Reset |
| Слоты PCIe | 7 |

Figure 3: Detailed specifications for the SAMA V60 PC Case.
4. Настройка и установка
4.1 Распаковка и первоначальный осмотр
Carefully remove the case from its packaging. Inspect for any damage during transit. Retain all packaging materials for future transport or warranty claims.
4.2. Снятие панели
The SAMA V60 features tool-free tempered glass panels. To remove a side panel, gently pull it away from the chassis. The panels are held by a lip and magnets. Exercise caution when handling glass to prevent damage.
4.3. Установка материнской платы
The case supports ATX, Micro-ATX, and Mini-ITX motherboards. Ensure standoffs are correctly aligned for your motherboard size. Note that ATX motherboards may sit very close to the bottom of the case, potentially making cable connections challenging. Consider connecting bottom-edge cables before fully securing the motherboard.

Figure 4: Motherboard support layout within the SAMA V60 case.
4.4. Установка вентилятора и радиатора
The SAMA V60 comes with 7 pre-installed 120mm ARGB PWM fans. A fan hub is included to manage these fans. Connect the fan hub to your power supply via a SATA cable. For ARGB control via your motherboard, ensure the fan hub is connected to a compatible 3-pin 5V ARGB header on your motherboard and hold the case's LED button for 5 seconds to switch control.
The case supports up to 360mm radiators on the top, bottom, and side. When installing a radiator on the bottom, be aware that this can make the pump the highest point in the loop, which is generally not recommended for optimal AIO longevity. For easier cable routing to the bottom of an ATX motherboard, it may be beneficial to temporarily remove the pre-installed bottom fans.

Figure 5: Connect the fan control board to your power supply using the provided SATA cable.

Figure 6: Cooling solution options and component clearances.
4.5. GPU and PSU Installation
The case supports GPUs up to 445mm in length. The power supply mounts vertically in the rear, supporting units up to 210mm. The case features 7 PCIe slots for flexible expansion.

Figure 7: Drive capacity and PSU mounting location.
4.6. Установка привода
The SAMA V60 provides support for two 3.5" HDDs and two 2.5" SSDs. Refer to the case's internal layout for specific mounting locations, typically behind the motherboard tray and near the bottom fan position.
4.7. Организация кабелей.
The case is designed with ample space behind the motherboard tray and includes Velcro straps to assist with cable routing, promoting a clean and organized build. Pay attention to the front panel connectors; while the case offers modern I/O, careful routing of these small individual cables is essential.
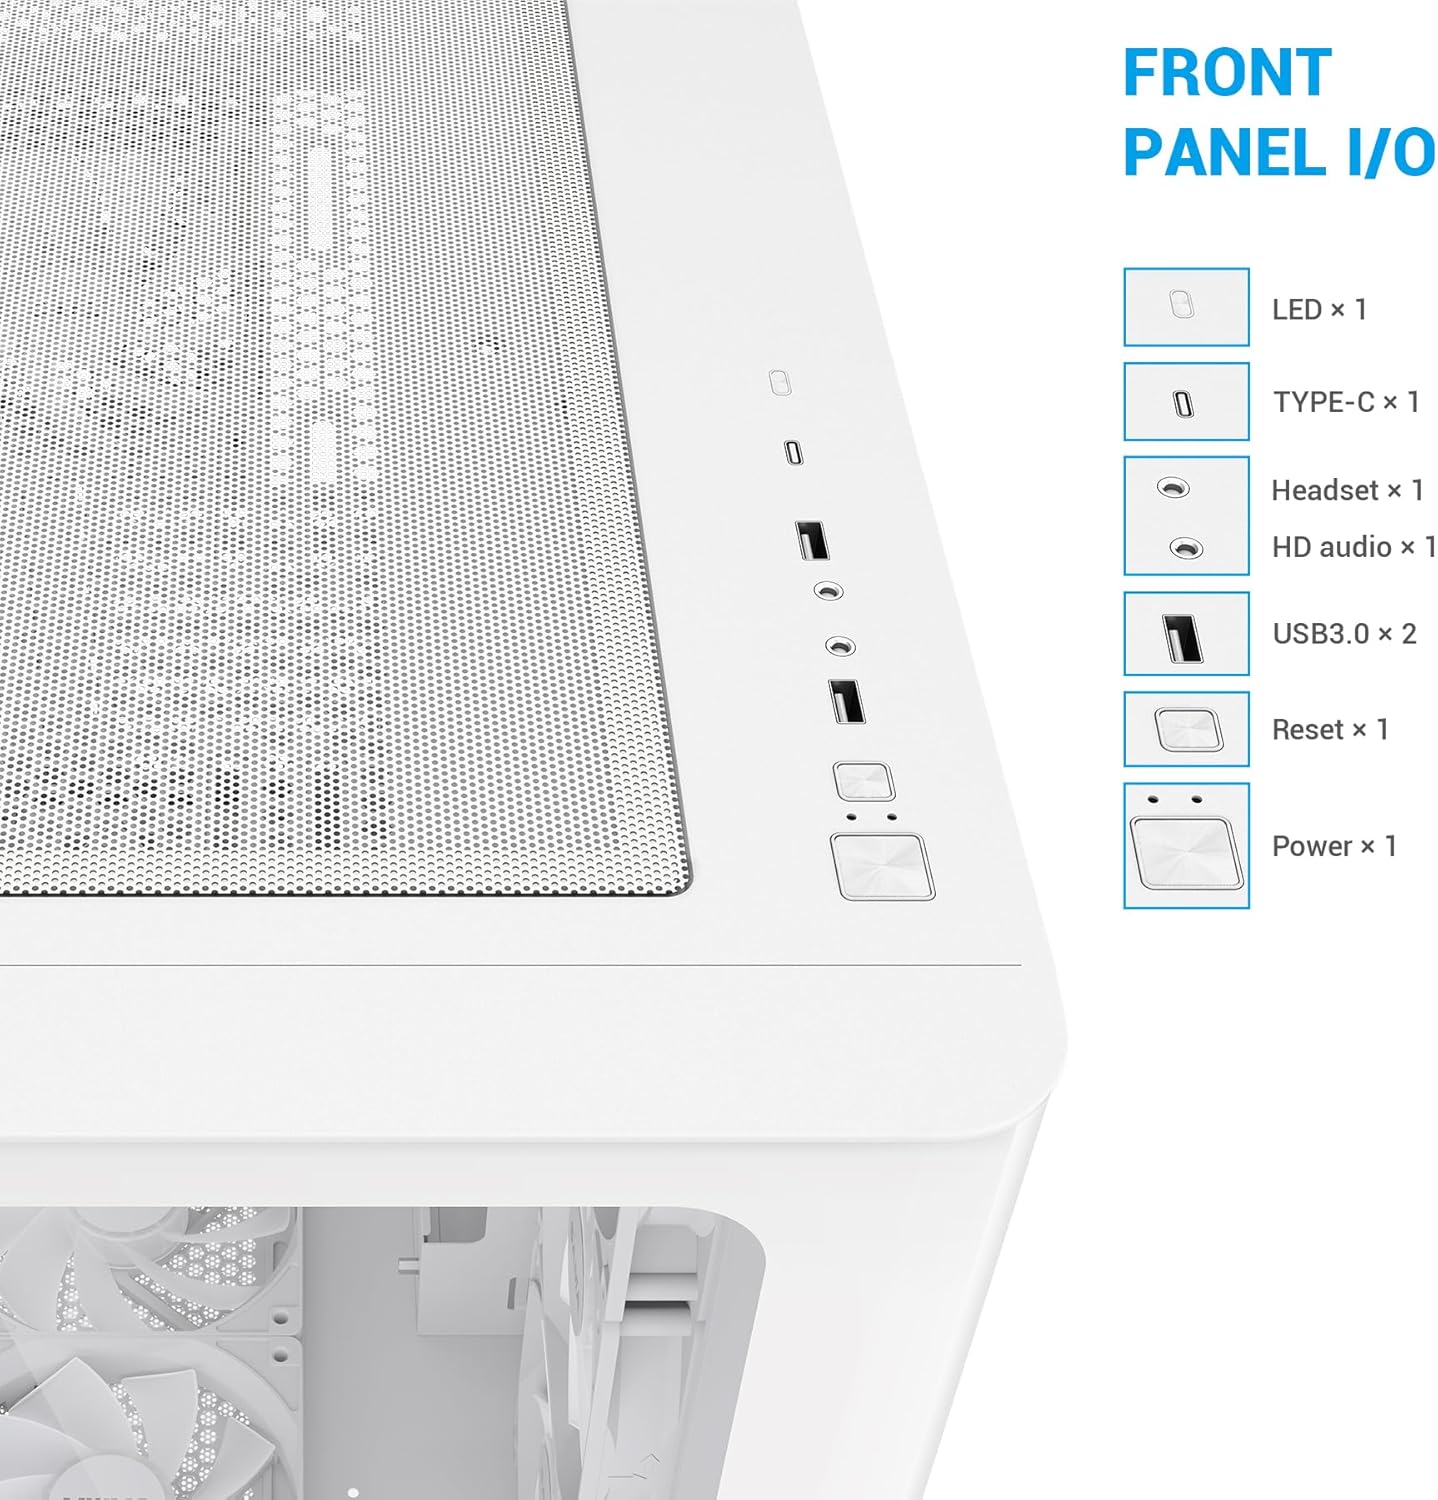
Figure 8: Front Panel I/O ports for convenient access.
5. Инструкция по эксплуатации
5.1. Включение/выключение и сброс
Use the dedicated Power button on the front I/O panel to turn your system on or off. The Reset button can be used for system restarts.
5.2. Управление вентилятором ARGB
The pre-installed ARGB fans can be controlled via the dedicated ARGB control button on the front I/O panel. Pressing this button cycles through various lighting effects and colors. To synchronize the fan lighting with your motherboard's RGB software, connect the fan hub to a compatible 3-pin 5V ARGB header on your motherboard and then press and hold the case's ARGB control button for approximately 5 seconds. This will transfer control to your motherboard software.
Video 1: SAMA V60 Chassis multi-angle display, showcasing the case's design and features.
6. Техническое обслуживание
6.1. Очистка пылевого фильтра
The SAMA V60 is equipped with magnetic dust filters on the top and bottom. Regularly remove and clean these filters to maintain optimal airflow and prevent dust buildup inside your system. Simply detach the magnetic filters, clean them with water or a soft brush, and reattach once dry.

Figure 9: Magnetic dust filters for easy cleaning.
6.2. Генеральная уборка
Use a soft, lint-free cloth to clean the tempered glass panels and exterior surfaces. Avoid abrasive cleaners or solvents that could damage the finish. For internal cleaning, use compressed air to remove dust from components and fan blades.
7. Поиск Неисправностей
7.1. Fan/RGB Control Issues
If your ARGB fans are not displaying the correct colors or are not responding to motherboard software:
- Ensure the fan hub is correctly connected to your power supply via the SATA cable.
- Verify that the fan hub is connected to a compatible 3-pin 5V ARGB header on your motherboard.
- Press and hold the dedicated ARGB control button on the case's front I/O panel for 5 seconds to switch control to your motherboard's software.
- Check your motherboard's BIOS settings to ensure PWM fan control is enabled (not DC mode) for fan speed management.
7.2. Cable Routing Challenges with ATX Motherboards
If you encounter difficulty connecting cables to the bottom edge of an ATX motherboard due to limited space:
- Consider connecting these cables before fully securing the motherboard to the standoffs.
- Temporarily remove the bottom pre-installed fans to gain additional access for routing.
8. Гарантия и поддержка
For warranty information, technical support, or further assistance, please refer to the official SAMA webили обратитесь в службу поддержки напрямую. Сохраните чек на случай предъявления гарантийных претензий.
Ask a question about this manual
Ask about setup, troubleshooting, compatibility, parts, safety, or missing instructions. Manuals+ will review the question and use this page’s manual context to help answer it.