1. Введение
This manual provides detailed instructions for the installation, operation, and maintenance of your SAMA V50 Mid Tower Gaming PC Case. Please read this manual thoroughly before beginning your PC build to ensure proper assembly and optimal performance. Keep this manual for future reference.

Image 1.1: SAMA V50 Mid Tower Gaming PC Case in a typical setup.
2. Особенности продукта
The SAMA V50 Mid Tower Gaming PC Case is designed for high-performance systems, offering a blend of aesthetics, cooling efficiency, and user-friendly features.
- 270 ° панорамный View: Dual-layer tempered glass panels and a removable front column provide an unobstructed view of internal components. Includes a display compartment for collectibles.
- Исключительное охлаждение: Comes with 4 pre-installed ARGB PWM fans. Supports 360mm radiators on the top and side, with CPU cooler clearance up to 181mm.
- Просторный салон: Accommodates GPUs up to 410mm, features 7 PCIe expansion slots, and 4 storage bays. Supports a reverse-ATX layout.
- Широкая совместимость: Compatible with ATX, Micro-ATX, Mini-ITX, and reverse-ATX motherboards. Supports ATX PSUs up to 265mm.
- Solid Build Quality & Smart Cable Management: Constructed from durable SPCC steel, tempered glass, and ABS. Features magnetic dust filters, a tool-free design, and a dual-chamber layout for clean cable routing. Includes a perforated removable top panel and front USB-C port.
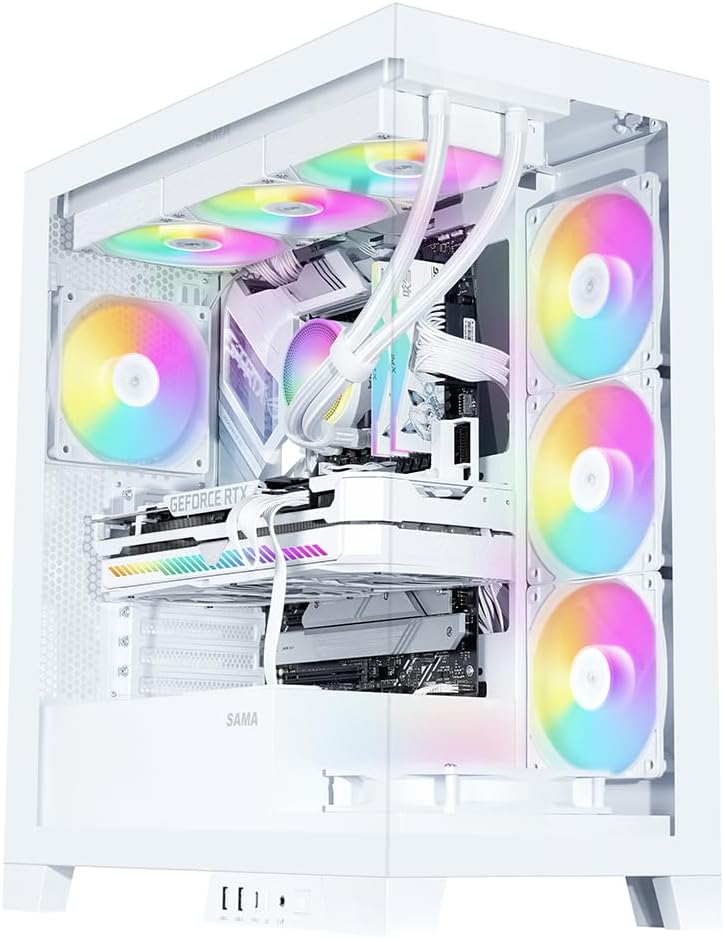
Image 2.1: Fully assembled SAMA V50 case highlighting internal components and RGB lighting.
3. Содержимое упаковки
Пожалуйста, проверьте наличие всех предметов в упаковке:
- SAMA V50 Mid Tower PC Case
- 4 x Pre-installed ARGB PWM Fans
- Коробка с принадлежностями (содержащая винты, стойки, стяжки и т. д.)
- Руководство пользователя (этот документ)
4. Технические характеристики
| Особенность | Спецификация |
|---|---|
| Название модели | SAMA Case V50 |
| Размеры (Д x Ш x В) | 17.36 x 9.25 x 19.72 дюйма (441 x 235 x 501 мм) |
| Тип корпуса | Средняя башня |
| Материал | SPCC Steel, Tempered Glass, ABS Plastic |
| Совместимость с материнской платой | ATX, Micro-ATX, Mini-ITX, Reverse-ATX |
| Зазор по высоте для установки процессорного кулера | До 181 мм |
| Поддержка длины графического процессора | До 410 мм |
| Поддержка длины блока питания | Up to 265mm (ATX) |
| Слоты расширения | 7 слота PCIe |
| Отсеки для дисков | 3 x 3.5" HDD, 3 x 2.5" SSD (combined with 3.5" mounts) |
| Поддержка фанатов | Сверху: 3 х 120 мм / 2 х 140 мм Сторона: 3 х 120 мм Сзади: 1 x 120 мм / 1 x 140 мм Снизу: 3 х 120 мм |
| Поддержка радиатора | Верх: 360 мм/280 мм/240 мм/140 мм/120 мм Side: 360mm / 280mm / 240mm / 140mm / 120mm Сзади: 140 мм / 120 мм |
| Передние порты ввода / вывода | 2 x USB 3.0, 1 x USB 3.1 Type-C, HD Audio/Mic, Power Button, LED Control Button |

Image 4.1: Motherboard and cooling compatibility overview.
5. Настройка и установка
Follow these steps for assembling your PC components within the SAMA V50 case.
5.1. Подготовка дела
- Снимите боковые панели: Carefully remove the tempered glass side panels. The V50 features an easy-to-disassemble design.
- Снять верхнюю панель: The top panel is mounted with pressure mounts. It can be completely removed for easier hardware installation.
- Detachable Column: The internal column can be optionally disassembled for a cleaner aesthetic without affecting stability.

Image 5.1: Easy-to-disassemble design for convenient access.

Image 5.2: Detachable column for aesthetic customization.
5.2. Установка материнской платы
- Install the necessary standoffs for your motherboard form factor (ATX, Micro-ATX, Mini-ITX) onto the motherboard tray.
- Аккуратно поместите материнскую плату на стойки, совместив отверстия для винтов.
- Закрепите материнскую плату прилагаемыми винтами.
5.3. GPU and PCIe Card Installation
- Снимите защитные крышки с соответствующих слотов PCIe на задней панели корпуса.
- Insert your graphics card or other PCIe expansion cards into the motherboard's PCIe slots.
- Secure the cards with screws. The V50 supports bulky GPUs with its 7-slot PCIe design.
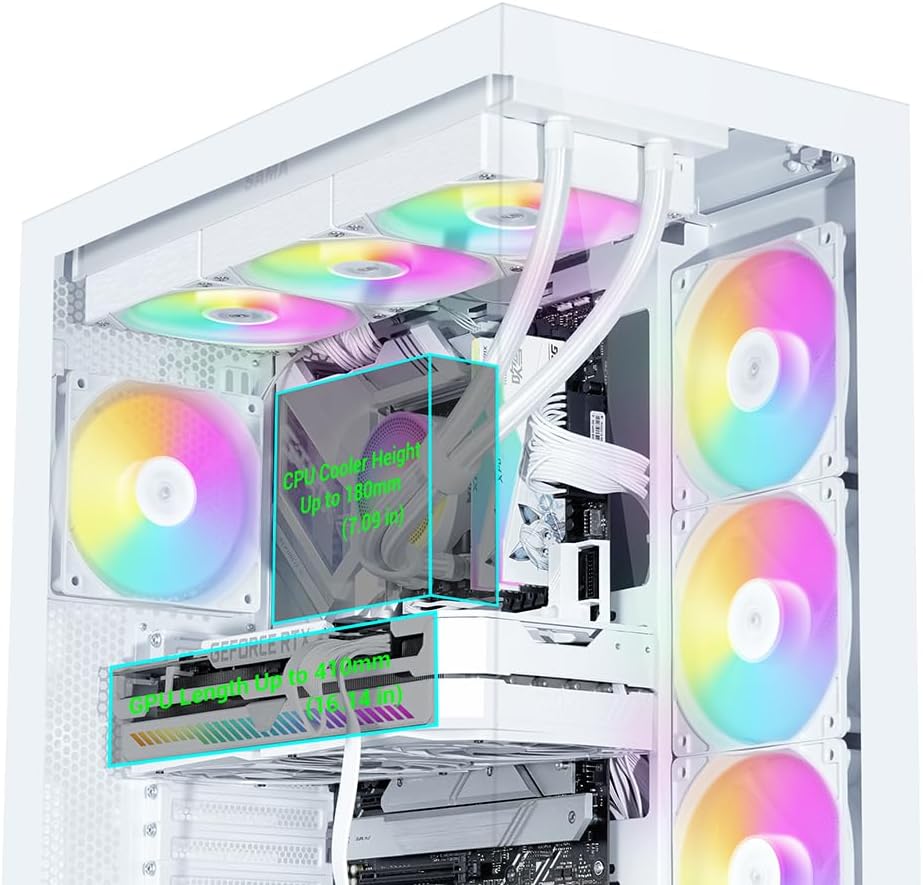
Image 5.3: Clearance for CPU cooler and GPU length.
5.4 Установка устройства хранения данных
The V50 offers multiple drive bays for 3.5" HDDs and 2.5" SSDs, primarily located behind the motherboard tray and near the PSU shroud.
- Mount your 2.5" SSDs or 3.5" HDDs into the designated drive trays/mounts.
- Secure the drives with the provided screws.

Image 5.4: Drive bay locations for SSDs and HDDs.
5.5 Установка блока питания (БП)
- Slide your ATX power supply into the dedicated compartment at the bottom rear of the case.
- Закрепите блок питания винтами с задней стороны корпуса.
5.6. Установка вентилятора и радиатора
The SAMA V50 comes with 4 pre-installed ARGB PWM fans. Additional fans or radiators can be installed as follows:
- Вершина: Supports up to 3 x 120mm fans or a 360mm radiator.
- Сторона: Supports up to 3 x 120mm fans or a 360mm radiator.
- Задний: Поддерживает установку одного вентилятора размером 120 мм или одного вентилятора размером 140 мм.
- Нижний: Supports up to 3 x 120mm fans.

Image 5.5: Detailed fan and radiator support.
5.7. Организация кабелей.
The V50 features a dual-chamber layout and ample space behind the motherboard tray for effective cable management.
- Route all power cables and data cables through the designated cutouts to the rear of the motherboard tray.
- Use the included zip ties to bundle and secure cables, ensuring optimal airflow and a clean aesthetic.

Image 5.6: Airflow channel for efficient cooling.
5.8. Подключения на передней панели
Connect the front panel cables (USB, Audio, Power, Reset, LED) to the corresponding headers on your motherboard. The I/O module is relocatable to two locations.

Image 5.7: Relocatable Front I/O Module.
5.9. ARGB Fan Hub Connection
The pre-installed ARGB fans connect to an included ARGB hub. To power the hub, connect a SATA power cable from your PSU to the SATA connector on the hub. Then, connect the ARGB cable from the hub to one of the 3-pin ARGB connectors on your motherboard. This allows for motherboard control of the fan lighting.

Image 5.8: Connecting the fan control board.
6. Инструкция по эксплуатации
6.1. Управление вентилятором ARGB
The pre-installed ARGB fans offer flexible lighting control:
- Ручное управление: Use the dedicated LED button on the front control panel to cycle through various lighting modes and colors.
- Синхронизация материнской платы: To allow your motherboard to control the fan colors, press and hold the LED button on the front panel for approximately 7-8 seconds. This will switch control to your motherboard's ARGB software (e.g., ASUS Aura Sync, MSI Mystic Light, Gigabyte RGB Fusion).
Note: The included fan hub does not provide fan speed control. Fan speed is controlled via PWM connection to the motherboard.
7. Техническое обслуживание
Регулярное техническое обслуживание помогает обеспечить долговечность и оптимальную производительность корпуса вашего ПК.
- Пылевые фильтры: The V50 features magnetic dust filters. Regularly remove and clean these filters to prevent dust buildup and maintain good airflow.
- Очистка корпуса: Используйте мягкий, damp cloth to clean the exterior surfaces of the case. For tempered glass panels, use a glass cleaner and a microfiber cloth. Avoid abrasive cleaners.
- Внутренняя пыль: Периодически используйте сжатый воздух для удаления пыли с внутренних компонентов и вентиляторов. Перед чисткой убедитесь, что система выключена и отсоединена от сети.
8. Поиск Неисправностей
If you encounter issues with your SAMA V50 case, refer to the following common solutions:
- Вентиляторы не вращаются/нет RGB-подсветки:
- Ensure the ARGB fan hub is correctly connected to your PSU via a SATA power cable.
- Verify that the ARGB cable from the hub is securely connected to a 3-pin ARGB header on your motherboard.
- If using motherboard software for RGB control, ensure the LED button on the front panel has been held for 7-8 seconds to transfer control.
- Check all fan PWM cables are connected to appropriate fan headers on the motherboard.
- Ввод/вывод на передней панели не работает:
- Confirm that all front panel cables (USB, Audio, Power, Reset, LED) are correctly connected to their respective headers on the motherboard. Refer to your motherboard manual for header locations.
- Плохой воздушный поток/Высокие температуры:
- Очистите все пылевые фильтры и внутренние компоненты.
- Ensure fans are oriented correctly for optimal airflow (intake vs. exhaust).
- Verify that all fans are spinning.
9. Гарантия и поддержка
SAMA products are manufactured to high-quality standards. For warranty information and technical support, please refer to the official SAMA webна сайте или обратитесь к местному продавцу. Сохраните чек о покупке для предъявления гарантийных претензий.
Для получения дополнительной помощи вы можете посетить SAMA Official Store on Amazon.