1. Введение
This manual provides detailed instructions for the safe and effective operation, setup, and maintenance of your ONEVAN 16 Lines Laser Level. This device features a 4x360° 4D green beam, self-leveling capabilities, and remote control for various leveling and alignment tasks. Please read this manual thoroughly before using the product to ensure proper function and safety.
2. Содержимое упаковки
Убедитесь, что все перечисленные ниже предметы включены в ваш пакет:
- 1 x Laser Level Unit
- 1 х пульт дистанционного управления
- 2 литиевых аккумулятора (1200 мАч каждый)
- 1 x Rotating Base
- 1 x Настенный кронштейн
- 1 x Lifting Platform
- 1 х Зарядное устройство
- Адаптер 1 x
- 1 холщовая сумка

Image 2.1: The ONEVAN 16 Lines Laser Level shown with all its accessories, including the main unit, remote control, batteries, various mounting bases, charger, and canvas bag.
3. Особенности продукта
- 4x360° Laser Lines: Projects two 360° horizontal lines and two 360° vertical lines, providing comprehensive coverage for floor, wall, and ceiling applications. This allows for a complete square layout visualization.
- Режим самовыравнивания: Automatically levels within a tilt angle of ±3°. If the tilt exceeds this range, the device will emit an audible alarm to indicate it is out of level.
- Ручной режим: For projecting laser lines at any desired angle, activate manual mode by holding the "OUTDOOR" button for 3 seconds. The self-leveling function is deactivated in this mode.
- Дистанционное управление: Allows convenient selection of laser lines without needing to directly interact with the unit, enhancing operational flexibility.
- Прочность: Features an IP54 waterproof and dustproof rating, ensuring reliable performance in various working conditions.
- High Visibility Green Beam: Utilizes advanced diode technology for a green laser beam that is approximately four times brighter than red beams, improving visibility and accuracy. The working range is up to 82 feet (25 meters).
- Источник питания: Comes with two rechargeable 1200mAh lithium batteries for extended use.
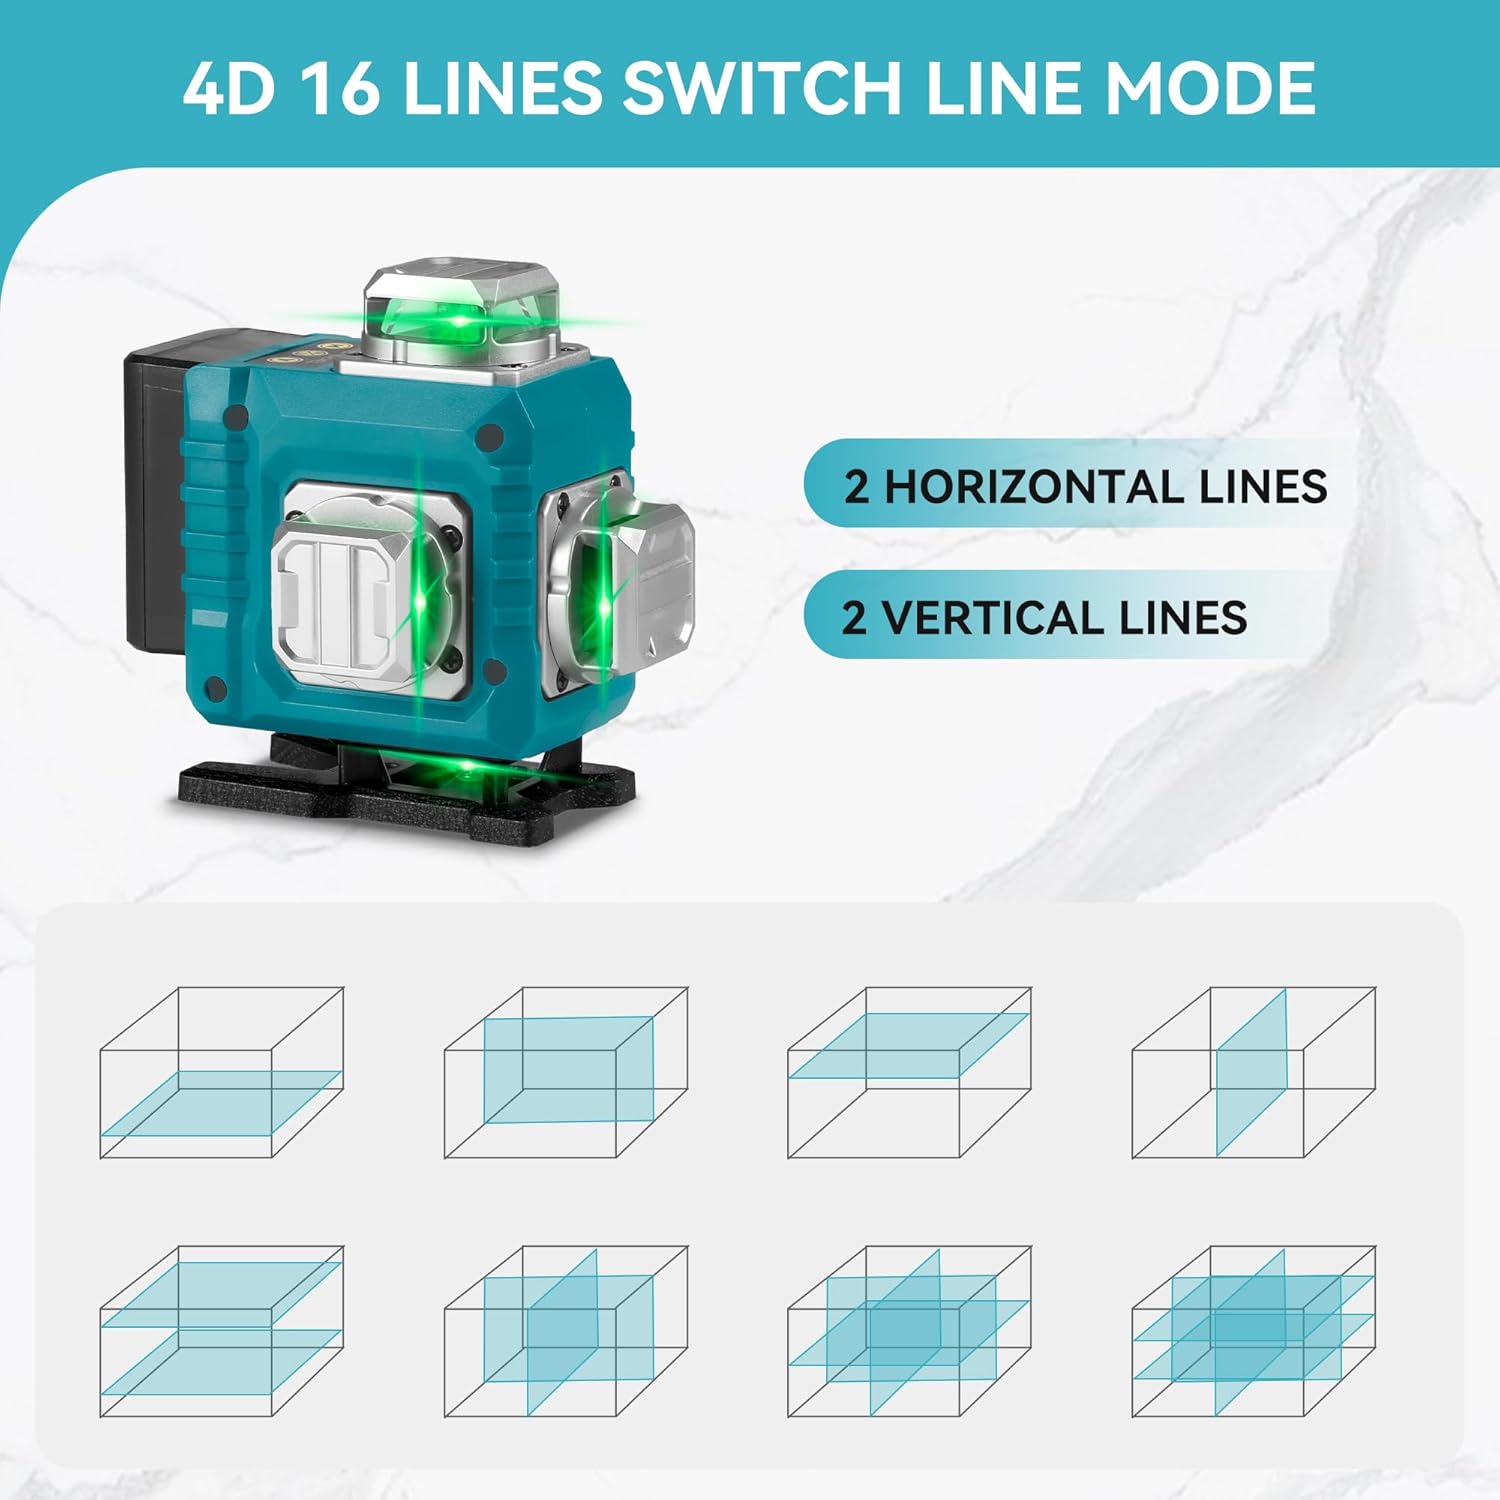
Image 3.1: Illustration of the 4D 16-line laser level, demonstrating how two horizontal and two vertical 360-degree laser lines provide full room coverage and various projection modes.
4. Инструкции по технике безопасности
WARNING: This product contains a Class II laser. Avoid direct eye exposure to the laser beam. Staring into the beam can cause eye injury.
- Не смотрите прямо на лазерный луч.
- Не направляйте лазерный луч на людей или животных.
- Do not operate the laser level in explosive atmospheres or near flammable materials.
- Храните устройство в недоступном для детей месте.
- Используйте только прилагаемое зарядное устройство и батарейки.
- Do not attempt to modify or disassemble the laser level. This will void the warranty and may result in hazardous laser exposure.
- Перед началом работы убедитесь, что устройство устойчиво, чтобы предотвратить случайное перемещение.
5. Настройка
- Установка аккумулятора: Open the battery compartment and insert the two provided lithium batteries, ensuring correct polarity. Close the compartment securely.
- Зарядка: Connect the charger to the laser level and plug it into a power outlet. The charging indicator will show the battery status. Ensure batteries are fully charged before first use.
- Варианты монтажа:
- Вращающаяся база: Attach the laser level to the rotating base for precise 360° rotation on a flat surface.
- Подъемная платформа: Use the lifting platform to adjust the height of the laser level for various applications.
- Настенный кронштейн: Secure the wall bracket to a vertical surface and attach the laser level for wall-mounted operations.
- Размещение: Place the laser level on a stable, level surface or mount it securely using the appropriate accessory. For self-leveling mode, ensure the surface is within the ±3° tilt range.
6. Инструкция по эксплуатации
- Включение/выключение питания:
- To power on, slide the pendulum lock switch to the unlocked position. The laser level will automatically enter self-leveling mode.
- Для выключения переведите переключатель блокировки маятника в заблокированное положение.
- Режим самовыравнивания:
When the pendulum lock switch is in the unlocked position, the laser level will automatically self-level. If the device is tilted beyond ±3°, it will emit an audible alarm and the laser lines will flash, indicating it is out of level. Adjust the position of the laser level until it is within the self-leveling range.
- Manual Mode (Lock Mode):
- To activate manual mode, ensure the pendulum lock switch is in the locked position. Then, press and hold the "OUTDOOR" button on the control panel for 3 seconds. The laser lines will turn on, allowing you to project lines at any angle without self-leveling.
- This mode is ideal for tasks requiring angled lines, such as installing handrails or decorative patterns.
- To exit manual mode, press the "OUTDOOR" button again or slide the pendulum lock switch to the unlocked position.
- Line Selection:
- Use the buttons on the control panel or the remote control to cycle through different laser line combinations (e.g., horizontal lines only, vertical lines only, all lines).
- Typically, a button marked "H" controls horizontal lines, and a button marked "V" controls vertical lines.
- Операция дистанционного управления:
The remote control allows you to switch between laser lines and modes from a distance. Ensure the remote control has working batteries and is pointed towards the laser level for effective communication.

Image 6.1: Demonstrates the laser level in use for both self-leveling applications, such as floor tiling, and manual mode for angled projections, like installing ceiling fixtures.
7. Техническое обслуживание
- Уборка: Используйте мягкий, damp cloth to clean the laser level. Do not use abrasive cleaners or solvents. Keep the laser apertures clean and free of dust.
- Хранилище: When not in use, store the laser level in its canvas bag in a dry, cool place, away from direct sunlight and extreme temperatures. Ensure the pendulum lock is engaged before storage to protect the internal components.
- Уход батареи: Remove batteries if the device will not be used for an extended period. Recharge batteries regularly to maintain their lifespan, even if not in use.
- Калибровка: If you suspect the laser level is out of calibration, contact customer support for assistance. Do not attempt to recalibrate the device yourself.
8. Поиск Неисправностей
| Проблема | Возможная причина | Решение |
|---|---|---|
| Лазерные линии не видны или тусклые. | Low battery; dirty laser aperture; excessive ambient light. | Recharge or replace batteries; clean laser apertures; use in lower light conditions or with a laser receiver (not included). |
| Laser level beeps and lines flash. | Device is out of its self-leveling range (tilted more than ±3°). | Place the laser level on a more level surface or adjust its position until it is within the self-leveling range. |
| Пульт дистанционного управления не работает. | Remote control batteries are dead; remote is too far or not pointed correctly. | Replace remote control batteries; ensure remote is within range and pointed towards the laser level. |
| Лазерные линии не являются прямыми или точными. | Device is not properly leveled (in self-leveling mode); device requires calibration. | Ensure the device is within its self-leveling range; if issues persist, contact customer support for calibration assistance. |
9. Технические характеристики
- Уровень защиты: IP54 (Waterproof/Dustproof)
- Точность измерения: ±1мм/7м
- Automatic Leveling Range: ±3°
- Рабочий диапазон: Приблизительно 82 футов (25 метра)
- Number of Laser Lines: 16 lines / 4D (2 horizontal, 2 vertical 360° lines)
- Емкость аккумулятора: 2 литиевая батарея 1200 мАч
- Расстояние дистанционного управления: 82 футов (25 метров)
- Класс лазера: Класс II, выходная мощность <1 мВт
- Применимая температура: -10°C до 50°C (от 14°F до 122°F)
- Вес товара: 1.48 кг
- Материал: Металл, Пластик
10. Гарантия и поддержка
По вопросам гарантии, технической поддержки или обслуживания обращайтесь к производителю или в место покупки. Сохраните чек в качестве подтверждения покупки.
Для получения дополнительной помощи вы можете посетить ONEVAN Store on Amazon.