1. Введение
This manual provides instructions for the VEVOR 3 Feet U-Channel Heavy Duty Metal Fence Posts. These posts are designed for various outdoor fencing applications, including gardens, yards, lawns, and farms. Constructed from Q235 carbon steel with a powder-coated finish, they offer durability and resistance to corrosion.
2. Информация по технике безопасности
- Always wear appropriate personal protective equipment (PPE), such as gloves and eye protection, during installation.
- Use caution when handling tools like hammers or post drivers to prevent injury.
- Ensure the ground is free of underground utilities (e.g., water pipes, electrical cables) before driving posts.
- Во время установки не допускайте детей и домашних животных в рабочую зону.
- Inspect posts for any damage before installation. Do not use damaged posts.
3. Содержимое упаковки
Убедитесь, что в упаковке присутствуют все компоненты:
- 10 x Fence Posts
- 20 x Zip Ties
- 20 металлических зажима
- 1 x Руководство по эксплуатации (этот документ)
4. Особенности продукта
- Прочная и долговечная конструкция: Made from 2 mm (0.08") thick Q235 carbon steel.
- Enhanced Bending Resistance: U-shaped channel design provides improved structural integrity.
- Защита от коррозии: Powder-coated finish offers UV protection and corrosion resistance.
- Стабильная поддержка: One-piece design with expert riveting and anchor plates ensures stability.
- Простая установка: Designed for straightforward ground insertion.
- Универсальное применение: Suitable for various outdoor fencing needs.

Рисунок 1: Подробная информация view of the fence post material, emphasizing its Q235 carbon steel construction and protective powder coating.
5. Настройка и установка
Follow these steps for proper installation of your VEVOR fence posts:
5.1 Prepare the Installation Area
Clear the area where the fence posts will be installed. Ensure the ground is level and free from obstructions. Mark the desired locations for each fence post, maintaining appropriate spacing for your fencing material.
5.2 Driving the Fence Posts
Using a hammer or a dedicated post driver, drive each fence post into the ground. Continue driving until the anchor plate at the base of the post is fully below the surface and flush with the ground. This ensures maximum stability.
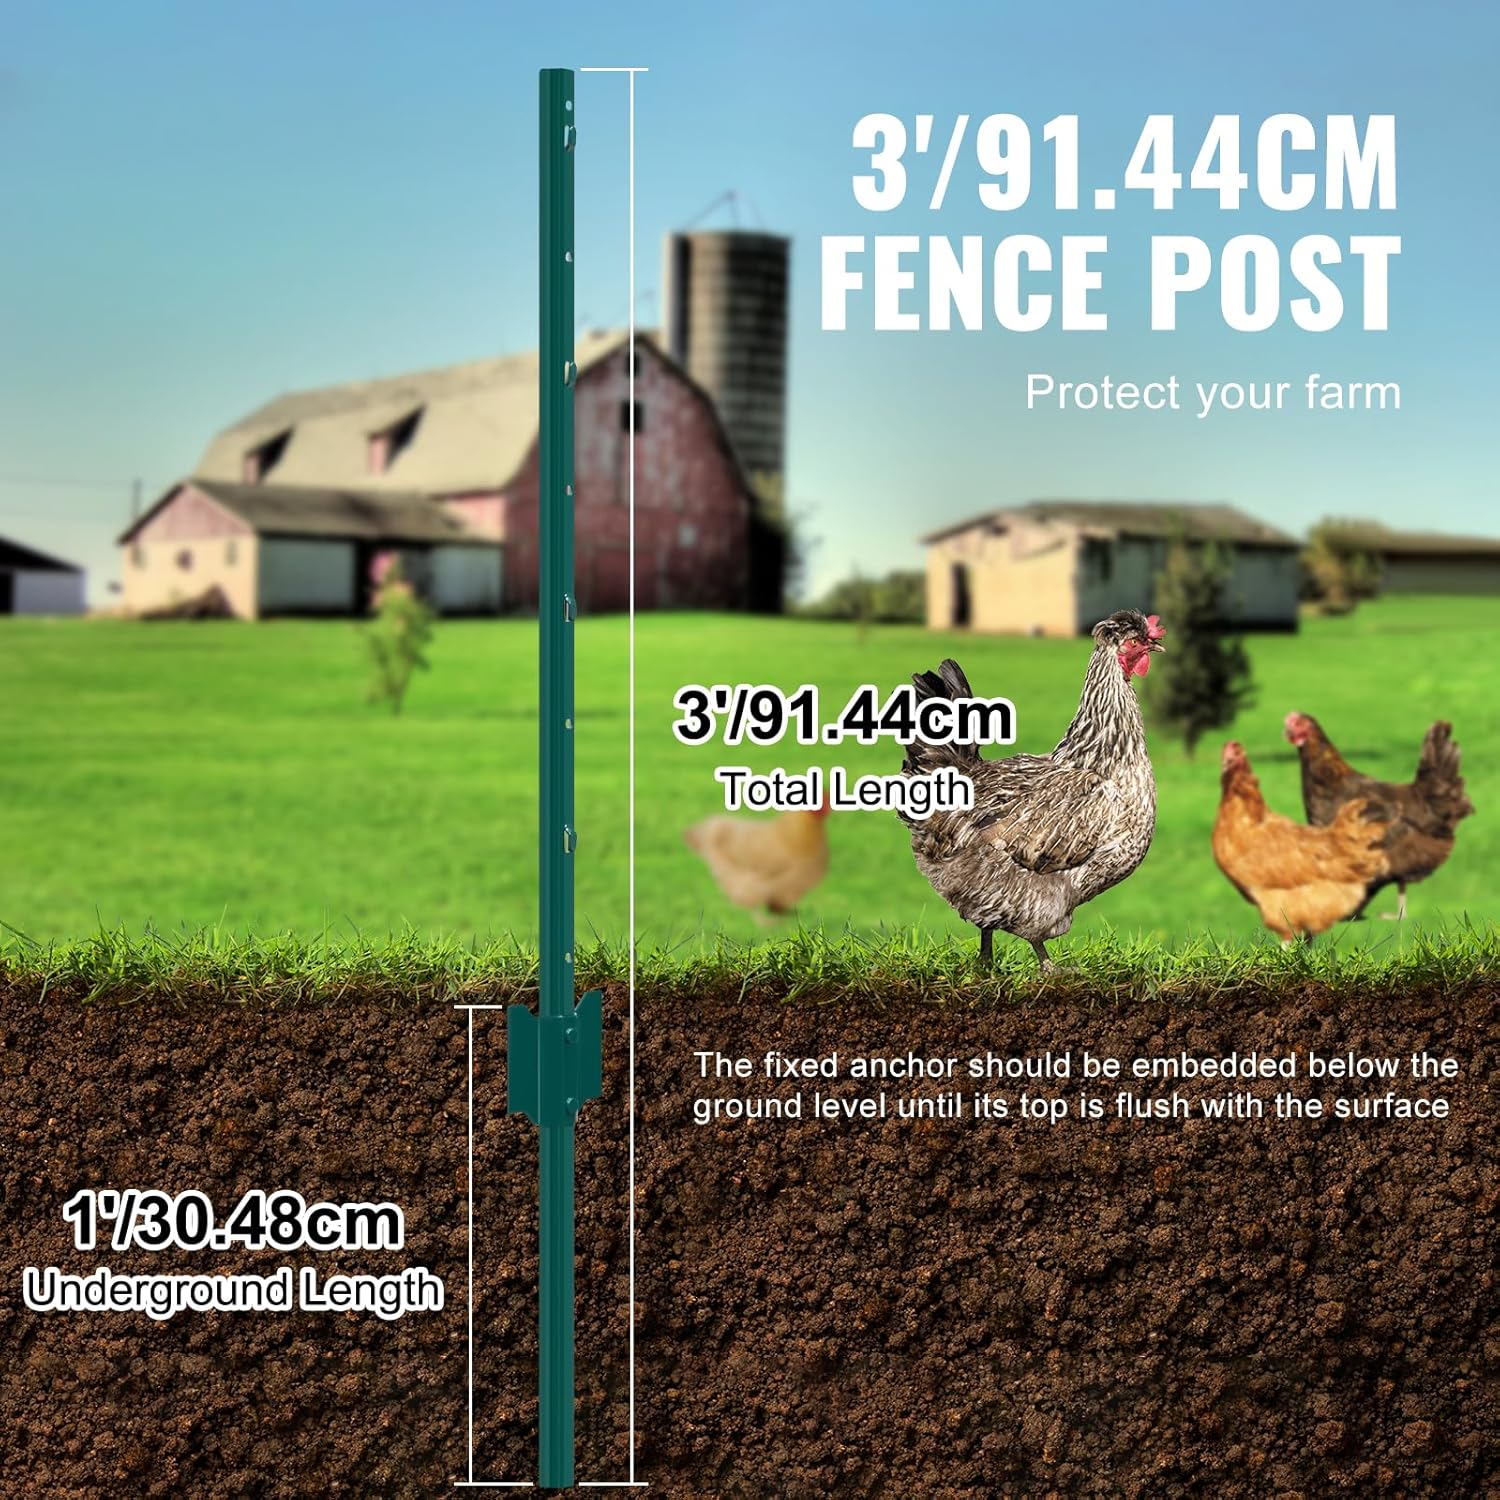
Figure 2: Illustration of a 3-foot fence post with 1 foot (30.48 cm) underground length, demonstrating the recommended installation depth where the fixed anchor is embedded below ground level.

Figure 3: Three-step installation process. Step 1: Use a hammer or pile driver to drive the fence posts 1 ft into the ground. Step 2: Install the fence wire and adjust the label to make it more stable. Step 3: Tie the metal fixing clip or zip tie to complete installation.
5.3 Attaching Fencing Material
Once the posts are securely in place, attach your desired fencing material (e.g., wire mesh, chain link) to the posts. Utilize the provided zip ties and metal clips to firmly secure the fencing to the U-channel and threaded holes on the posts. Ensure the fencing is taut and evenly distributed for optimal stability.

Figure 4: Close-up of a fence post demonstrating the use of metal fixing clips and zipper ties for securing fencing material.

Figure 5: Key design features of the fence post, including the U-channel for anti-bending, threaded holes for attachments, stable hooks, and a fixed anchor for ground stability.
6. Эксплуатация и использование
These fence posts are designed to provide support for various types of wire fencing in outdoor environments. Once installed and the fencing material is attached, the posts will maintain the fence's structure. Periodically check the tension of your fencing and the stability of the posts, especially after severe weather conditions.

Рисунок 6: Examples of versatile applications, showing the fence posts supporting various fence lines such as plastic mesh, square wire mesh, chain link, and simple wire strands.
7. Техническое обслуживание
- Регулярный осмотр: Periodically inspect the fence posts for any signs of wear, damage, or corrosion.
- Чистота: Clean the posts as needed to remove dirt, debris, or organic matter that could trap moisture.
- Предотвращение ржавчины: Although powder-coated for rust resistance, if the coating is scratched or damaged, consider applying a rust-inhibiting paint to prevent further corrosion.
- Проверка устойчивости: Ensure posts remain firmly in the ground. Re-drive or reinforce any loose posts.
8. Поиск Неисправностей
- Post Bending During Installation: Ensure the ground is not excessively hard or rocky. If resistance is met, consider pre-drilling a pilot hole or using a more robust post driver. Avoid excessive force.
- Posts Not Stable: Verify that the anchor plate is fully embedded below the ground surface. If the ground is soft, consider using additional bracing or deeper posts if available.
- Fencing Material Not Secure: Ensure zip ties and metal clips are properly fastened and tightened. Add more attachment points if necessary to prevent sagging or detachment.
- Появление ржавчины: While the posts are powder-coated, prolonged exposure to harsh conditions or physical damage can lead to rust. Clean the affected area and apply a rust-inhibiting primer and paint.
9. Технические характеристики
| Особенность | Деталь |
|---|---|
| Номер модели | 10-3 футов |
| Материал | Углеродистая сталь Q235 |
| Цвет | Зеленый |
| Длина сообщения | 3 футов (91.44 см) |
| Размеры изделия (Д x Ш) | 3.41 x 1.18 дюйма (86.5 x 30 мм) |
| Вес товара | 1.29 Pounds (per post) |
| Установить количество | 10 штуки |
| Включенные компоненты | 10 Fence Posts, 20 Zip Ties, 20 Metal Clips, 1 Instruction Manual |

Figure 7: Visual representation of product dimensions and a summary of specifications.
10. Гарантия и поддержка
Для получения информации о гарантии или технической поддержки обратитесь к контактной информации, предоставленной при покупке, или посетите официальный сайт VEVOR. webСохраните чек в качестве подтверждения покупки.