1 Важная информация по безопасности
Please read and understand all instructions before installing or operating this fixture. Failure to follow these instructions may result in electric shock, fire, or other hazards that could cause personal injury or property damage.
- ПРЕДУПРЕЖДЕНИЕ: Риск поражения электрическим током. Перед установкой или обслуживанием отключите питание от предохранителя или автоматического выключателя.
- ПРЕДУПРЕЖДЕНИЕ: Опасность возгорания. Держите легковоспламеняющиеся материалы подальше от источника огня.amp.
- This fixture is intended for indoor use only. Do not use in wet locations or where directly exposed to water.
- Обеспечьте объем поставкиtage is compatible with the fixture's requirements (120V-277V).
- Все электромонтажные работы должны выполняться в соответствии с местными и национальными электротехническими нормами. Если вы не уверены в правильности электромонтажных работ, обратитесь к квалифицированному электрику.
- Не пытайтесь модифицировать или разбирать светильник. Внутри нет деталей, которые пользователь мог бы обслуживать самостоятельно.
2. Что в коробке
Перед началом установки убедитесь, что все компоненты присутствуют:
- LED Shop Light Fixture(s)
- Монтажное оборудование (винты, анкеры)
- Linking Cables (1.5" and 8" for daisy-chaining)
- Проволочные гайки
3. Технические характеристики
| Особенность | Спецификация |
|---|---|
| Бренд | Sunco Освещение |
| Название модели | LED Shop Light, 4ft Wraparound, Prismatic Lens, 8.5 Inch |
| Размеры (Д x Ш x В) | 48"Д x 8.58"Ш x 2.56"В |
| Ватtage | 60 Вт |
| Яркость | 7200 люмен |
| Эффективность | 120 лм / Вт |
| Цветовая температура (ЦТ) | Выбираемый: 4000К, 5000К, 6000К |
| Томtage | 120В-277В |
| Диммируемый | Нет (без регулировки яркости) |
| Материал | Alloy Steel, Polycarbonate |
| Тип крепления | Потолочный монтаж (встраиваемый) |
| Особые возможности | Linkable, Wide Beam Angle (110°) |
| Сертификаты | ETL, FCC, RoHS |
| Средняя продолжительность жизни | 50,000 часов |
The fixture features a durable build with an impact-resistant prismatic lens for wide and consistent light dispersion.

This image illustrates key features including impact resistance, the prismatic lens design, non-dimmable functionality, and the wide voltage compatibility of 120-277V.
4. Настройка и установка
Follow these steps for proper installation. Ensure power is disconnected before starting.
4.1. Подготовьтесь к установке.
- Отключить питание: Locate the circuit breaker controlling the installation area and turn off the power.
- Удалите диффузор: Gently remove the prismatic diffuser from the lamp base to access the internal components.
- Выберите цветовую температуру (CCT): Before mounting, locate the CCT switch inside the fixture. Select your desired color temperature (4000K, 5000K, or 6000K). This setting cannot be changed easily after installation.

This image shows the internal CCT switch, allowing selection between 4000K, 5000K, and 6000K before installation.
4.2. Монтаж приспособления
The fixture is designed for flush mounting to a ceiling or surface. It includes keyhole slots for easy installation.
- Отметьте точки крепления: Hold the fixture in the desired mounting location and mark the positions for the mounting screws. Ensure these align with a junction box or suitable support structure.
- Установите монтажное оборудование: Drill pilot holes if necessary and install the provided mounting screws, leaving a small gap for the fixture to slide onto.
- Подготовьте проводку: If connecting to a junction box, knock out the appropriate punch hole on the fixture's housing.

This diagram illustrates the three main steps for installation: securing the housing, connecting electrical wires, and attaching the light fixture.
4.3. Электрическое подключение
- Подключите провода: Using the provided wire nuts, connect the fixture's wires to the supply wires: Live (black) to Live, Neutral (white) to Neutral, and Ground (yellow/green) to Ground. Ensure all connections are secure.
- Подверните провода: Carefully tuck all wires and wire nuts into the junction box or fixture housing.
4.4. Linking Multiple Fixtures (Daisy Chain)
This fixture supports daisy-chaining to extend lighting coverage. Use the provided linking cables.
- Connect Linking Cable: Insert one end of a linking cable into the designated port on the first fixture and the other end into the port on the next fixture.
- Безопасные соединения: Ensure linking cables are securely connected and properly routed.
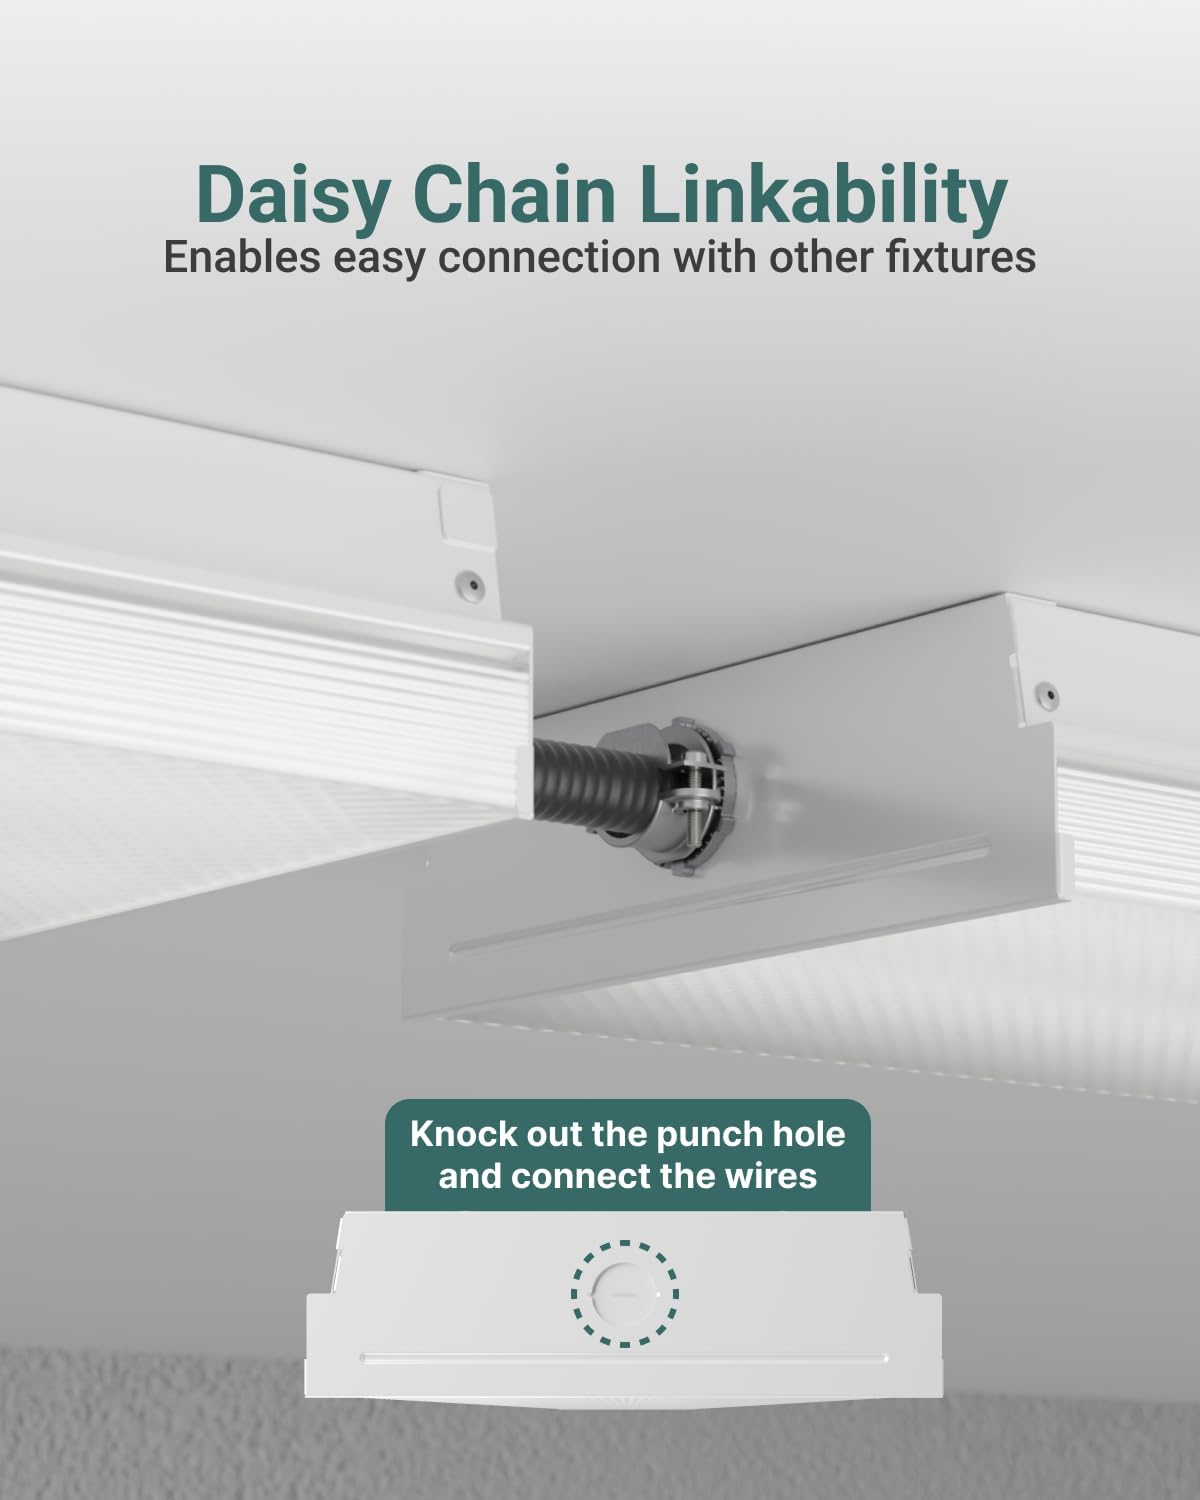
This image demonstrates how to daisy-chain multiple fixtures using the linking cables and highlights the knockout punch hole for electrical connections.
4.5. Заключительные шаги
- Прикрепите рассеиватель обратно: Align one end of the diffuser with the aluminum base and push it into place until it snaps securely.
- Восстановить мощность: Turn the circuit breaker back on to restore power to the fixture.
5. Инструкция по эксплуатации
The Sunco Lighting LED Shop Light is designed for straightforward operation once installed.
5.1. Выбор цветовой температуры (ЦТ)
This fixture features a selectable color temperature (CCT) switch, allowing you to choose between 4000K (Cool White), 5000K (Daylight), and 6000K (Bright White) to suit your preference or application. The CCT switch is located inside the fixture and must be set during installation before the diffuser is reattached.
- 4000К: Provides a neutral white light, suitable for offices or general workspaces.
- 5000К: Offers a bright, crisp daylight-like illumination, ideal for tasks requiring high visibility.
- 6000К: Delivers a very bright, cool white light, often preferred for industrial settings or areas needing maximum brightness.

This image displays the internal components and wiring, emphasizing the high efficiency of the LED fixture operating within a 120-277V range.
5.2. Включение/выключение питания
The fixture is non-dimmable and operates via a standard wall switch connected to its power supply. Simply toggle the wall switch to turn the light on or off.
6. Техническое обслуживание
The Sunco Lighting LED Shop Light requires minimal maintenance. Always ensure power is disconnected before performing any maintenance.
- Уборка: Протрите внешнюю поверхность светильника мягкой, сухой или слегка влажной тряпкой.amp cloth. Do not use harsh chemicals or abrasive cleaners, as these can damage the finish or lens.
- Инспекция: Periodically inspect the fixture for any signs of damage, loose wiring, or wear. If any issues are found, disconnect power and consult a qualified electrician.
- Замена лампочек не требуется: This fixture uses integrated LEDs, meaning there are no bulbs to replace. The LEDs are designed for a long lifespan of 50,000 hours.
7. Поиск Неисправностей
If you experience issues with your LED Shop Light, refer to the following common troubleshooting steps:
- Свет не включается:
- Проверьте автоматический выключатель, чтобы убедиться, что питание включено.
- Убедитесь, что все проводные соединения надежно и правильно соединены.
- Убедитесь, что настенный выключатель находится в положении «ВКЛ».
- Мерцание света:
- Confirm the fixture is not connected to a dimmer switch, as it is non-dimmable.
- Проверьте надежность соединений проводов.
- Обеспечьте объем поставкиtage является стабильным и находится в пределах указанного диапазона.
- Неправильная цветовая температура:
- The CCT switch must be set before installation. If the diffuser is already installed, carefully remove it to access and adjust the switch.
If these steps do not resolve the issue, contact Sunco Lighting customer support for assistance.
8. Гарантия и поддержка
Sunco Lighting stands behind the quality of its products.
- Гарантия: This product is backed by a 3-Year Warranty. Please refer to the official Sunco Lighting webПолную информацию о гарантии и условиях можно найти на сайте или в документах, подтверждающих покупку.
- Служба поддержки клиентов: For technical assistance, troubleshooting, or warranty claims, please contact Sunco Lighting customer support.