1. Введение
This manual provides detailed instructions for the installation, operation, and maintenance of your EVTSCAN Digital Thermoregulator. This device is designed to precisely control heating equipment, such as wall-mounted boilers and gas boilers, ensuring a stable and energy-efficient temperature environment. Please read this manual thoroughly before installation and use to ensure proper function and safety.
2. Информация по технике безопасности
Во избежание повреждения устройства или травм всегда соблюдайте следующие меры предосторожности:
- Перед установкой или обслуживанием убедитесь, что источник питания отключен.
- Если вы не уверены в своих знаниях об электропроводке, установку должен выполнять квалифицированный специалист.
- Не подвергайте устройство воздействию воды или чрезмерной влажности.
- Use only the specified battery type (2 AA batteries) and ensure correct polarity.
- Держите устройство вдали от легковоспламеняющихся материалов.
3. Продукт закончилсяview
The EVTSCAN Digital Thermoregulator features a clear LCD display for easy monitoring and a simple interface for temperature control. Its compact design allows for discreet integration into your living space.

Рисунок 3.1: Передняя часть view of the Digital Thermoregulator. The LCD screen displays current settings and room temperature, with a rotary knob below for adjustments.
Ключевые компоненты:
- ЖК-дисплей: Shows set temperature, room temperature, time, and operational icons.
- Ручка/кнопка управления: Используется для навигации по меню и настройки параметров.
- Отсек для батареи: Located on the rear or side for 2 AA batteries.
- Клеммы проводки: For connection to the heating system.
4. Технические характеристики
| Особенность | Спецификация |
|---|---|
| Модель | EVTSCANok0g9ct2zq |
| Режим мощности | 2 батарейки типа АА (не входят в комплект) |
| Screen Accuracy | 0.5 ℃ |
| Датчик зонда | НТК (10к) 1% |
| Контактная мощность | Greater than 30-230 V DC working voltage, lower current. Reference: 5 A 30 V (HF relay) or 2 A 30 V (NEC relay) |
| Диапазон отображения температуры | от 1 до 40 ℃ |
| Диапазон регулировки температуры по умолчанию | от 5 до 35 ℃ |
| Диапазон рабочих температур | от 0 до 50 ℃ |
| Программа бега | Set once a week |
| Выход | Реле переключения |
| Материал | Огнестойкий поликарбонат |
| Масса | 170 г |
5. Настройка и установка
The EVTSCAN Digital Thermoregulator is designed for simple installation. Follow these steps carefully:
5.1. Распаковка и осмотр
Аккуратно извлеките все компоненты из упаковки. Убедитесь, что все предметы, указанные в содержимом упаковки, присутствуют и не повреждены.
- 1 Digital Temperature Controller
- 2 винтов
5.2. Установка аккумулятора
The device requires 2 AA batteries for operation. These are not included in the package.
- Locate the battery compartment on the back of the thermoregulator.
- Откройте крышку батарейного отсека.
- Вставьте 2 батарейки типа АА, соблюдая правильную полярность (+/-).
- Плотно закройте крышку батарейного отсека.

Рисунок 5.1: Наклонный view of the thermoregulator, illustrating its compact size and potential location for battery access or mounting points.
5.3. Монтаж и подключение.
The thermoregulator is designed for wall mounting. Ensure the power to your heating system is turned off before proceeding with wiring.
- Выберите подходящее место на внутренней стене, вдали от прямых солнечных лучей, сквозняков или источников тепла, которые могут повлиять на показания температуры.
- Mount the backplate (if detachable) to the wall using the provided screws.
- Connect the thermoregulator to your boiler or heating system according to the wiring diagram provided with your boiler and the thermoregulator's terminal markings. This typically involves connecting the switching relay output to the boiler's control input.
- Secure the thermoregulator onto the mounted backplate.
Примечание: For wiring, consult a qualified electrician if you are unfamiliar with electrical installations.
6. Инструкция по эксплуатации
The EVTSCAN Digital Thermoregulator uses a microcomputer control technology to maintain your desired temperature efficiently.
6.1. Powering On and Initial Display
Once batteries are installed, the LCD display will illuminate, showing the current room temperature, set temperature, and time.
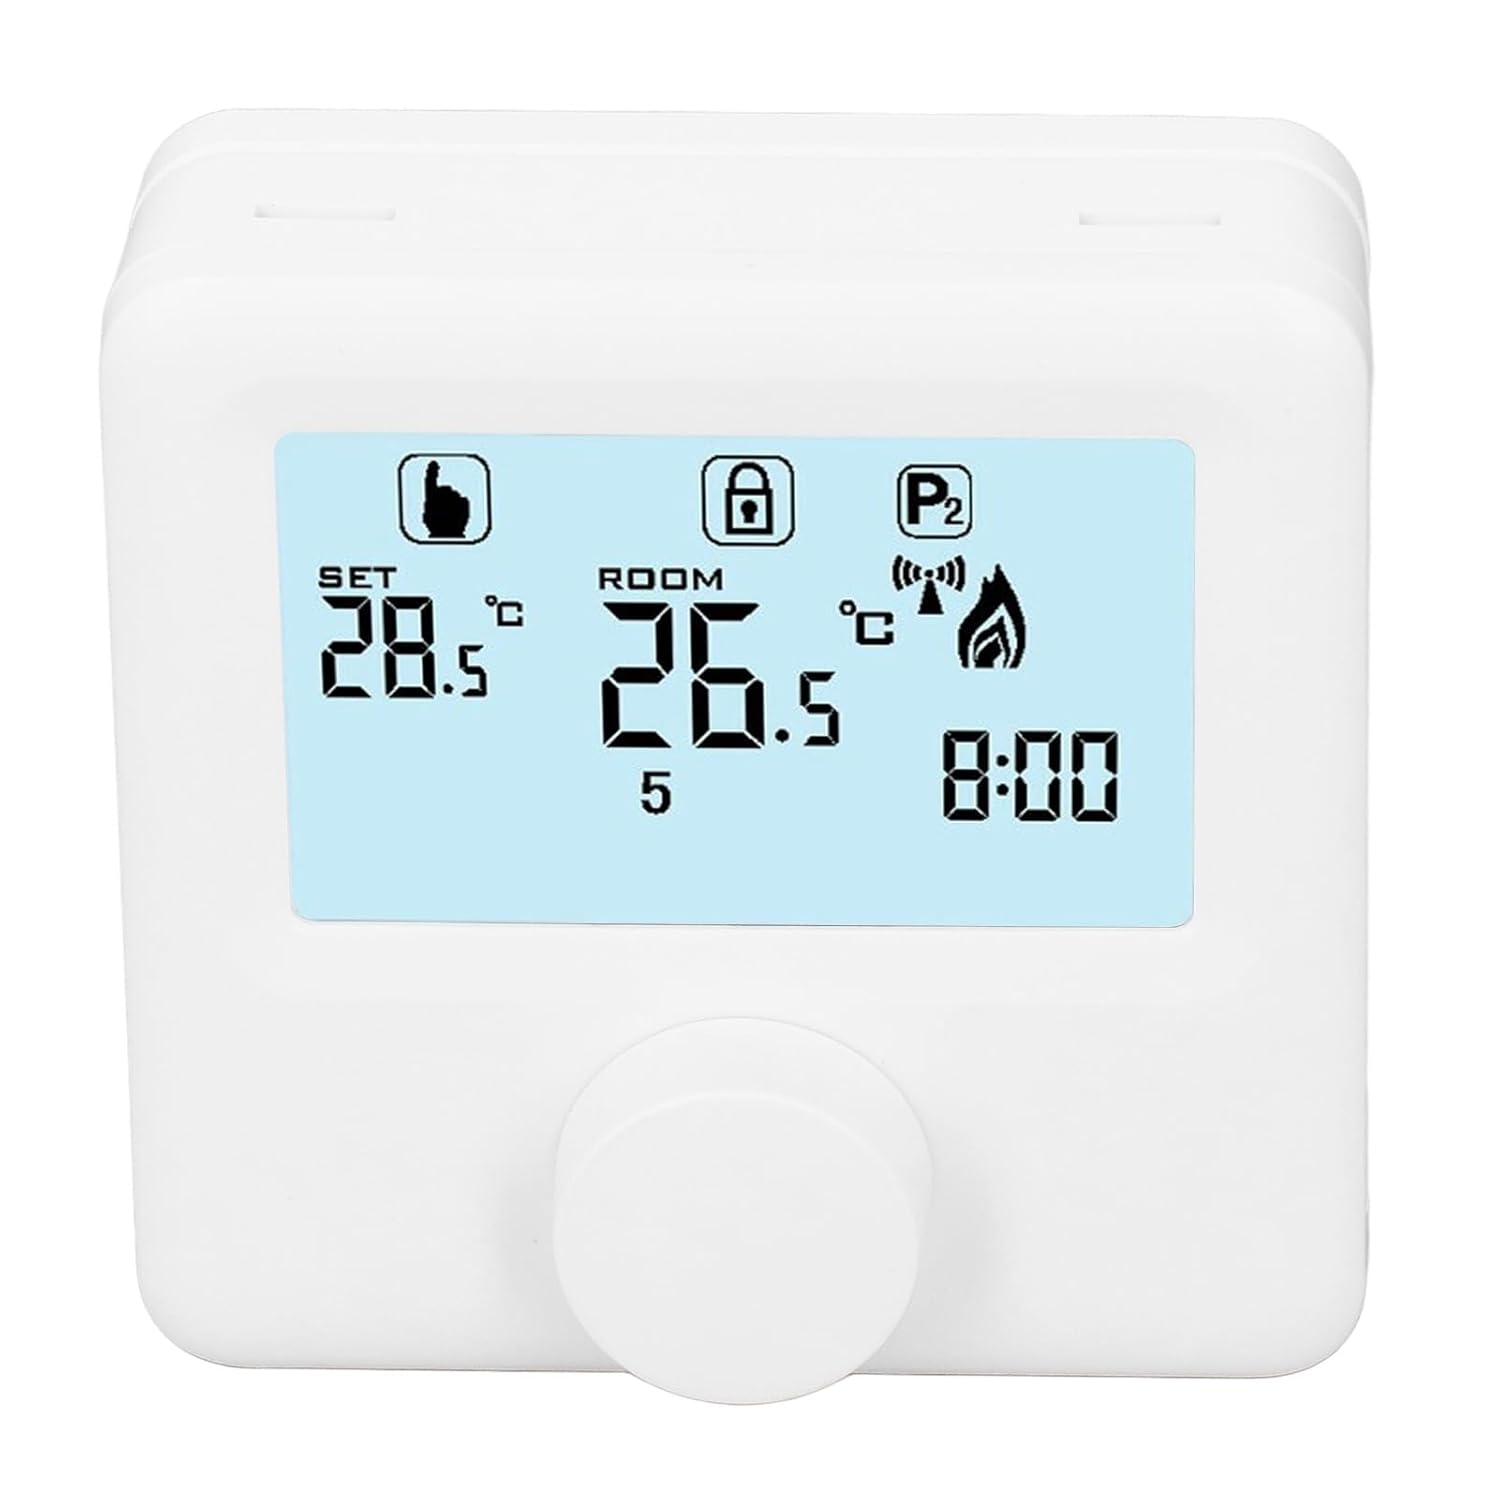
Рисунок 6.1: Подробная информация view of the LCD display. It shows the set temperature (SET), room temperature (ROOM), a lock icon, a program icon (P2), a signal icon, a flame icon indicating heating, and the current time.
6.2. Установка температуры
Чтобы отрегулировать желаемую температуру:
- Rotate the control knob to increase or decrease the set temperature. The "SET" value on the display will change accordingly.
- The device will automatically activate or deactivate the heating system to maintain the set temperature within the range of 1 to 40 ℃. The default adjustment range is 5 to 35 ℃.
6.3. Еженедельное расписание программирования
The thermoregulator supports a weekly programming schedule. This allows you to set different temperatures for various times of the day across the week.
- Press and hold the control knob (or a designated button, if available) to enter programming mode.
- Use the control knob to navigate through days of the week and time slots.
- Adjust the desired temperature for each programmed period.
- Confirm your settings to save the weekly program. The device will then operate according to this schedule.
6.4. Understanding Display Icons
- ЗАДАВАТЬ: Indicates the target temperature you have set.
- КОМНАТА: Отображает текущую температуру в помещении.
- Значок пламени: Подсвечивается, когда система отопления активна.
- Значок замка: May indicate a keypad lock feature to prevent accidental changes.
- P1/P2 Icon: Indicates the current program mode (e.g., P1 for comfort, P2 for economy, or specific weekly program segments).
- Значок сигнала: May indicate wireless communication status if applicable.
7. Техническое обслуживание
Regular maintenance ensures the longevity and optimal performance of your thermoregulator.
- Уборка: Протирайте устройство мягкой сухой тканью. Не используйте абразивные чистящие средства или растворители.
- Замена батареи: Replace batteries when the low battery indicator appears on the display. Always replace both batteries simultaneously with new AA batteries.
- Площадь датчика: Ensure the temperature sensor area (usually a small vent on the device) is free from dust and obstructions for accurate readings.
8. Поиск Неисправностей
If you encounter issues with your EVTSCAN Digital Thermoregulator, refer to the following common problems and solutions:
- Дисплей пуст:
- Проверьте правильность установки батареек.
- Замените старые батарейки на новые.
- Система отопления не реагирует:
- Ensure the thermoregulator is powered on and the flame icon is displayed when heating is expected.
- Verify wiring connections to the boiler are secure and correct.
- Проверьте электропитание и состояние котла.
- Ensure the set temperature is higher than the current room temperature.
- Неточные показания температуры:
- Ensure the device is not exposed to direct sunlight, drafts, or heat sources.
- Clean any dust or debris from the sensor area.
- Невозможно изменить настройки:
- Check if the lock icon is displayed. If so, refer to the operating instructions to unlock the keypad.
Если проблема не устранена, обратитесь в службу поддержки.
9. Гарантия и поддержка
Specific warranty information for this product is not provided in the available data. Please refer to the product packaging or the retailer's webсайт с информацией о гарантии.
For technical support or further assistance, please contact EVTSCAN customer service through their official channels or the retailer from whom you purchased the product.
You can visit the EVTSCAN store on Amazon for more information: EVTSCAN Store