
Sharp ES-NIH814BWA-EN
Руководство пользователя встраиваемой стиральной машины Sharp ES-NIH814BWA-EN
Model: ES-NIH814BWA-EN | Capacity: 8kg | Spin Speed: 1400 rpm
1. Введение
1.1 продукта болееview
Thank you for choosing the Sharp ES-NIH814BWA-EN Integrated Washing Machine. This appliance is designed to provide efficient and reliable laundry care for your home. With an 8kg capacity and a 1400 rpm spin speed, it offers powerful cleaning performance while integrating seamlessly into your kitchen or utility space.

Рисунок 1.1: Передняя часть view of the Sharp ES-NIH814BWA-EN Integrated Washing Machine, showing its sleek design and integrated panel.
1.2 Информация по технике безопасности
Before operating your washing machine, please read all safety instructions carefully. Keep this manual for future reference. Improper installation, maintenance, or use can cause serious injury or damage. Always disconnect the appliance from the power supply before cleaning or maintenance.
- Убедитесь, что прибор правильно заземлен.
- Не позволяйте детям играть с прибором.
- Do not open the detergent dispenser during the wash cycle.
- Не прикасайтесь к прибору мокрыми руками.
- Храните упаковочные материалы в недоступном для детей месте.
2. Настройка и установка
2.1 Распаковка
Carefully remove all packaging materials. Check for any transport damage. Remove all transit bolts from the rear of the machine before installation. These bolts are essential for safe transport but must be removed for operation to prevent vibration and damage.
2.2 Расположение и выравнивание
Place the washing machine on a firm, level floor. Adjust the adjustable feet to ensure the machine is perfectly level and stable. This prevents excessive vibration and noise during operation.
2.3 Подключение воды
Connect the water inlet hose to a cold water tap with a 3/4-inch thread. Ensure all connections are tight to prevent leaks. The drain hose should be securely placed into a standpipe or connected to a suitable drain system, ensuring it is not kinked.

Рисунок 2.1: Сзади view стиральной машины, иллюстрирующий соединения шлангов подачи и слива воды.
2.4 Электрическое подключение
Подключите шнур питания к заземленной розетке. Убедитесь, что напряжениеtagЗначения параметров e и частоты соответствуют техническим характеристикам, указанным на паспортной табличке прибора. Не используйте удлинители или несколько адаптеров.
2.5 Первое использование
Before the first wash, run an empty cycle with a small amount of detergent at 60°C to clean the drum and remove any manufacturing residues.
3. Инструкция по эксплуатации
3.1 Панель управления оконченаview
The control panel consists of a program selection dial, a digital display, and function buttons for customizing your wash cycle.
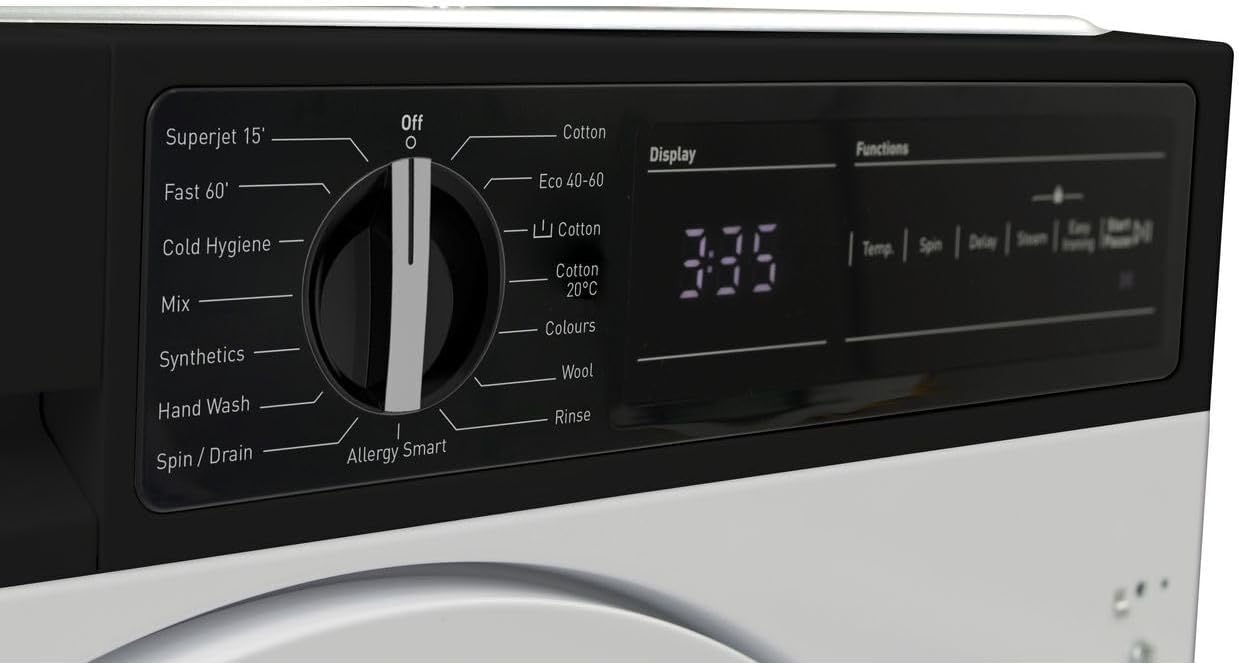
Рисунок 3.1: Подробная информация view of the program selection dial and digital display.

Figure 3.2: Close-up of the digital display showing time remaining and function buttons for Temp, Spin, Delay, Steam, and Easy Ironing.
3.2 Загрузка белья
Open the washing machine door and load your laundry. Do not overload the machine; leave enough space for clothes to tumble freely. Close the door firmly until it clicks.

Figure 3.3: The washing machine door open, revealing the drum for loading laundry.

Рисунок 3.4: Внутреннее убранство view of the stainless steel drum, designed for effective washing.
3.3 Добавление моющего средства и добавок
Pull out the detergent dispenser drawer. Add the appropriate amount of detergent to the main wash compartment and fabric softener to its designated compartment. Refer to your detergent packaging for dosage recommendations.

Рисунок 3.5: Выдвижной ящик для моющего средства, показывающий отделения для моющего средства и кондиционера для белья.
3.4 Выбор программы стирки
Turn the program selection dial to choose your desired wash program. Available programs include:
- Superjet 15'Быстрая стирка для вещей с незначительными загрязнениями.
- Fast 60': A faster cycle for everyday loads.
- Cold Hygiene: For hygienic washing at lower temperatures.
- Смешивание: For mixed fabric loads.
- Синтетика: For synthetic fabrics.
- Ручная стирка: Gentle cycle for delicate items.
- Отжим/слив: To spin and drain water from laundry.
- Аллергия Smart: Designed to remove allergens.
- Хлопок: Standard program for cotton items.
- Эко 40-60: Energy-efficient program for cottons and mixed items at 40-60°C.
- Хлопок 20°C: Low-temperature cotton wash.
- Цвета: For colored garments to preserve vibrancy.
- Шерсть: Gentle program for woolens.
- Смывать: To rinse laundry without washing.
3.5 Настройка параметров
After selecting a program, you can customize settings using the function buttons:
- Темп: Adjust wash temperature.
- Вращаться: Change spin speed.
- Задерживать: Set a delayed start time.
- Пар: Add a steam function for better hygiene or wrinkle reduction.
- Легкое глажение: Reduces creasing для более легкой глажки.
3.6 Запуск цикла стирки
Нажмите Старт/Пауза button to begin the selected wash cycle. The display will show the remaining time.
3.7 Завершение цикла стирки
Once the cycle is complete, the machine will signal. The door will unlock after a short delay. Remove your laundry promptly.
4. Техническое обслуживание и уход
Регулярное техническое обслуживание обеспечивает оптимальную производительность и продлевает срок службы вашей стиральной машины.
4.1 Очистка дозатора моющего средства
Периодически снимайте и очищайте отсек для моющих средств под проточной водой, чтобы предотвратить скопление остатков моющего средства.
4.2 Очистка барабана
Run a maintenance wash (e.g., a hot cycle with a washing machine cleaner or vinegar) monthly to clean the drum and remove any odors or residue.
4.3 Очистка фильтра
Locate the drain pump filter, usually at the bottom front of the machine. Open the cover, drain any residual water, and carefully remove and clean the filter. This should be done regularly to prevent blockages.
4.4 Очистка внешней поверхности
Протрите внешние поверхности мягкой, damp Ткань. Не используйте абразивные чистящие средства или растворители.
5. Поиск Неисправностей
Если у вас возникли проблемы со стиральной машиной, перед обращением в службу поддержки ознакомьтесь со следующими распространенными проблемами и способами их решения.
| Проблема | Возможная причина | Решение |
|---|---|---|
| Машина не заводится | Нет питания; Дверь не закрыта; Программа не выбрана; Кнопка «Старт/Пауза» не нажата. | Check power supply; Ensure door is latched; Select a program; Press Start/Pause. |
| Нет потребления воды | Водопроводный кран закрыт; Наливной шланг перегнут; Давление воды слишком низкое. | Откройте водопроводный кран; Выпрямите шланг; Проверьте давление воды в доме. |
| Вода не сливается | Drain hose kinked; Drain pump filter blocked. | Straighten drain hose; Clean drain pump filter. |
| Чрезмерная вибрация / шум | Транспортировочные болты не удалены; Машина установлена неровно; Неравномерная нагрузка. | Remove transit bolts; Adjust feet to level machine; Redistribute laundry. |
| Остатки моющего средства в дозаторе | Too much detergent; Low water pressure; Dispenser blocked. | Reduce detergent amount; Check water pressure; Clean dispenser. |
6. Технические характеристики
| Особенность | Спецификация |
|---|---|
| Бренд | Острый |
| Модель | ES-NIH814BWA-EN |
| Емкость | 8 Килограмма |
| Максимальная скорость вращения | 1400 об/мин |
| Тип установки | Интегрированный |
| Консоль управления | Buttons, Dial, Digital Display |
| Доступ к местоположению | Фронтальная загрузка |
| Материал (барабан) | Нержавеющая сталь |
| Томtage | 2.2E+2 Вольт (переменный ток) |
| Цвет | Белый |
7. Гарантия и поддержка клиентов
Your Sharp ES-NIH814BWA-EN Washing Machine comes with a manufacturer's warranty. Please refer to the separate warranty card provided with your appliance for specific terms and conditions, including warranty period and coverage.
For technical assistance, spare parts, or to schedule a service appointment, please contact Sharp customer support. Contact details can typically be found on the Sharp official webсайте или в гарантийной документации.
When contacting support, please have your model number (ES-NIH814BWA-EN) and serial number ready. The serial number is usually located on a sticker inside the door frame or on the back of the appliance.
Ask a question about this manual
Ask about setup, troubleshooting, compatibility, parts, safety, or missing instructions. Manuals+ will review the question and use this page’s manual context to help answer it.